I love where this is going!
-
Enjoy XS650.com? Consider making a donation to help support the site.
XS650.com receives a small share of sales from some links on this page, but direct donations have a much greater impact on keeping this site going.
You are using an out of date browser. It may not display this or other websites correctly.
You should upgrade or use an alternative browser.
You should upgrade or use an alternative browser.
Yamaha / Triumph tank badges, made by Resto, wanted!
- Thread starter jackchen
- Start date
So apparently I'm not going to get work done this morning.
That looks FANTASTIC !
Another option, if looking for the retro look, would be to consider using the older Thunderbird model integrated with the rendering you have just created. It could be printed "flat", in say silver/gray, and painted to match the paint on the tank. Knee pads would complete the look.
Attachments
Solomoriah
XS650 Addict
My original tank badge (in the photo I shared above) is printed in black and then painted gold. It looks better in person, honestly, but Resto's logo is still better.
I just printed one using Prusa Galaxy Black PLA with Inland Silk Copper on top. At a glance it looks pretty good, but up close there are visible extrusion issues, which are almost certainly the result of me running an 0.6mm nozzle instead of a smaller 0.4mm size. I have the 0.6mm mounted to print tough parts, not pretty ones. I may swap to an 0.4mm nozzle and try it again just to see how it looks, but I don't have time for that now.
I just printed one using Prusa Galaxy Black PLA with Inland Silk Copper on top. At a glance it looks pretty good, but up close there are visible extrusion issues, which are almost certainly the result of me running an 0.6mm nozzle instead of a smaller 0.4mm size. I have the 0.6mm mounted to print tough parts, not pretty ones. I may swap to an 0.4mm nozzle and try it again just to see how it looks, but I don't have time for that now.
Attachments
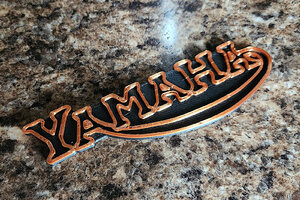
Amazing! You've done in half an hour what had taken me half a week.My original tank badge (in the photo I shared above) is printed in black and then painted gold. It looks better in person, honestly, but Resto's logo is still better.
I just printed one using Prusa Galaxy Black PLA with Inland Silk Copper on top. At a glance it looks pretty good, but up close there are visible extrusion issues, which are almost certainly the result of me running an 0.6mm nozzle instead of a smaller 0.4mm size. I have the 0.6mm mounted to print tough parts, not pretty ones. I may swap to an 0.4mm nozzle and try it again just to see how it looks, but I don't have time for that now.
Solomoriah
XS650 Addict
Ah, but I started with your design; didn't have to create it from scratch.
Solomoriah
XS650 Addict
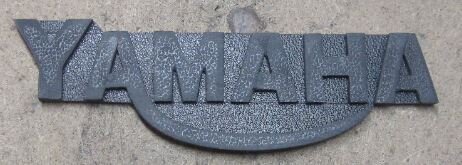
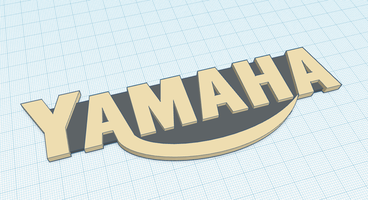
Here's another thing I did today, instead of doing real work.

STL here: http://newcenturycomputers.net/temp/Resto's Yamaha Sun Flag Logo.stl
STL here: http://newcenturycomputers.net/temp/Resto's Yamaha Sun Flag Logo.stl
Solomoriah
XS650 Addict
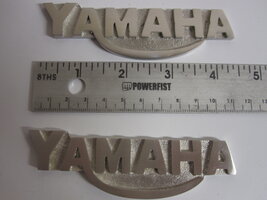
I can't stop... but wait, this is the last one...

STL here: http://newcenturycomputers.net/temp/Resto's Yamaha Sun Wings Logo.stl
STL here: http://newcenturycomputers.net/temp/Resto's Yamaha Sun Wings Logo.stl
Solomoriah
XS650 Addict
Resto, can I get your consent to publish these? I'd love to put them on my Printables.com account, but they're not my original work.
You sure can!Resto, can I get your consent to publish these? I'd love to put them on my Printables.com account, but they're not my original work.
I take that as a compliment.
-resto
Solomoriah
XS650 Addict
Thanks! They are here: https://www.printables.com/model/580236-restos-yamaha-xs650-tank-and-side-panel-logos
Solomoriah
XS650 Addict
Nice. Not sure if I'll get to them but I might...
A good idea, but, as a Spanish girl I knew used to say, 'For me, No!' Takes me back to the days when I first rescued her. Miss November, that is, not the Spanish girl.Another option, if looking for the retro look, would be to consider using the older Thunderbird model integrated with the rendering you have just created. It could be printed "flat", in say silver/gray, and painted to match the paint on the tank. Knee pads would complete the look.

And I have little desire to go back . . .
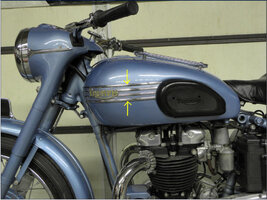
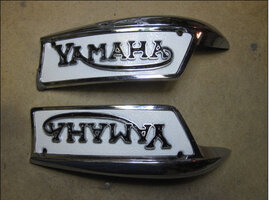
Are you intending to put the badges on a stock Yamaha tank, or a real Triumph tank?Dear brothers
Could you please help me find this??
i really need
for father
but i am asian
so it's hard
If it's a real Triumph tank, only the insert (with the lettering) is required. If it's a Yamaha tank, much more work is required. And as I've mentioned, I no longer have workable molds or any previously made blanks from the past (that was 10 years ago).
Perhaps there is a member out there with a pair (that I have sold them) that would be willing to part with them. I think I made about a dozen pairs back then.
-resto
for a Triumph tank; https://www.ebay.com/itm/2660776543...uid=tW1migcmQPO&widget_ver=artemis&media=COPY
TRIUMPH PAINTED GAS TANK BADGES EMBLEMS 66-79 500 650 750 EMGO BACK IN STOCK!!!

TRIUMPH PAINTED GAS TANK BADGES EMBLEMS 66-79 500 650 750 EMGO BACK IN STOCK!!!
Solomoriah
XS650 Addict
Done. I'm not going to link the STL here, it's on my Printables.com page linked above.
EDIT: Just to be clear, I redrew this one rather more completely than the others; since it's a "modern" design I went with a replica font and redid the text, to make it crisp. Likewise, the "swoosh" is made using bezier curves, not cut and paste. But it's still Resto's design, just my rendering of it.
EDIT: Just to be clear, I redrew this one rather more completely than the others; since it's a "modern" design I went with a replica font and redid the text, to make it crisp. Likewise, the "swoosh" is made using bezier curves, not cut and paste. But it's still Resto's design, just my rendering of it.
Attachments
This place is freakin' amazing! I have just enough experience in the area to fully appreciate the skill and effort involved in creating those files.
While I no longer have an XS, I downloaded the "swoosh" files anyway and will play with them. I expect my Ender 3 with the small nozzle will take roughly forever to print one, but I'll give it a whirl in a day or three when I get caught up on everything else.
While I no longer have an XS, I downloaded the "swoosh" files anyway and will play with them. I expect my Ender 3 with the small nozzle will take roughly forever to print one, but I'll give it a whirl in a day or three when I get caught up on everything else.
Solomoriah
XS650 Addict
I'm printing the one with the holes right now using my Ender 5 Plus with an 0.4mm nozzle at a 0.15mm layer height, and Cura tells me it's going to take two hours. Of course, with a filament change near the end it will take a bit longer (depending on how much attention I'm paying).
Similar threads
- Replies
- 25
- Views
- 702
- Replies
- 4
- Views
- 2K