Good evening all!
Well, today I completed the starter hairpin job and it was certainly a fun-filled task! Here is a run-down, complete with the data on hairpin torque in which everyone is interested.
When we last left the bike, the RH engine case cover and clutch plates and inner clutch member were off courtesy of my big bad #3 JIS
IMPACTA impact driver (get one - awesome, 'uge! -
believe me!). The next task was to get the big 29mm clutch centre nut off and I had to nip out and buy some big metric sockets (new tools - always fun!!

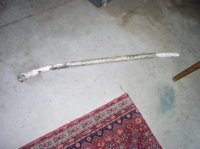
). First, I tried the careful approach and used a 3 ft. breaker bar and the XS650 Direct / MikesXS clutch holding tool. Forget it - total looser. The darn thing folded like a cheap suit. Don't waste your money on this turkey.
Well, at this point, I became more "authoritative" and switched to the the
brute-force approach: I reached around and popped the bike into first gear, re-mounted the rear brake pedal, pulled down on the pedal to lock the rear wheel and hit that 29mm nut with my electric buzz-gun.
That puppy had that 29mm nut off faster than a bride's nighty. I carefully removed the clutch basket and all of the many washers, shims, the funny little thrust bearing, etc. (and for goodness sake get a manual and KEEP TRACK of all that stuff). Set the assembly aside on a clean surface and covered it to keep
crapola out of it. At this point, I was staring at the RH end of the starter gear train with the infamous gear #4 and the starter hairpin just behind.
It was a simply matter of using my snap-ring pliers and removing that little snap ring and gently wiggling that larger gear (of the two that are meshing in the photo) off its shaft.
Be patient here. There is a special cap washer and an odd little split bushing right under the snap ring and you do NOT want to pop that gear off and launch those small parts all over your garage (see the next two photos of the snap ring - and then of the little split bushing that lives underneath it.
OK - so now you can see gear #4 - the one that causes all the trouble with XS650 starters.
For some odd reason - I did not take a photo at this point. Sorry - brain-f@rt. I guess I was still excited about my buzz-gun victory. Anyhow, you need to persuade gear #4 up and off. Again, no tools and be patient here as the gear is on a tightly fitted spline with a lot of teeth and it is also spiraled so the gear will rotate a little as it slides off (see the photo below).
Note - the hairpin will come off with the gear and there is also a large diameter, but quite weak, coil spring behind the gear which is helping (a little) with the removal task. Here is a close-up of the gear showing the spiral internal splines. Folks, this is a pretty complex mechanical part.

Being the trusting soul that I am, I pulled off the old gear #4 and simply slipped on my nice new
XS650 Direct Starter Gear Repair unit. Needless to say, I failed to check the slip force on the hairpin - but it
seemed like a pretty tight fit on the new gear, so I figured I was good to go.
Well....I wasn't. Dammit. I reassembled the starter gears, re-installed the clutch and found not one, but two problems.
- the starter still sounded like a spoon down a garburator (great description Mailman);
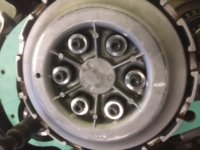
- the clutch wouldn't work - the lever was loose, the cable was slack and the inner clutch member (the one through which the six clutch holding screws go) was sitting about 3mm proud of the outer-most clutch plate.
Sh!t - I had assembled the clutch incorrectly - somehow. So, I pulled it all apart again, and referring the manual, made sure that I had all of the various shims, washers and the tiny little thrust bearing in the right places (as far as I could tell -
they were) - AND - that they are were all the correct thickness (
they were). I had no alternative, but to put it all back together again - and this time, the clutch worked properly - but the ding-danged starter was still grinding like a 50 year old stripper trying make her rent.
Clearly, the clutch is a bit complex to assemble: its not difficult, but you must pay attention to what you're doing here.
Soooo....I pulled it all apart again (
I was getting pretty good at this job...wanna hire me??) - and THIS time I checked the torque (
more correctly, the force required to make the hairpin slip on the groove cut into the backside of gear #4) using my handy-dandy fish scale.
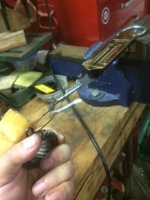
I am sure that all of this talk about hairpins, fish scales and forces is puzzling - but it really is very simple. Here is a photo of the set-up to measure the force to make the hairpin slip on the #4 starter gear. You simply hook it up as shown in the photo below, and pull on the gear until the hairpin slips a bit. A bad force value is below 6 lb and a good force value is well above 6 lb. You want it as high as possible to prevent that awful grinding noise.
Don't assume that just because you have new parts - they will work properly.

The
XS650 Direct / MikesXS hairpin replacement slipped at a force of 4 lb. which is well below the recommended
minimum of 6 lb. I then checked the failed hairpin/gear assembly which I had just removed from the bike and the force was 4.5 lb (which explained the horrible noises with both hairpins) - but the "old" hairpin appeared to be a thin aftermarket unit that had already been squeezed -
so I scrapped that hairpin. I then mounted one of my NOS OEM hairpins on the old gear from the bike - and it yielded 12 lb - which is really good! BTW - the NOS hairpins are made from
much thicker wire than the one I had just removed from the bike. The MikesXS hairpin was about the same thickness as the NOS OEM unit. After doing the squeeze on the brand new
XS650 Direct / Mikes XS gear and its supplied hairpin - and the slip force jumped from 4.5 lb to 12+ lb. Here is the data in tabular form:
- Old gear w. old hairpin: 4 lb. (hairpin had already been squeezed - scrapped it)
- Old gear w. NOS OEM hairpin: 12 lb. (gear was chewed - saved this ass'y as a spare)
- New gear w. supplied hairpin: 4-5 lb. (the new gear is good but the hairpin was too loose)
- New gear w. squeezed supplied hairpin: 12+ lb. (I installed this one on the bike)
In the end, I re-assembled the starter gears and clutch using the XS650 Direct replacement gear #4, squeezed hairpin and the supplied coil backup spring (it was much stronger than the old spring that came out of the bike). I did use the new hairpin that was supplied by XS650 Direct - but as noted, I did the squeeze in my vise and achieved a slip force of 12+ lb. The results are excellent - the clutch now works fine (I haven't ridden the bike yet - but it feels good) and the starter now works every time I hit the button.
I also scrapped the six stock JIS clutch holding screws (several of which had damaged heads) in favour of a set of XS Performance Allen head screws - MUCH better items and they fit fine.

Along the way, I checked the lengths of the clutch springs (
all well within spec), the condition of the anti-rattle springs on the clutch basket (
all good) and the thickness of the clutch plates (
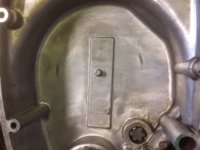
pretty much like new parts). I also noted that there were some minor scrape marks on the inside of the RH engine case cover - which confirms my suspicion that someone had been in there before and they had some difficulty in getting the clutch re-assembled properly (see photo below) - as had I. The difference was that I stopped well before putting cover back on - and they obviously barged ahead.


