-
Enjoy XS650.com? Consider making a donation to help support the site.
XS650.com receives a small share of sales from some links on this page, but direct donations have a much greater impact on keeping this site going.
You are using an out of date browser. It may not display this or other websites correctly.
You should upgrade or use an alternative browser.
You should upgrade or use an alternative browser.
Build Thread...Special to Cafe Bike
- Thread starter MaxPete
- Start date
Bob Kelly III
Ranch Kid from way back,.... that got Old !
LOL go get'em Pete !
.....
Bob.........

.....
Bob.........

Pete,
One good mental health day can lead to another.....
..and before long, you discover retirement.
One good mental health day can lead to another.....
..and before long, you discover retirement.
Holy cow - what an awesome feeling.
....OK, NOW I think I'll begin to make some real progress!
Well done Pete! Awesome news. What a sweet sweet sound eh? Looking forward to watching your progress.
Glad you were able to take a day for 'you', they're important and hard to come by.
GeorgeOC
XS650 Junkie
Awesome news Pete! Nicely done! Mental health has its perks!
It sure does George and the goofing-off continues.....
....today I am up in Stratford, ON at XS650 Direct (CDN affiliate of MikesXS) dropping about $850 (including the usual outrageous taxes) on a PAMCO system and new fork tubes, springs and seals for Lucille plus an 18" rim and spokes for the Cafe bike (to change it from the small 16" Special size rear tire). I need new skins on that bike anyway and it didn't make sense to buy a 16" when I really want the 18" rear size.
Cheers,
Pete
BobbedSled
XS650 Addict
BIG FAT HAIRY ANNOUNCEMENT!!!!!
NYHOW....today, I declared a mental health day - put the carbs on, connected a fuel line, pulled the choke knob, hit the button....and, guess what: IT STARTED AND RAN!!!!!
It idled a little high (around 2500 rpm) and I could turn it down to about 15-1700 before it stalled. I've got one noisy valve and the headlight is out, but basically, I've got a runner!
Holy cow - what an awesome feeling.
....OK, NOW I think I'll begin to make some real progress!
Indeed it is, well done and congrats so far! lots of fun and good times ahead.
Ok Pete, now all you need is time to apply all those newly acquired goodies! Some more mental health days are in order!
Is that what they call it? I'm on permanent mental health day? Lately I find myself giving advice to guys 20 years older than me. Had a stranger at the restaurant the other day tell me " I just retired a year ago and I don't know what to do with myself", I told him to sit down and I continued to give him retirement advice. This was so strange, he was 20 years older than me, and I felt like the elder.
Scott
Scott
It's not the money spent, it's realizing on the trip home that you just bought yourself about ANOTHER 150 hours of garage labor,It sure does George and the goofing-off continues.....
....today I am up in Stratford, ON at XS650 Direct (CDN affiliate of MikesXS) dropping about $850 (including the usual outrageous taxes) on a PAMCO system and new fork tubes, springs and seals for Lucille plus an 18" rim and spokes for the Cafe bike (to change it from the small 16" Special size rear tire). I need new skins on that bike anyway and it didn't make sense to buy a 16" when I really want the 18" rear size.
Cheers,
Pete


Yup - me too!
Go for it, Pete !
Glad to hear that the 81 fired up.
Yup - she runs well. I've got a slightly noise valve and likely some fiddling to do, but she sounds very solid!
Cheers,
Pete
Cheers,
Pete
NOTE: shameless hijack here - but it's my thread so - NYAH!
If you are in Michigan,Ohio, Illinois or Ontario (or just passing through) don't forget about the up-coming SE-MI / SW-ON meet-up.
There is a thread in the Regional Forum (Great Lakes & Canada) but here are the details:
Berkley, MI 48072
(248) 548-7711
NOTE: XS650s preferred, but ALL BIKES WELCOME!!! Ride whatcha got and come for a chat!
Hope you can come!
Pete
If you are in Michigan,Ohio, Illinois or Ontario (or just passing through) don't forget about the up-coming SE-MI / SW-ON meet-up.
There is a thread in the Regional Forum (Great Lakes & Canada) but here are the details:
- DATE: Sat. July 15 - 2017
- TIME: 11:00 AM (that will ensure that we get a table and give us time to oggle each other's bikes)
- LOC: Vinsetta Garage Restaurant (a very cool historic burger joint in old Detroit)
Berkley, MI 48072
(248) 548-7711
NOTE: XS650s preferred, but ALL BIKES WELCOME!!! Ride whatcha got and come for a chat!
Hope you can come!
Pete
Well, after a looong absence, I took the second half of today and really dug into my '81 Heritage Special donor bike. The last time we chatted about this bike, I had gotten the BS34 carbs back from our local carburetor wizard - Bruce - and after installing them, the bike started and ran really quite well. She has a couple of other problems (front brake may be wonky and there are some electrical gremlins) but the major issue at this point really is that the starter make that delightful "teaspoon down the garburator" sound that we all know and love about our XS650s.
The problem is that I have a bad right knee from an injury I suffered as a 13 year old kid, and so my days of riding a kick-start-only-bike....are over. Thus, I really cannot to do too much more on this bike until I can get it started reliably - "on the button". So, in my usual uptight, engineer fashion, I have been researching the famous 4th starter gear hairpin repair and assembling parts, tools and equipment to do the job. This dumb little component has kept me up late for weeks as I prepared to fix it.
The hairpin lives inside the RH engine case cover and is hidden behind the clutch.
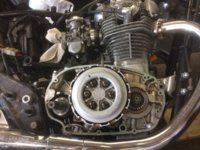
The actual hairpin (clip?) is mounted on one of the starter gears and that assembly looks like this:
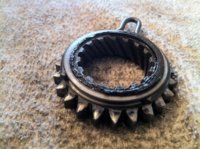
The difficulty with the hairpin - clip occurs if it is too loose on the gear which causes the starter to fail to engage properly. There is a lot of info on the clip, on squeezing it in a vise so that it grips the gear more positively and so I won't go into that. My purpose in this post is to describe the initial steps of actually getting access to the hairpin clip so that I can squeeze it, or change it. The damn thing is bad - and CHoHW - I am going to deal with it. I also wanted to point out the pitfalls in this task that I have found - so far - so hopefully, the next person to do this very common repair will benefit from my experience.
First, I removed the fuel tank and laid the bike down on her left side with an axle stand (suitably padded of course) under the LH exhaust header pipe. This gets the bike over far enough that I don't need to drain the oil, but more importantly, it places the clutch and attendant components at the ideal height and orientation for me to work on them.
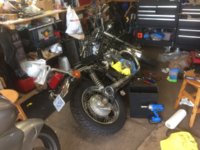
I then removed the foot peg ass'y, the kickstarter lever and the rear brake lever from the bike. After disconnecting the tach drive cable, off came the many (is it 10 or 11?) socket head capscrews (aka Allen head bolts) that secure the right-hand side engine case-cover (aka clutch cover). Then I removed the cover itself. It came off very easily (no mallet tapping required) - BUT - there is a major gotcha in this step:
LESSON 1 You must push the kick start shaft IN - as you remove the RH engine case cover.
If you don't push the kick start shaft in - the whole kick start mechanism can come away with the engine case cover - and that is a major PITA when you go to reassemble the engine. Once you've got the case cover off - set it aside and drape it with a clean cloth to keep the nasties out.
NOTE: don't bother to remove the oil strainer and its little round cover - they come off with the engine case-cover. The oil pump comes off and stays in the case cover. Also, after you get the engine case cover off, you need to clean ALL remnants of the gasket off the case and the engine itself to ensure a clean smooth surface for the new gasket.
At this point, I was facing this:
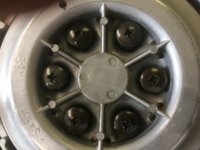
Let's take a really close look at those side clutch-pack securing screws. Note how the 11:00, 3:00 and 5:00 o'clock screws are pretty badly...well, screwed. Somebody has been in there before, and whoever it was didn't use good tools on those big JIS clutch fasteners. All I could think was "holy crap - how the he!! am I going to get these friggin' screws out?"

But wait! I remembered that in my enduring quest to acquire every single tool ever made, I had bought a #3 JIS impact driver - the IMPACTA.
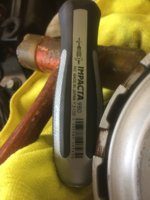
So, I set that big bad boy #3 into (what was left of) the head of the 3:00 screw - which was the worst one. I pre-loaded the driver by turning it counter-clockwise in the screw head, and gave it a mighty swat with my mallet. It loosened about 1/8 of a turn on the first hit. VICTORY!!! After a couple of good hits, each of the other five screws were loose and I turned them out 1/2 turn at a time in a cris-cross sequence and in a few minutes, I had the clutch inner-member off. Needless to say, I have already a set of XS Performance socket head clutch screws for the re-install. Those dumb and damaged JIS clutch screws are going into the can - for sure.
LESSON 2 - everyone should have one of those grey Vessel brand #3 JIS impact drivers. I ordered mine on Amazon, you can get yours there too, or from your Aunt Mary's utensil drawer or from Santa Claus - but get one. IMPACTA - YEAH BABY!
At this point, I figured that I had this whole job on the run - but I didn't. My bike still had another gotcha in store for me - and this one IS truly puzzling. I had checked very carefully and found that the clutch assembly is secured by a big 27mm nut - and so I had bought a 27mm socket and a clutch holding tool just for this job.

Imagine my surprise when I found that my shiny new 27mm socket would NOT fit on the nut. How....odd.
I whipped out the ole' digital vernier caliper and measured that big nut - and it is a solid 29mm across the flats. This is very surprising and quite puzzling. Anyhow, I went out to Princess Auto and bought myself a few more BIG metric sockets. I am now the proud ovwner of 27, 28, 29, 30, 32, 33 and 34 mm sockets.
C'mon big metrics - I'm ready for ya!!!
LESSON #3. Never assume you have enough tools - there are always more tools that YOU need and you must seek opportunities to buy them.
OK, it's late and Lucille and I are going to cover about 450 km tomorrow so - stand-by for chapter 2 of the saga of the starter hairpin repair.
Cheers,
Pete
The problem is that I have a bad right knee from an injury I suffered as a 13 year old kid, and so my days of riding a kick-start-only-bike....are over. Thus, I really cannot to do too much more on this bike until I can get it started reliably - "on the button". So, in my usual uptight, engineer fashion, I have been researching the famous 4th starter gear hairpin repair and assembling parts, tools and equipment to do the job. This dumb little component has kept me up late for weeks as I prepared to fix it.
The hairpin lives inside the RH engine case cover and is hidden behind the clutch.

The actual hairpin (clip?) is mounted on one of the starter gears and that assembly looks like this:

The difficulty with the hairpin - clip occurs if it is too loose on the gear which causes the starter to fail to engage properly. There is a lot of info on the clip, on squeezing it in a vise so that it grips the gear more positively and so I won't go into that. My purpose in this post is to describe the initial steps of actually getting access to the hairpin clip so that I can squeeze it, or change it. The damn thing is bad - and CHoHW - I am going to deal with it. I also wanted to point out the pitfalls in this task that I have found - so far - so hopefully, the next person to do this very common repair will benefit from my experience.
First, I removed the fuel tank and laid the bike down on her left side with an axle stand (suitably padded of course) under the LH exhaust header pipe. This gets the bike over far enough that I don't need to drain the oil, but more importantly, it places the clutch and attendant components at the ideal height and orientation for me to work on them.

I then removed the foot peg ass'y, the kickstarter lever and the rear brake lever from the bike. After disconnecting the tach drive cable, off came the many (is it 10 or 11?) socket head capscrews (aka Allen head bolts) that secure the right-hand side engine case-cover (aka clutch cover). Then I removed the cover itself. It came off very easily (no mallet tapping required) - BUT - there is a major gotcha in this step:
LESSON 1 You must push the kick start shaft IN - as you remove the RH engine case cover.
If you don't push the kick start shaft in - the whole kick start mechanism can come away with the engine case cover - and that is a major PITA when you go to reassemble the engine. Once you've got the case cover off - set it aside and drape it with a clean cloth to keep the nasties out.
NOTE: don't bother to remove the oil strainer and its little round cover - they come off with the engine case-cover. The oil pump comes off and stays in the case cover. Also, after you get the engine case cover off, you need to clean ALL remnants of the gasket off the case and the engine itself to ensure a clean smooth surface for the new gasket.
At this point, I was facing this:

Let's take a really close look at those side clutch-pack securing screws. Note how the 11:00, 3:00 and 5:00 o'clock screws are pretty badly...well, screwed. Somebody has been in there before, and whoever it was didn't use good tools on those big JIS clutch fasteners. All I could think was "holy crap - how the he!! am I going to get these friggin' screws out?"
But wait! I remembered that in my enduring quest to acquire every single tool ever made, I had bought a #3 JIS impact driver - the IMPACTA.

So, I set that big bad boy #3 into (what was left of) the head of the 3:00 screw - which was the worst one. I pre-loaded the driver by turning it counter-clockwise in the screw head, and gave it a mighty swat with my mallet. It loosened about 1/8 of a turn on the first hit. VICTORY!!! After a couple of good hits, each of the other five screws were loose and I turned them out 1/2 turn at a time in a cris-cross sequence and in a few minutes, I had the clutch inner-member off. Needless to say, I have already a set of XS Performance socket head clutch screws for the re-install. Those dumb and damaged JIS clutch screws are going into the can - for sure.
LESSON 2 - everyone should have one of those grey Vessel brand #3 JIS impact drivers. I ordered mine on Amazon, you can get yours there too, or from your Aunt Mary's utensil drawer or from Santa Claus - but get one. IMPACTA - YEAH BABY!
At this point, I figured that I had this whole job on the run - but I didn't. My bike still had another gotcha in store for me - and this one IS truly puzzling. I had checked very carefully and found that the clutch assembly is secured by a big 27mm nut - and so I had bought a 27mm socket and a clutch holding tool just for this job.
Imagine my surprise when I found that my shiny new 27mm socket would NOT fit on the nut. How....odd.

I whipped out the ole' digital vernier caliper and measured that big nut - and it is a solid 29mm across the flats. This is very surprising and quite puzzling. Anyhow, I went out to Princess Auto and bought myself a few more BIG metric sockets. I am now the proud ovwner of 27, 28, 29, 30, 32, 33 and 34 mm sockets.
C'mon big metrics - I'm ready for ya!!!

LESSON #3. Never assume you have enough tools - there are always more tools that YOU need and you must seek opportunities to buy them.
OK, it's late and Lucille and I are going to cover about 450 km tomorrow so - stand-by for chapter 2 of the saga of the starter hairpin repair.
Cheers,
Pete
Last edited:
Hey, Pete. An addendum, if it's not in your chapter 2.
There's a thin shim washer for the kickstart shaft that often sticks to the sidecover. Easily lost. If unsure after reassembly, check in/out play of kickstart shaft. Shouldn't be much more than 1mm.
Re the starter. As an engineer, this may interest you:
http://www.xs650.com/threads/xs650-electric-start-system.948/page-5#post-431265
http://www.xs650.com/threads/testing-my-starter-gear.43623/
Note: In past threads on this issue in the Tech section (starter gear repair), doubt has been cast as to the tension provided by the
Starter Gear Repair Kit 1972-1984 XS650
Part #24-6522 at MikesXS. That may have been the case in the past, but I can report that I bought this repair kit (Gear plus clip already mounted), about 4 months ago, and the tension reading on my scale surpassed the figure suggested in the Tech threads as being sufficient. In terms of "real world results", the starter in my '75 now works perfectly every single actuation.
Hope this was helpful.
Last edited:
Bob Kelly III
Ranch Kid from way back,.... that got Old !
Fantastic MaxPete ! I know I will Use this in the future ! THANK YOU !!!!!!
....
Bob.......
....
Bob.......
