1976 Tracker Build

Also did some polishing--as I said in my previous post, I still need to finish polishing the fork legs. Once I get this done I think I am finally ready to start putting things back together!
 

Attachments

  • polishing4.jpg
    polishing4.jpg
    63.7 KB · Views: 188
  • polishing3.jpg
    polishing3.jpg
    53.1 KB · Views: 193
  • polishing2.jpg
    polishing2.jpg
    56.7 KB · Views: 190
  • polishing.jpg
    polishing.jpg
    67 KB · Views: 180
Used the Jim Henry conversion on the 19" back wheel. Just got the rims back from the Powdercoater and I really like them!
 

Attachments

  • jim henry.jpg
    jim henry.jpg
    31.7 KB · Views: 163
  • wheel convert.jpg
    wheel convert.jpg
    52.4 KB · Views: 188
  • wheel.jpg
    wheel.jpg
    66.7 KB · Views: 201
Did some polishing last night after getting the legs shaved--I think they turned out pretty good.
 

Attachments

  • IMG_1320.jpg
    IMG_1320.jpg
    286.1 KB · Views: 154
  • IMG_1321.jpg
    IMG_1321.jpg
    282.2 KB · Views: 173
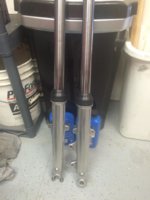
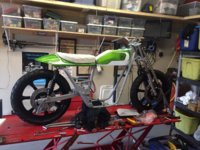
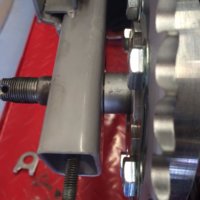
So, this is the machine I use. I bought this when I decided that I was really going to get into doing this. I use 10 inch wheels and use Tripoli on the initial breakdown and cutting of the layer on these parts. Before that, however, I have to sand out any imperfections or gouges using different levels of wet/dry sandpaper. For the shaving of these forks, I cut them off with a cut off wheel attached to my grinder and then ground them down using a flap wheel. Once they are level, I used 220, 500, 800, 1200, and 2000 grit wet sandpaper and then I used the Tripoli. After I get them shined up, I put the final touch on by using white rouge.
 

Attachments

  • Jet.jpg
    Jet.jpg
    126.4 KB · Views: 166
Wow, that's a lot of sanding, lol. I don't sand too much anymore. I've switched over to using medium, fine, and extra fine 2" Roloc discs in a die grinder. The medium makes short work of removing heavy scratches and gouges, also the casting lines on the fork bottoms and caliper mounts. The fine gets heavy corrosion off, the extra fine just smooths everything more and readies it for buffing. I start my buffing with the coarse black emery compound. Even when I did sand, I usually never went down further than 400 paper. The black emery would remove the scratches left by that.
 
Last i heard Mr Henry had gotten into a bad dirt track accident and was eventually moved into some rehab? Has he recovered? Did you get the wheel kit recently or had it for a while?
 
The funny part is I ran across a guy on a Facebook site for XS650 owners and he asked about the conversion part and I told him I bought it from Jim Henry. I guess he knew Jim and this guy was selling a bunch of conversion units that Jim had made.
 
well, fork shifters are put in as well as the crank--going well thus far.
 

Attachments

  • putting back together.jpg
    putting back together.jpg
    259.9 KB · Views: 150
  • putting back together2.jpg
    putting back together2.jpg
    208.1 KB · Views: 152
Getting it together further--working on getting the camshaft in place---the new cam chain is a pain in the butt---but again, I need to torque all the bolts down--that should give me a little more room.
 

Attachments

  • camshaft4.jpg
    camshaft4.jpg
    260 KB · Views: 172
  • camshaft3.jpg
    camshaft3.jpg
    268 KB · Views: 155
  • camshaft.jpg
    camshaft.jpg
    121.5 KB · Views: 160
  • engine putting together.jpg
    engine putting together.jpg
    132.7 KB · Views: 119
I have one of Jim's kits as well. Omar wasn't making them and I got a kit sent out to me right before his wreck. "Lucky" for me I guess? But you're absolutely correct: he was a very nice guy!!

Nice job on the polishing
 
Little bit of work done again last night--not enough but getting some things put together finally. I have the engine at TDC and the cam mark on the top as it should be. I also have the front forks put on the frame as well as the back Progressive shocks in place.

I know, I have two things going on at once---would like to focus on one thing but I need to see progress so I had to get those forks on! :)
 

Attachments

  • front forks on.jpg
    front forks on.jpg
    232.3 KB · Views: 135
  • TDC.jpg
    TDC.jpg
    221.9 KB · Views: 137
Worked a lot this weekend on the bike. Making good progress. Was able to get her up on her legs---the front and back 19" wheel stance is awesome--I really like the look. Putting it together was really easy with the Jim Henry kit--all the spacers were there and it was a no brainer, even with the conversion to a back disc brake from the drum I started with. I couldn't wait any longer to see it so I put the tank and back seat part on just to see what it is finally going to look like when completed and I like the color combo. I am thinking of getting a short front fender to go over the Hugh's fork brace---not because of the look but because of dirt and water potentially flying up in my face with the lack of one.
 

Attachments

  • assembly5.jpg
    assembly5.jpg
    237.1 KB · Views: 183
  • assembly4.jpg
    assembly4.jpg
    133.8 KB · Views: 175
  • assembly3.jpg
    assembly3.jpg
    218.1 KB · Views: 152
  • assembly2.jpg
    assembly2.jpg
    165 KB · Views: 177
  • assembly.jpg
    assembly.jpg
    195.7 KB · Views: 157
  • back wheel spacers.jpg
    back wheel spacers.jpg
    136.9 KB · Views: 136
  • back wheel spacers2.jpg
    back wheel spacers2.jpg
    114.7 KB · Views: 155
In the above post I said the engine was ready to install into the frame. I am looking to get rid of the electric start.

I have looked at many posts and really want to make sure I am on track---as you can see in the pics, the spot where the gears all go for the electric start are gone---is that correct?
 

Attachments

  • electric start.jpg
    electric start.jpg
    201.5 KB · Views: 155
  • electric start2.jpg
    electric start2.jpg
    196.3 KB · Views: 143
The front mudguard is a good idea, and I think you paint job looks fantastic despite the obvious green connotations.

Re Starter gear removal, the electric start reduction and transfer gears are removed in the first picture. In the second picture the most obvious feature is that the kick start mechanism is removed.

That's ok, but you will have to bump it or use rollers to start, which is a total pain and in my opinion not worth the weight reduction benefit.

On my tracker I removed the electric start, if I was doing it again I would retain the electric start and remove the kick mechanism. (I am not 18 anymore)

Lithium batteries are small, light and sealed and have changed the game for me.
 
Back
Top