1976 Tracker Build

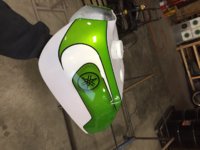
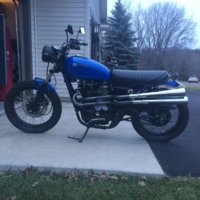
Tank was around the $300 range. No body work required on the tank other then a little sanding around the edges to get rid of little splinters here and there. It is made out of a resin that is impervious to ethanol. I haven't personally bought anything from Omar's but I know that a new person is running it now and so far it looks good and that the owner is trying hard to turn it around.
 
I placed an order online with omars fiberglass company today.
I sent an email to them asking when my order would go out and Jeff sent me back an email right away saying the tank and fender are in stock and they will go out today. I'm so exited to get the stuff...:thumbsup:
 
I love getting parts back after they are like brand new. The guy I use for powdercoating did a great job once again.
 

Attachments

  • PC Swingarm.jpg
    PC Swingarm.jpg
    99.9 KB · Views: 185
  • PC.jpg
    PC.jpg
    76.2 KB · Views: 214
I can't say enough about the guys at Omar's Fiberglass Co. I Received my tank and fender about a week after I ordered them and they are perfect. The tank and fender fit perfectly on my frame. It was super easy to install. They supplied the mounting hardware and instructions. I ordered the fender with the tail light/lic. bracket and it looks so cool. I ran new gas lines and have been working on prepping the frame so I can give the frame a fresh coat of paint. Not sure if I'm going to paint the fiberglass myself or have someone else do it. I will post pictures when I get the bike completed.
Thanks guys for the recommendation.
Anyway I just wanted to give those guys at Omar's Fiberglass a great review and I would recommend them to anyone looking for great Fiberglass parts.:thumbsup::bike:
 
Was able to do a little "horse trading" with someone regarding my half mile Omar Pipes. I traded them for the Yo Mama pipes from Pandemonium. I won't run straight pipes without mufflers however. My question is this---I know by looking at pictures that most people on trackers run something like an Emgo muffler--but could I run Harley Mufflers instead? Thoughts?

And no, this isn't my bike (wish it was) but I like how those mufflers look.
 

Attachments

  • yamaha-xs650-special-by-motor-rock1.jpg
    yamaha-xs650-special-by-motor-rock1.jpg
    54.7 KB · Views: 264
Well, been awhile since I have been on here---been busy moving and setting up shop to finally get some work done on the bike. Paint is taken care of---Zack, the guy who paints for me, did a great job. Love the shadow effect.
 

Attachments

  • tank and frame.jpg
    tank and frame.jpg
    172.6 KB · Views: 205
  • Paint finished2.jpg
    Paint finished2.jpg
    132.3 KB · Views: 197
  • Paint finished5.jpg
    Paint finished5.jpg
    160.5 KB · Views: 218
  • Shop.jpg
    Shop.jpg
    243.2 KB · Views: 190
I guess you could say that---I believe the color is "sassy green" from the Mopars. The white is Harley pearl white. I wanted something different---haha
 
Did some engine tearing down today--looks good and I don't see any scratches on the cylinder walls.
 

Attachments

  • 60.jpg
    60.jpg
    259.1 KB · Views: 158
  • 65.jpg
    65.jpg
    309.1 KB · Views: 159
  • 64.jpg
    64.jpg
    330.1 KB · Views: 161
  • 68.jpg
    68.jpg
    316.2 KB · Views: 155
  • 76.jpg
    76.jpg
    318 KB · Views: 170
  • 77.jpg
    77.jpg
    189.8 KB · Views: 129
Had some issues with about three screws though---anyone know where I can get these?
 

Attachments

  • 50.jpg
    50.jpg
    216 KB · Views: 148
  • 54.jpg
    54.jpg
    305.8 KB · Views: 144
  • 52.jpg
    52.jpg
    173 KB · Views: 150
  • 53.jpg
    53.jpg
    262.5 KB · Views: 170
Also a big thanks to my brother in law for helping me build this nice battery box---just waiting on switches to put in.
 

Attachments

  • battery box2.jpg
    battery box2.jpg
    178.3 KB · Views: 166
  • battery box.jpg
    battery box.jpg
    171.7 KB · Views: 174
  • battery mock up.jpg
    battery mock up.jpg
    76.8 KB · Views: 157
Lastly, dry fitted the exhaust on my other 650 to see how I liked the mid high pipes. Great job by Daniel at Pandemonium for building me this exhaust! Great work!
 

Attachments

  • Pandemonium.jpg
    Pandemonium.jpg
    302.8 KB · Views: 193
  • Pandemonium2.jpg
    Pandemonium2.jpg
    248.1 KB · Views: 151
Have a really close look the the clutch screws threads where they end at the thicker shoulder. Bad screws will show signs of cracks and stretch there. You could drill them out, make them into shouldered sleeves per 5wins writeup in the clutch tech section. Or buy from MikesXS.

Yes, I'd replace the gouged camchain tensioner.

Like them pipes. No reverse cones?
 
Hi TwoMany,
Thanks a lot for the reply and advice---first time I have had a 650 engine apart and taking advice from guys on here on what to replace. I have also been trying to look at other threads as well.
 
ok, engine is all apart. Also had a chance to take the carbs apart--they look pretty nasty as this motor has been sitting for quite awhile.

Two questions---what does everyone use for cleaning carbs and making them look new again? Vinegar I have heard of, ultrasonic cleaning, anything else?

Second question---besides the obvious of gaskets and seals to replace, what other things should I be looking at? I am not seeing anything obvious with this engine that needs replacing.
 

Attachments

  • 102.jpg
    102.jpg
    303.3 KB · Views: 147
  • 90.jpg
    90.jpg
    296.2 KB · Views: 178
  • 85.jpg
    85.jpg
    304.5 KB · Views: 145
Ok, had the engine bead blasted and finally had a chance to get it all painted.
 

Attachments

  • painted7.jpg
    painted7.jpg
    187.2 KB · Views: 136
  • painted4.jpg
    painted4.jpg
    152.2 KB · Views: 138
  • painted3.jpg
    painted3.jpg
    248.9 KB · Views: 143
  • head.jpg
    head.jpg
    200 KB · Views: 175
Had a chance to do some fork shaving---I was a little nervous going into this but turned out pretty decent actually. Started with my grinding cut off wheel and then I used a flap sanding disc to get it down to where it was pretty flat. From there I used 220 grit wet/dry working my way up with 500 grit, 1200 grit, and finally 2000 grit until it is basically sand mark free. Need to finish polishing these but I ran out of time.
 

Attachments

  • forks2.jpg
    forks2.jpg
    56.8 KB · Views: 147
  • fork shave parts.jpg
    fork shave parts.jpg
    230.5 KB · Views: 144
  • fork shave.jpg
    fork shave.jpg
    142.6 KB · Views: 146
  • fork shave sanded.jpg
    fork shave sanded.jpg
    131.2 KB · Views: 163
  • fork shave done sanding.jpg
    fork shave done sanding.jpg
    167.7 KB · Views: 143
Back
Top