Here's an excerpt from the 1978 manual.

You're in spec, barely...
You're in spec, barely...

...Regardless, would it be best to gap a new set of rings here?
Sorry, I wasn't super clear. I am using the new rings that came with the new pistons, brand spanking new.Huh? You're gapping used rings on a fresh rebore?
Always use new rings here...
Totally agree with 2M.
It is false economy to put old rings back into an engine (same as removing a clutch and then putting it back in). No matter how good they look (clutches, rings, seals, gaskets,...whatever) - just as sure as God made little apple-strudles, the old part(s) will fail 15 minutes AFTER you have reassembled the engine.
If you have gone to all the work of tearing down an engine - put in new stuff, so that when you start it up - you know that you won`t have to tear it down again.
Pete
I find it interesting that a new set of rings would gap at the far end of the scale. Makes me wonder if the bores are a bit oversized. Then again, could just be the way the cookie crumbles.
Those gaps are fine for a streetbike. Some of us would want to try a set of the next size up, and gap to minimums. But, that's being obsessive. Don't go there...


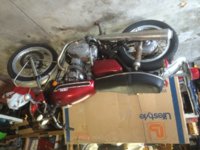
Lakeview,Here is the starting point for the 76 I am resto modding. It was in pretty bad shape, so I dissembled it and brought it into basement. The frame is now rattle canned and it's going back together.
The anchor for the side stand return spring was chewed off on mine, (I think it used to be sort of a dowel with a big head to hold the spring from slipping off.) I ground the remnant flat so I could centre punch it, then drilled and tapped a hole so I could put in a bolt that was an equivalent. Works fine.
G'day Gibson,Great! Lookin good! Please keep us posted on what you find in there. I was fortunate with the engine anyway on mine. I was able to just clean/ rebuild the carbs and do ignition tune up. I just rode it on Saturday. Ill bet the iron brake caliper is seized. (very common with them). I've decided on mine to not do any mods that are not easily reversible (like cutting anything off). I've been running synthetic oil and changing every 1K miles or so. The more I run it, the better it runs! These things are tanks...