Charging System Question. Yes, I've read it.

EvenmoreXS - one more test... (following your schematic)

Plug everything back together
Put voltmeter red lead on brown wire connector inside the connector block from rec/reg
Put voltmeter black lead on green wire connector inside the connector block from rec/reg
(This will measure voltage being supplied to rotor by the regulator)

Report voltage when:
Everything off (should be zero)
Ign 'on' (should be ~ 11-12v)

Start engine
Bike idling (might show ~12.5v)
3000 rpm (might show ~13.5v)

When the engine is running:
If the battery voltage comes up enuff, the reg should start throttling the green wire, and rotor voltage will drop. But, this is not really readable on a dc voltmeter, since the green wire voltage will be flipping up/down during regulation, and is best viewed on a scope. So those last two values may not appear on your meter. Could turn headlight on to minimize this regulation and get better reading.


Red to brown, Black to green = .1 volt

Open short with switch on and/ or bike running.

Im going to run this test again later today. When checking the battery voltage after charging I noticed my auto button wasnt depressed. Not sure I can trust the first measurements.

I will double check later today.
 
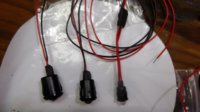
It just so happens I talked to this guy in england and got a batch of these cool "color changing" LED voltage indicators, very small and discrete yet full function AND auto dimming. the color indicates voltage/charging. with some added flashing for really low volts. If you swear you will install it right away I'll send you one really cheap! maybe throw in an untested reg/rec to add to the circus.
 
Well, this is a circus after all.....

I will greatfully install it asap. You like this kind as much as the kind with numbers?

Keep in mind I have to put a new plug on the reg/rec.
 
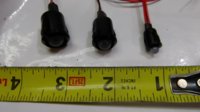
There's a recent thread, I talked to maker and he shipped me 6 sets. I have 4 of the smallest size. So I'm looking for early adaptors, a few guys to install them and see what they think.

led volt meters 001.jpg

led volt meters 002.jpg

The leads are nice and long 2' plus it needs to be installed switched so after the ignition switch and must be connected with a battery in the circuit. DO NOT hook up directly to a battery charger or use with a capacitor only charging system.

PM for a super help me test these price. Again I can send out a couple of the smallest size only i only have one each of the bigger ones.


Thanks for your message. The units are available in 5mm, 8mm and 10mm LED
sizes (panel holes required are 8, 12 & 14mm respectively). All sizes can
be either standard or auto-dimming.


From the vender
"In principle I would be happy to supply you for you to resell in the USA. I have to point out that these items aren't mass produced (it's a small, niche market - so I do quite small production runs, which also allows for personal custom jobs as required). With that in mind I don't benefit economies of scale on larger orders. What would suit me best would be to supply you with
20 to 40 units on a regular basis (that suits you)"

So my anticipated to your door price will be $28.00 each, any of the three sizes auto dimming.
PM for a BETA tester deal, if you would install immediately and supply some feedback of what you think.
 
Well, gonna have to wait till later tonight to run the test again.

I went to run the test again and my red lead broke off. Gotta buy new leads now.

Par for the course.
 
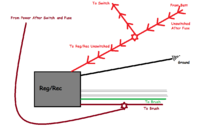
So, If i were going to test JUST the regulator part of the new reg/rec boxs I got, would I connect the red, green, and brown wires from the new box..?.. leaving the whites and black to the current rectifier.

Why you ask....... well, because It would allow me to test the regulator only on the new box and would save me time and pins for the connector. If it works, I would then wire in all the pins and put the connector on and plug it in and smile.

yes its possible then the rectifier could be bad......burn that bridge when I get there.

Just want to test the regulator.

Thanks everyone

some of the to's and from's in the pic could be wrong. sorry.
 

Attachments

  • Rectifier Regulator Wiring.png
    Rectifier Regulator Wiring.png
    37.3 KB · Views: 134
Do the test referred to in posts #76, #79, #82. The rotor lines (brown and green) must be hooked up. Without the rotor load, not sure if you could reliably measure what the regulator is doing with the green grounding line.
 
Went ahead and wired it up fully.

Same problem. Dont have time to run the test now, have to try to later or tomorrow. Have 1 more box to try. That would be 4 bad boxes. What are the odds.

I'll be re re re checking the wiring again too.
 
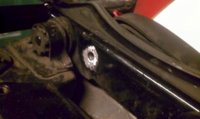
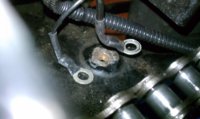
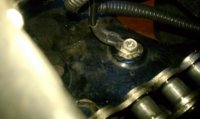
Well, I moved my ground to a new location and it works now. Everything checked out because it was working and continuity was good because no shorts. But, for some reason, it decided it didnt like its ground location anymore. After I moved the ground to a new spot, 14.5 volts when revving. Headlight brightens properly.

Now on to the voltage monitor diode. Gonna try to mount it inside my speedo. Gotta be ingenious......I have an easy backup, but I want it to be spiffy instead.

Thanks for all the help everyone. Im going to try my old box and I bet it works. I'll let you know.
 
Sounds like you will need to visit the pass it forward thread with some regulators.
 
I think because It was grounded to the swingarm. There was already a threaded hole on top of it near the pivot, so I used it. I just dont think it was providing enough ground to work, but it was enough to look correct on a volt meter. I feel stoopid, but a little bit smarter...I learned a lot through this issue....

It is now grounded to the bracket that is welded to the backbone above the swing arm. Maybe where the reg/rec was originally????...... Either way, I used a file and rubbed it down to metal....like all my grounds....installed with a star washer.

Works again. :bike:


I'll finish this thread tomorrow when I install my new voltmeter diode.

Thanks everyone. :thumbsup:
 
Quote back about 20 posts ago.
"As a general rule no returns on electrical items. Sadly there is a very good reason for this rule. Replacing parts to find the fault often results in more ruined parts. Just sayin....
You might try a craigslist ad for charging system help. We can only do so much from a distance. I get kind of frustrated on these threads. You are doing well (much better than most) trying to help us help you. But, straight up, an experienced electrical guy, hands on your bike, would have this hammered out in about 10 minutes."

One picture would have solved this 2 weeks ago. Thanks for telling us where the problem was. Fessing up must have been hard.

Confession I am having fun with a 77 right now. It works perfect, then out on the road after 20 minutes it blew it's fuse. No tools or spare fuse, I stuck the holders together and got home. I have the led on the bike. showing low charge at idle then "after a while I saw high voltage, green red flashes, then very low voltage. all the way down to VERY dim lights, Then back to running, charging perfect. Replaced original fuse with auto reset circuit breaker. Popped the breaker, it reset and went back to running fine, rode it home. Last night I rechecked rotor, (previously replaced with used rotor), 5.8 ohms, brushes, good length, battery is new,lead acid, battery voltage, even after funky charging is high, cranks great, lights are bright. Replaced ground strap from battery to frame with new, cleaned strap mount. checked hot strap from battery to solenoid, opened rectifier plug, checked diodes, all good. greased, replaced plug. Opened regulator, sanded, cleaned points (regulator was very clean inside) Rechecked recent work in headlight (including rerouting wiring to the newly installed LED voltage indicator) and under gas tank mount of new coil Pamco install for possible shorts, nothing found, Removed reserve lighting unit which had been a bit flaky, jumpered wires. Temporarily added a digital voltage gauge for closer voltage monitoring. Will test ride again today. Wiring is bone stock except changes mentioned above. Bike was in generally good to very good condition, dry stored and has been recently brought back to life.

"One picture would have solved this 2 weeks ago."

Here's those pics.......too little too late???? This was before I moved the ground. Everythnig checked out. I had continuity all over the bike from that swingarm ground.


"Thanks for telling us where the problem was. Fessing up must have been hard. "

A bit, not too bad. Its always frustrating when you put that much effort into something that turns out to be simple. I didnt just go throught the motions, I did the work and learned a lot doing it though. Proud of that. This is a good example of a problem that a voltmeter wont find. Everything checked out, but it wasnt good enough.

Lesson learned,....

Dont ground to the swing arm, Even if its easier.

Gonna finish my voltmeter install later tonight and then I'll move on to my next project.

Thanks everyone for sticking it out.
 

Attachments

  • IMAG0858.jpg
    IMAG0858.jpg
    111.3 KB · Views: 148
  • IMAG0862.jpg
    IMAG0862.jpg
    146.4 KB · Views: 135
  • IMAG0865.jpg
    IMAG0865.jpg
    135.7 KB · Views: 137
  • IMAG0866.jpg
    IMAG0866.jpg
    105.6 KB · Views: 130
Swing arm is OEM on plastic bushings, your ground path was through the chain and transmission bearings, Yikes! Back in the old days when a car's rear end started to howl the first thing a wise mechanic checked was the engine to chassis ground strap so the new gears and bearings weren't quickly ruined again.
 
Swing arm is OEM on plastic bushings, your ground path was through the chain and transmission bearings, Yikes! Back in the old days when a car's rear end started to howl the first thing a wise mechanic checked was the engine to chassis ground strap so the new gears and bearings weren't quickly ruined again.

Well, hopefully im ok. Been like that for a few months, but only a few hundred miles of riding.
 
Back
Top