Countershaft Seal Replacement

YL82

Perpetual Restorationist
Messages
851
Reaction score
8
Points
16
Location
Goose Creek, SC
Today, I decided to tackle clutch pushrod bushing replacement and countershaft/output shaft seal replacement instead of mowing my lawn.

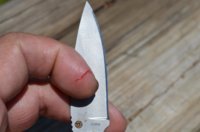
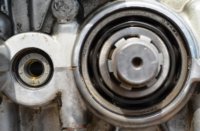
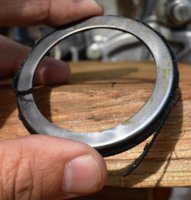
Removal of the stock bushing went well following instructions on mikesxs website. See images 1 and 2.

I've removed the output shaft seal (or I'm wondering whether I removed ALL of it). Sure wasn't pretty. I've got a pile of rubber to prove it.

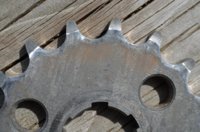
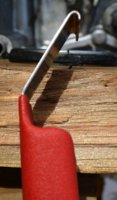
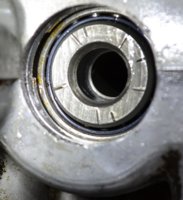
I have removed the distance collar. Refer to 3rd image. In the 4th image, I put a red circle showing the collar prior to removal.

As far as the part I've put a green circle around, is this the bearing or simply the backside of the seal that I can pull out???

If its part of the trashed seal, I did a hell of a job cleaning all of that rubber off the face of it...

I've ordered a new seal, but haven't received it, so I don't have a good idea what ithe new seal looks like on the bearing side.

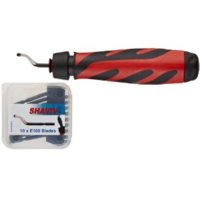
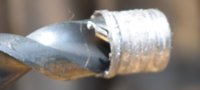
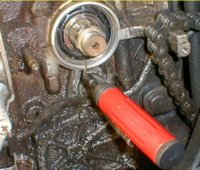
I've attached a pic (last image) from 650motorcycles.com that looks a bit different (much more open) where the deburring/chamfering tool is being used.

Thanks.
 

Attachments

  • DSC_0023.jpg
    DSC_0023.jpg
    175.2 KB · Views: 905
  • DSC_0016.jpg
    DSC_0016.jpg
    53 KB · Views: 701
  • DSC_0012.jpg
    DSC_0012.jpg
    114.6 KB · Views: 809
  • Output_Shaft_Seal_Replacement.jpg
    Output_Shaft_Seal_Replacement.jpg
    96 KB · Views: 695
  • Chamfering_Tool_For_Countershaft_Seal.jpg
    Chamfering_Tool_For_Countershaft_Seal.jpg
    88.8 KB · Views: 710
I think I got mine out with a claw hammer as if I was pulling a nail. Pretty easy.

Chamfer it well and have a wood block and little hammer to coax it in if necessary. My replacement was tight.
 
The backside of your new seal will resemble the backside of the pushrod seal. To get max life outta that new seal, polish-up that spacer and assemble with a little oil...
 
I've been web shopping for a deburring tool. The650motorcycles.com page on engine seal replacement indicates that the same deburring tool can be used for chamfering the engine case at the clutch pushrod and the countershaft.

(I've thought of using a Dremel Tool, but not sure which bit (if any) are safe to use w/o totally fucking up the aluminum).

Lots of choices out there for different blade types for a deburring tool, such as B10 and E100, long reach blade types, extra close blade types, etc.

I did find the below link.

https://www.suncoasttools.com/crm/pdf/ShavivBBladeIndex.pdf

Any suggestions for blade type selection for chamfering the clutch pushrod and countershaft engine case holes?
 

Attachments

  • SHIVIV_TOOL.jpg
    SHIVIV_TOOL.jpg
    8.3 KB · Views: 390
I would suggest getting a kit that comes with a handle and a couple blades. The handles are cheap, it's the blades that cost. That standard "S" shaped blade in your picture is all you need, I think that's a B10. A telescoping handle is also a nice feature, allowing for easier access to some holes. This looks to resemble the one I have although I can't say for sure since I've had it for so long .....

http://store.bierbros.net/auto/detailview.php?id1=248432&id2=2071025&id3=YES&id4=BIERBROS.net

The "E" blades are a slightly larger diameter than the "B" blades and consequently, cost more. The smaller "B" blades are all we need here.
 
A pocket knife that you don't mind wrecking the edge on will work fine too.
 
Yes, in fact you will need a little knife to complete the clutch pushrod seal hole. It's so close to the alternator compartment wall that you can't get that deburring tool all the way around it.
 
I suppose we should discuss the assembly of the sprocket and nut after the seal is replaced. As you've probably read here, the sprocket retaining nut needs to be really tight or the seal will leak. Well, that's very true but if loose, it's really not the seal that's doing most of the leaking. A loose retaining nut allows oil to get past the end of the sleeve where if rests against the inner race of a bearing inside the motor. Then that oil runs down the shaft and out around the nut and sprocket. After doing mine, I had that left cover off a few hundred miles later and this is what I found, oil streaks emanating from the shaft and retaining nut .....

OutputShaftLeak.jpg


I had the nut very tight but still, a bit of oil was making it out. So I took a few additional steps to help seal this thing. I pulled the sprocket off and thoroughly cleaned the front and back sides. I then applied some Yamabond to the back where it meets the sleeve and to the front under the lock washer, also a little under the nut.

Now for torque values on that nut. This is one of those fasteners that Yamaha seemed to change their mind about several times. The early shop manuals speced a very high value, 10-13m-kg (72-94 ft/lbs). In subsequent years, Yamaha reduced this and you'll find values as low as 36 ft/lbs for some years, 47 ft/lbs for most. It's become accepted practice to use the old higher values. You really need to force that sleeve in hard to seal it against that bearing inner race and to seal the sprocket to it. You're trying to seal hard metal surfaces to each other without the aid of any gaskets or o-rings. So, beside polishing the sides of the sleeve that work against the seal, you'll want to make sure both ends are clean and free of any nicks or corrosion. Also the front and back areas of the sprocket that contact the sleeve and nut/washer.
 
I've got just the knife for the job that I don't mind wrecking the edge on. Just about took the top of my index finger with it yesterday while needlessly slicing off the rubber from that damn seal. :cussing:

Awesome information, 5twins!

As far as the tool, looks like I need not have to spend that much.

I have in mind of replacing my front sprocket, but not sure there's a need. Mine sure doesn't look like the example of a spent one looks like in one of the manuals where the teeth are bent back the other way. They don't look that expensive from Mikesxs.
 

Attachments

  • DSC_0001.jpg
    DSC_0001.jpg
    105.9 KB · Views: 350
  • DSC_0005.jpg
    DSC_0005.jpg
    276.2 KB · Views: 388
When I replaced my clutch pushrod seal I deburred it with a dremel using bit
Dremel High Speed Cutter Model # 191 is worked well for me

Thanks, I am Carbon. I may just have one of those. I will have to practice using that bit on some other piece of aluminum before I consider using it. BTW, I've seen your videos on this job and others. Love em!
 
Your sprocket doesn't look badly worn but it does appear that corrosion has eaten into the side in those streaked areas. Sealer of some sort around that "ring" area where it's going to contact the sleeve or washer/nut would probably be a good idea.
 
I think I got mine out with a claw hammer as if I was pulling a nail. Pretty easy.

Chamfer it well and have a wood block and little hammer to coax it in if necessary. My replacement was tight.

Since I'd removed so much of the rubber from between the case and the seal, it took very little effort to pull out the metal piece.

Here are some pics of the tool I used and some pics of what was left of the seal after I mangled the shit out of it. I believe I picked it up at Lowe's or Home Depot.
 

Attachments

  • Tool_3.jpg
    Tool_3.jpg
    106.2 KB · Views: 437
  • Tool_for_Countershaft_Seal_Removal_2.jpg
    Tool_for_Countershaft_Seal_Removal_2.jpg
    184.9 KB · Views: 410
  • Seal_Removed_1.jpg
    Seal_Removed_1.jpg
    212.3 KB · Views: 552
  • Countershaft_Seal_1.jpg
    Countershaft_Seal_1.jpg
    195.4 KB · Views: 471
  • Countershaft_Seal_2.jpg
    Countershaft_Seal_2.jpg
    201.4 KB · Views: 455
It was your engine disassembly video (head removal) that inspired me to tackle my first top end rebuild. I concluded, Hey, I can do that!

Just saving up $$ for the parts I need and am waiting on others like the new pushrod bushing and the new countershaft seal.

Thanks again, I Am Carbon.
 
It's a good idea to wait for the replacement parts before you remove the old ones.
 
Back
Top