Help repairing a damaged swing arm pivot

Port

XS650 Addict
Messages
111
Reaction score
87
Points
28
Location
Atlanta Georgia
i thought it might feel nice to shoot myself in the foot so i went ahead and dropped my swing arm on the concrete while walking in from painting it. The thing landed right on the pivot sleeve and pushed it in. Any hope repairing this or should i replace it? If so how, would you go about it? I dont have a machine shop but i might be able to find someone to help me out if its worth it. I had it off to replace the stock bushings with brass. Im in Atlanta if anyone is near that could help.
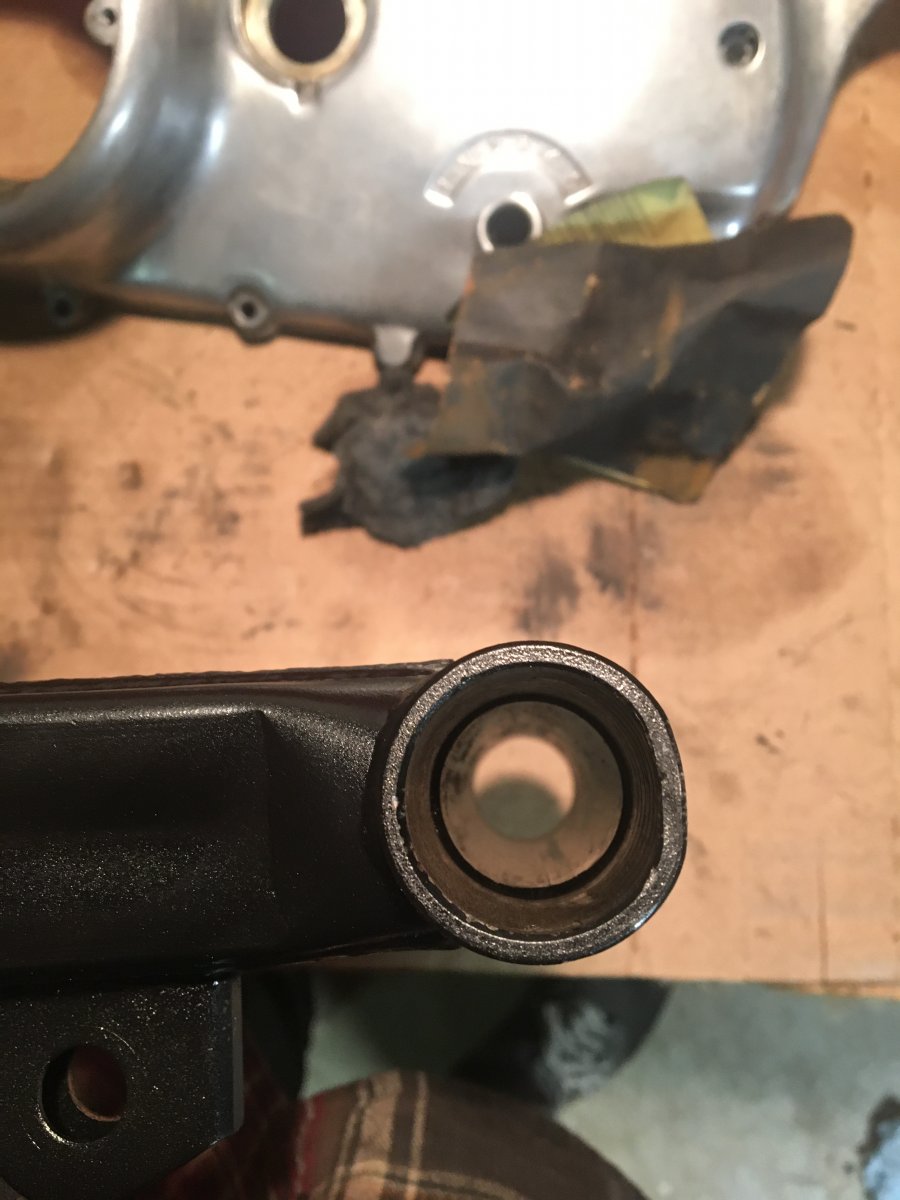
IMG_0768.jpg
 
Last edited:
Never done it to a swingarm, but have done to other tubes..... With the swingarm secured in place. take a deep well socket and a long extension. The closer the socket is to a tight fit the better. Pull the extension into the ding and start tapping the socket. Take your time.... it will eventually work its way out. Finish off any burrs with a single cut half round file....

IMG_20190328_155935.jpg

IMG_20190328_155943.jpg
 
That can be fixed. Best way , hmm ?
You do have the other side for fit comparison.
I'd look for a soft brass or hard wood broom handle (round end) to smack with and put it on a piece of wood and start experimenting how resistant it is to push back.
De burr the bore ID. too
 
Could file the brass bushing on that side to match the dent so it slots into the swing arm as per normal..........As long as the center hole is still center the to the swing arm and chassis the dent won't affect the operation.........as for a visual it is all hidden............

Could end up damaging the swing-arm end more by trying to get it round..........i would leave it and try the above method........even if the filing done ended up being a bit to much there is enough round left in the end to get a good tight fit
 
I would have a machine shop make a plug with the proper OD. Have them put a slight taper on half of it and the other half remains the proper OD. I would heat the area to cherry red that needs to be pused back out and gently tap the tapered plug into the bore until it reaches the straight part of the plug. Keep on tapping until you are satisfied you pushed out the problem area
 
Little more on this, yeah as big a heavy round as you can get in there,1/2 drive impact sockets are good for this. :thumbsup: If you have a lathe; an iron plug would be great. turn a correct diameter on one end, a big as you can fit inside diameter to start with, on the other.
Picture does a pretty good job of showing the true nature of the deformation, it's not just a flat, the circle has become an oval with a flat on one side. Your goal is a true circle that's not bigger than when you started. Why you want to hammer/tap the OUTSIDE only. Be sure to work to the depth of the dent not just the outer edge of the tube. . Now get a nice big hammer, work slowly and methodically on the OUTSIDE of the tube, concentrate on the big arrows then work the smaller ones. With luck after a bit you can get one size larger socket inside the tube, once the flat starts to disappear and the part gets more round. When it starts to get really round, use your brass bushing ONLY to check size and perfect circle. Good luck and post up photo results? :wink2:

swing arm ding.jpg
 
Last edited:
So, i have it rounded back out. I used a couple of sockets and a plain steel hammer. I screwed a 2x4 to my work bench and clamped the swing arm to it so that the dent was hanging off the edge just a bit and facing down. I started with the largest socket i could get in the dented end and moved up with larger sockets as i was able. Ended up only using 3 different sockets. my 3/8 socket actually fit snug just short of the knurling on the undamaged side so when i got close, i taped it in, shown a light from the other side and then tapped around the outside to finish rounding it out as Garry suggested. Im doing to lightly dress the edge with a file and clean out the inside with a brass brush. Then i intend to add the extra grease zerk and press in the brass bushing using a threaded rod and some nuts.

Something i notices is that the ID of the swing arm is ~27.2mm is and the OD of the brass bushings is 28.02mm this seems like a lot of interference. Im not sure how good the ID reading is, i think the brush might knock it down a little bit as there is some over spray from a previous paint job and some staining from rust. Curios what yall think

Thanks for the help


IMG_0771.jpg
IMG_0772.jpg
 
Do both sides of the swingarm measure the same? If so I wouldn't worry to much. Put bushings in a freezer overnight. Warm up the swingarm, work fast and install 1 at a time.
 
Looks great, good work!
I'll try to measure a few, but "too big " aftermarket bushings are more common than they should be..
 
If it is that much interference it's not going to go in unless he has a bigger than average press.:whistle:
Yeah... pretty sure my 20T press would shave that bushing down to 27.2mm right quick... ;)
 
Yeah... pretty sure my 20T press would shave that bushing down to 27.2mm right quick... ;)
First you'd have to put a pretty healthy chamfer on it just to get it started.
 
Last edited:
Adding to the other stupid statements for a solution to fitting an oversized part into an undersized hole
I agree with you Jim but as he said he unsure of the ID.
I really doubt his measurements.So I think we may have been having just a little bit of fun. OK maybe too much.
 
material at about 50 degrees;
5 or 6 removed plastic bushings ran from 28.02 to 28.04mm
TC bros bronze bushings 28.01mm
All balls needle bearing race 28.02mm
Short version is your bushes seem to be the proper size, so a remeasure, comparison of both sides of the swing arm would be a good idea.
Sorry I didn't have any swingarms with the bushings out handy.

From a machinists forum
"Generally .0005-.001 per inch of diam is a good fit for bronze bushings. As said, if you press or shrink a bushing by .003, expect a .003 reduction in ID, as well. If you can heat a 5" bore housing up to about 200F and freeze the bushing, you should have about .006 clearance to slide it in before it binds up. You'll have about four or five seconds before it grabs."

0.001 Inches = 0.0254 Millimeters
so somewhere around .03mm interference would be a "typical fit" in this application, putting the bore at about 27.98mm +-.01mm

Just for fun


:geek:
 
I wasn't home earlier when i mentioned the questionable ID measurement. I went and checked them again and the lowest ID measurement that i got was 27.7mm and the largest bushing OD measurement i got was 28.2mm. That still leaves 0.5mm interference potential. I still have not dressed the ID with a file nor brush so it should still open up slightly. This was with all components around room temp (~65F). I'm using a digital caliper so i can only really measure at the lip of the ID, i don't have a telescoping gauge or anything.

I mocked up a bushing with the threaded rod, some washers and a couple of nuts at room temp. I wasn't able to get the bushing started straight. Hopefully ill be able to get it started with a decent temperature differential then press it home with the rod. If not, i might see if i can find someone who will let me use their press for a couple of minutes.

Thanks for all the help everyone and thanks for those measurements Garry, they've given me some needed confidence.
 
Back
Top