-
Enjoy XS650.com? Consider making a donation to help support the site.
XS650.com receives a small share of sales from some links on this page, but direct donations have a much greater impact on keeping this site going.
You are using an out of date browser. It may not display this or other websites correctly.
You should upgrade or use an alternative browser.
You should upgrade or use an alternative browser.
Jim's 1980 SG Miss September
- Thread starter Jim
- Start date
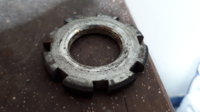
Looks like you're in the moneyThought I had an old Honda K2 headstem on a shelf somewhere and Yes!!!....with not one but 2 headstem nuts!....bingo!
")
TwoManyXS1Bs, do you think I could make one from Aluminum if I cut a 24x1.00mm internal thread, or would the rotor be too tight so the thread strips?
Thank you.
Thank you.
Some of these rotors have been on the bike for it's whole life. Those take some pretty serious "taps" to got em' loose. You'd be lucky to get even 1 use out of it. Most likely the threads would strip just trying to "load" the bolt up.
Yeah - I doubt an aluminium puller of any kind would really do the job.
Big taps....on a similar Honda rotor, I used the rear axle of the bike, same thread, and a 20 lb. mall. After 5 tightenings of the axle and pendulum swings of the mall, the rotor dropped off.
Scott
Scott
I must’ve been lucky. I bought a new puller, and it took no effort at all. Tightened it up a little , tap, tap with a little ball peen hammer on the end of the puller bolt and it just fell right off.
I will say there was no corrosion or rust on this bike. It came from a dry climate.
I will say there was no corrosion or rust on this bike. It came from a dry climate.
motorbikerx
XS650 Addict
I must’ve been lucky. I bought a new puller, and it took no effort at all. Tightened it up a little , tap, tap with a little ball peen hammer on the end of the puller bolt and it just fell right off.
I will say there was no corrosion or rust on this bike. It came from a dry climate.
Thats what I like to hear!
Fingers crossed....
motorbikerx
XS650 Addict
Everything crossed!...rewind man not back from hols toll 23rd so I got time to spray with WD 40 every day and also time to make up a puller from my Honda headstem nuts.Fingers crossed....
23rd is the day my Vic parts supposed to arrive at the dealership too and my tank, fenders etc for it should be painted and flamed by then too.
Right now Im tryna minimise the oil leak and experiment with my total loss riding range.. did 60 kms (35 mile) yesterday and battery topped up in half hour on my cheap charger, my guess is I can go further...totally discharging a batterys not good though.
Got 2 runs on this coming weekend,
At least my local club has a breakdown trailer and theres 240 volt power for charging at our lunch destination .
Releasing tapers usually requires a sharp rap that'll send a ringing-type shockwave thru the metal. If you study some of the oldschool auto suspension parts, you may see a mysterious raised casting bulge near the tapered fitting. This is the 'tap' point. With the pickle-fork jammed in there, applying its spreading force, just 'rap' on that bulge, and the taper releases...
Aahhhh, the pickle fork. There’s a term I haven’t heard in a good long while.
Fork seal removal.
I put this up on another thread, so I figured I might as well add it to the SG build... To be honest, I been doin' seals this way all my life, never gave it much thought...
I made these years ago, ,but I'll put some dimensions up here in a sec. Soon as I measure 'em.
They're cut from 1"X1"X1/8" mild angle. Cut 2 pieces about 1-1/4" long and drill a 5/16" hole through the center of 'em. Bolt 'em together with a 1/4" bolt and round 'em off with a disk sander, grinder...whatever, so they look like this......


With 'em still bolted together, weld a 3/8' nut to the bottom on one angle only. You now have a tool that makes removing fork seals a piece of cake.To use them, remove the snap ring and washer from the seal and take an Exacto knife and cut the rubber from the lower part of the seal. Two reasons for this.... one, ya gotta' make room for the angles and two.... the more rubber you remove, the less "bounce" you'll get when using this tool. The rubber absorbs the impact instead of directing it to the metal frame of the seal. So, the more rubber removed, the easier it is to pop the seal out. The rubber's pretty soft. It only takes about 30 sec. to cut it out...


Once the rubber is out of the way, insert the angle with the nut welded on and work it into the correct position. Work the other angle into place beside it and bolt it together with the 1/4" bolt....


Turn your lower upside down and insert a steel rod (3/8" or thereabouts) until you feel it settle into the 3/8' nut welded to the bottom of the angle...

If you have a soft jaw vise, clamp the top of the lower in it. If you don't have a soft jaw vise.... make one dammit... they're invaluable.
.... if you don't have a soft jaw vice, support the top (upside down) on a couple pieces of wood...

Let it rest on the dust seal shoulder. Don't over-tighten!!! The lowers are cast aluminum. If you try hard enough, you can turn it into an oval shaped boat anchor. Just snug it up so it don't move around... 'nuf said. Take your BFH and give the steel rod a forceful smack... like you mean it. A couple of those and the seal will pop right out.

I been doin' it this way all my life and in all that time... I ain't never damaged a lower. Imagine my dismay when I popped out the left seal and saw this...

Yup.... some hack has been here before me.
I put this up on another thread, so I figured I might as well add it to the SG build... To be honest, I been doin' seals this way all my life, never gave it much thought...
I made these years ago, ,but I'll put some dimensions up here in a sec. Soon as I measure 'em.
They're cut from 1"X1"X1/8" mild angle. Cut 2 pieces about 1-1/4" long and drill a 5/16" hole through the center of 'em. Bolt 'em together with a 1/4" bolt and round 'em off with a disk sander, grinder...whatever, so they look like this......
With 'em still bolted together, weld a 3/8' nut to the bottom on one angle only. You now have a tool that makes removing fork seals a piece of cake.To use them, remove the snap ring and washer from the seal and take an Exacto knife and cut the rubber from the lower part of the seal. Two reasons for this.... one, ya gotta' make room for the angles and two.... the more rubber you remove, the less "bounce" you'll get when using this tool. The rubber absorbs the impact instead of directing it to the metal frame of the seal. So, the more rubber removed, the easier it is to pop the seal out. The rubber's pretty soft. It only takes about 30 sec. to cut it out...
Once the rubber is out of the way, insert the angle with the nut welded on and work it into the correct position. Work the other angle into place beside it and bolt it together with the 1/4" bolt....
Turn your lower upside down and insert a steel rod (3/8" or thereabouts) until you feel it settle into the 3/8' nut welded to the bottom of the angle...
If you have a soft jaw vise, clamp the top of the lower in it. If you don't have a soft jaw vise.... make one dammit... they're invaluable.
.... if you don't have a soft jaw vice, support the top (upside down) on a couple pieces of wood...
Let it rest on the dust seal shoulder. Don't over-tighten!!! The lowers are cast aluminum. If you try hard enough, you can turn it into an oval shaped boat anchor. Just snug it up so it don't move around... 'nuf said. Take your BFH and give the steel rod a forceful smack... like you mean it. A couple of those and the seal will pop right out.
I been doin' it this way all my life and in all that time... I ain't never damaged a lower. Imagine my dismay when I popped out the left seal and saw this...
Yup.... some hack has been here before me.
Last edited:
My custom made seal removal tool, a 16 penny nail clamped in a pair of vice grips. I cut the rubber out of the seal as Jim describes above. I hook the head of the nail under the metal part of the seal and tap on the sweet spot of the vice grips with a hammer. Working around the diameter of the seal. Works great on small seals with no place to pry, avoid prying anyways.
Scott

Scott
I like it Scott - simple, cheap and effective! 
Thank you Pete, my middle name is "Cheap Ass SOB".
Had a great day in the shop. Replaced 9 florescent light bulbs, changed the oil in the compressor, set up a new welder. Can't wait till the next warm days (above 30F), or when I get the furnace plumbed up for propane, which ever comes first.
Scott
Had a great day in the shop. Replaced 9 florescent light bulbs, changed the oil in the compressor, set up a new welder. Can't wait till the next warm days (above 30F), or when I get the furnace plumbed up for propane, which ever comes first.
Scott
That's a great write up Jim! I like your idea! 
Thank you Pete, my middle name is "Cheap Ass SOB".
.....oddly, that is also MY middle name!!!
I love my hobbies and pastimes, but funds are not unlimited and besides, I get huge satisfaction from making something out of nothing. Right now I’m trying to resurrect a cheapo little clock in wifey’s sewing room. Turns out the old button cell was corroded and dead - but the clock still works, so I spent 20 minutes cleaning out the corrosion and will buy a new button cell tomorrow. In the fall I rebuilt a cheap Chinoise fan for Daughter #2 who had dropped it and smashed the switch.
I find the time and effort spent on those tasks really enjoyable and MUCH more satisfying than simply buying a new clock or fan. I guess in the old days I would have been a blacksmith.
Pete
Thanks Bob.
Similar threads
- Replies
- 30
- Views
- 2K