My engine rebuild from scratch!!

Thanks for the ind words Anlaf! And yes, I will put your mind at ease! It was at 12' o clock when the bearings were on! Thanks for the concern!

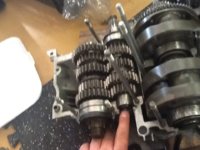
You can see in the pic below where the dimple is, it is aligned WITH the bearings in place. Seems a bit out, but thats just the angle of the shot, my camera didn't know where to focus!
 
Hi just wanted to thank you for your pic's on the rebuild great job. I am still waiting to buy parts for mine but after looking at your thread I thought it would be a good ideal to start piecing mine to gether as I looked at your thread and I think i am missing something on the trans. could you tell me what it is and where to find one maybe
 

Attachments

  • image.jpg
    image.jpg
    238 KB · Views: 375
Okay thanks it might be with the clutch then i do have the bearing and i did find a short pushrod about 4" or so bot i thought his looked like it went all the way through thank you for the reply i wish i would have been the one to have torn the motor down
 
Okay thanks it might be with the clutch then i do have the bearing and i did find a short pushrod about 4" or so bot i thought his looked like it went all the way through thank you for the reply i wish i would have been the one to have torn the motor down

there is a 2 piece rod setup too it has outer rod steel, ball, aluminum rod, ball.
The single rod is the link I gave You It is like a upgrade I guess
 
Frankenbob, I looked and looked a the pic you posted - how did you manage to get it mirrored like that?

The rightside you're pointing to is actually the left side, and that is where the clutch pushrod sits, with its ball bearings. They tend to fall out when rebuilding or just tinkering.

Anlaf
 
Frankenbob, I looked and looked a the pic you posted - how did you manage to get it mirrored like that?

The rightside you're pointing to is actually the left side, and that is where the clutch pushrod sits, with its ball bearings. They tend to fall out when rebuilding or just tinkering.

Anlaf

I think we are looking at the gears sitting in the top engine case.
 
Hi just wanted to thank you for your pic's on the rebuild great job. I am still waiting to buy parts for mine but after looking at your thread I thought it would be a good ideal to start piecing mine to gether as I looked at your thread and I think i am missing something on the trans. could you tell me what it is and where to find one maybe

Thanks Frankenbob! The part you are missing is as I am Carbon is saying. I went for the one piece pushrod because I don't like fidgeting. Also seems like you are missing the oil seal there as well?

logged on to subscribe. great documentation and pics.

Thank you sir!!:thumbsup:

what did you use to clean your mating surfaces and the inside of your case?

Nozila, I got my whole case wet blasted. After that I did a THOROUGH clean with a steam cleaner, followed by washing the cases with hot water and dishwashing soap, twice. Then I rinsed it all AGAIN with more hot water(don't tell the missus, this was all done in the bath!! I used the shower head to get into all the channels and holes). You will be amazed at how much sand is still in there after the first wash!

I then used a stanley blade and carefully went over all the mating surfaces to ensure there is no leftover gasket on them. Just before closing the halves, I used paper towel to rub off all the crud and crap that came on there while putting the internals in. Keep doing it until they are clean and no dirt marks on them. Then I took cotton ear buds and white spirit(use any degreaser here) and went over all the mating surfaces, let it evaporate before putting on the gaskets. HOPEFULLY this will do the job!
 
Lacquer thinner works well for cleaning the gasket surfaces. In particular, it will melt away and thoroughly remove any traces of the old original Yamabond. Also, it dries quickly and leaves no residue. It's my "go to" stuff for the final wipe down before assembly.
 
Yes it is upside down in the top case I am not ready to rebuild yet I have to buy all new seals n gaskets ect when I got the motor it was a box of parts n when I saw this thread it is just what I needed so I thought I would practice n put it together following this thread I did find both push rods n balls I just had to dig through the boxes it will be hard but I have been trying to I.D. All parts n lable them thanks guys
 
There are some that throw stuff into boxes, and some that put stuff in bags and label... it is probably best to bag and label until you know the parts. If you get stuck, take a pic, post it, and someone will ID it.

Anlaf
 
Back to write ups!!

Next step is the breather: Clean all mating surfaces, add gasket, and bolt it onto the engine.

9988555313_c35b79aa10_b.jpg


Pretty straightforward as well is the chain tensioner. Loads of different ones, so refer to your builders manual

9988432564_1614c96e51_b.jpg


Electric starter cover is next. I have removed all innards here as I am going kick only.

Clean, add gasket, torque to spec

9988428354_7b77361d7d_b.jpg


Oil feeder tube next. Make sure the bowl and socket where the bottom part fits in is super clean and no dirt or anything is in there. Add a brass washer, and CAREFULLY torque to spec, these tend to break I have read if you do them up too tight!!

10008217225_8242a57569_b.jpg


10008309423_9f91a48776_b.jpg


Add the banjo bolts on top with copper washers either side of the fitting. Check the hole in the bolt is centered and then again CAREFULLY torque to spec. If the hole is not centered, get another one, it will break!

10008173694_d5869cd0b9_b.jpg
 
Back
Top