On the road again at 40.............the bike that is..........PART DEUX

Sprayed a few cars and bikes with imron clear top coat in a small garage in winter. Within a few years my lungs mostly recovered. Met a mechanic that retired on full disability when he was in a truck shop where a truck was Imron painted. He could only walk a few steps at a time, his lungs were shot. Wouldn't use it again without a positive pressure breathing system. Not that I'm likely to do much serious painting, I pay pros for that anymore. :shrug:
 
Is it a curse or a blessing to have 2 projects on the go at the same time? Sometimes both…..lol.

But for me right now a blessing I guess. I've got something I can work on. While I'm waiting to get my 77’s engine back together in the spring I can play around with cleaning up some bits on my 78.

I decided to tackle the rims and rear wheel parts as a good winter project and get what will likely be the toughest part of the restoration and clean up on this bike over with. Next to detailing the engine IN the bike that is..

Started this process the week before Christmas, finished today……..whew!

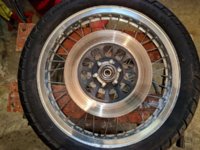
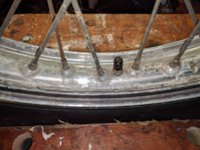
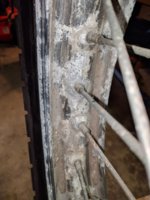
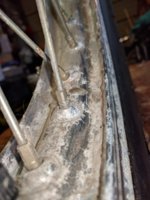
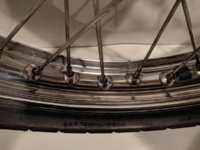
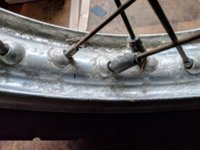
Here’s some pics of the front rim that show how badly they were corroded and pitted after sitting for 12 years in our humid climate. Wasn’t sure what I could do as these were in far worse shape than the rims on my 77, but hoped I could clean them up a bit and save them.

Posted IMG_20171218_145557.jpg Posted IMG_20171218_145716.jpg Posted IMG_20171218_145734.jpg Posted IMG_20171218_145745.jpg

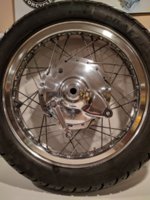
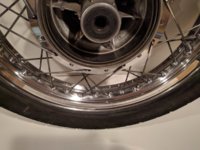
And some pics finished……

IMG_20180122_211234.jpg


IMG_20180122_210752.jpg IMG_20180122_211245.jpg

Found that ½” dia. foam caulking rope/backer rod works great to make sanding blocks to fit in the gutters and conforms to the profile of the outer edge of the rim. Makes it a lot easier on the fingers too.

IMG_20171227_171922.jpg


Also found sanding between the spokes is a bit of a challenge, so carried on with the hot glue gun popsicle stick theme and these worked great.

IMG_20171226_163147.jpg IMG_20171226_173520.jpg

Didn’t have the spokes on hand to relace so once I got started I just kept going. Next set I do I will be learning how to relace rims! :yikes:

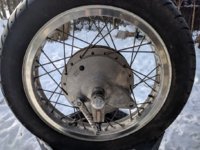
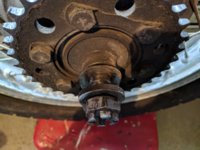
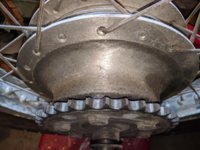
Rear Wheel before…..

Posted IMG_20171230_123301.jpg Posted IMG_20171230_133447.jpg Posted IMG_20171230_133526.jpg Posted IMG_20171230_134000.jpg

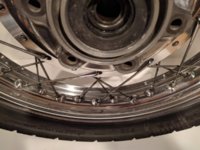
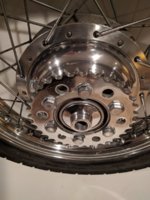
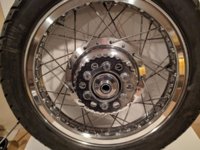
After…..


IMG_20180122_201553.jpg


IMG_20180122_201522.jpg IMG_20180122_200514.jpg IMG_20180122_200642.jpg IMG_20180122_203512.jpg IMG_20180122_203455.jpg

When doing this polishing work the question always is where do you stop. On my 77 I tried to bring things back to what I think the level the factory finish would have been. On this one for some reason I seem to be going past that. I guess something to do to pass a long winter. I will say however that it is interesting to see how far we can take the process.

I know I’ve added to the maintenance schedule on these by going this far but what the heck. A little touch up polishing here and there throughout the riding season will keep them looking good.

Man, I’m sure glad this job’s done.
I think I’ll go rebuild a Master Cylinder, or Caliper, or some carbs, or maybe paint up some bits.

Anything but polishing!
 
The Prince of Polishing is at it again !
Robin, you have turned some ugly ducklings into gleaming Jewels.
The number of hours you put in to these wheels, with all of the extensive hand-and-finger repetitive work,
as well as ten kilos of tenacity, is truly impressive.
Seems clear to me, once again, that you love to restore vintage beauty.

Congratulations on another successful Master Class.

,
 
Lol. Thanks gggGary. Sure why not. Wanted to see what I could do with it. Figured it will shine for a mile or two until it's covered with chain fling.......:eek:
 
Jesus I'm a pain;
Have you had the tires off? I have run into alloy rims that were beyond saving, too much corrosion, structural integrity in question.
 
No not a pain gggGary. Good question.

No I haven't. Never considered that. I'm getting new tires so will have a look before I order.
Thanks for bringing this up.
 
Thank you Daniel. Well, I'm in no rush with it so I'll keep cleaning over the winter, fix up some stuff, then do some painting.
 
I think your rims will be fine as far as the structural integrity goes. I think the majority of the nasty looks was due to the failing clear coat. Great tips on the sanding aids, I'm going to try them. And just how fine did you sand to before buffing? 400? 600? Wet or dry?

When I have the tire off, I clean up the inside of the rim. It's not a polishing job, just a cleaning of the corrosion and old rubber bits from past tires. I use a 3M rust/paint removal disc in a drill. It's a coarse Scotch-brite wheel with a mandrel on it. They're available at Walmart .....

full


You've done a wonderful job bringing those parts back. The hardest part is done. The maintenance really is nothing compared to the initial work needed. Mine usually require a couple quick hand polishes a season. They get a more in depth polish when a wheel is off for a tire change. It's easier to get at everything then.

As Gary mentioned, some of the items you polished may not hold up well. Things like the sprocket and the wheel spacers are just cad plated. That's a very thin coating and polishing is usually enough to remove it. Yes, they shine up nice, but I don't think they'll stay like that. The spokes are the same way. If you do eventually replace them, spend the extra and get stainless spokes. New cad ones will only look good for a few years before they start to degrade.
 
Robin emerges from his basement in the spring after polishing parts all winter and realizes his shirts don’t fit anymore.
56F0BB1F-F521-4163-A1EB-635B5DD569B4.jpeg

Haha! All I can say is WOW! You can do more with sweat equity and determination than anyone I know! Truly impressive! You really saved those rims!
 
WOW! Those are some impressive before/after pics. Great job! I often have grand ambitions for polishing rims, but after about an hour and extremely sore fingers from getting pinched in the spokes...I tend to call it "good". Ha ha. Your custom sanding tools are really clever...I will definitely try those out. Thanks for sharing and good luck getting everything else on your bike to look have as nice. :)
 
Thanks 5twins! I appreciate it.

I think your rims will be fine as far as the structural integrity goes.
Here's hoping. I'm sure happy gggGary asked though. Now I will look really close and if unsure will get a second opinion.
I will clean up the inside as you've shown, great idea.
Worse comes to worse I'll get some new rims and stainless spokes and lace them to these hubs. Probably would be cheaper than buying used wheels in good shape.

Then I'd be left with a couple of shiny round picture frames for some garage art!
When life gives you lemons………..

Ya, those cad parts will probably corrode quickly now and end up as they were pretty fast. I haven't had a good look at the chain yet but I think I will replace it, the sprocket and the locking tabs anyways. There's not a lot of miles on this bike, but who knows how well that chain was maintained and it's probably the original now 40 years old.

Here is my finishing schedule. As you have mentioned in other threads, it is the Black Emery bar that is the biggest improvement and it probably makes sense to just quit there as maintaining them tends to continue to improve them as well.
That being said though, I could see improvement with each finer grade of compound. Noticeable up close, but likely not so much from a few feet away.
So we each need to decide how much time we want to invest.

Step 1 - Strip Clear Coat - I just used a gel paint stripper
Step 2 - Brass Wire Wheel - I tried cleaning the remaining pitting and corrosion up with a Nylox wheel, but it barely touched it so I resorted to a brass wire wheel in a cordless drill. The rear wheel wasn't as bad so I decided to try the Nylox again. It wasn’t as aggressive as the brass wire wheel and I saved some time cleaning up afterwards.
Step 3 - Hand sand with 180 grit emery cloth, 120 grit sandpaper, fine emery cloth. Used different grits dependant upon how aggressive I needed to be in different spots. This was the most time consuming step by far. Was able to go right to Step 4 - 240 grit on the rear.
Step 4 - Hand sand with 240 grit wet/dry - rinsed and soaked in water
Step 5 - Hand sand with 400 grit wet/dry - rinsed and soaked in water
Step 6 - Hand sand with 600 grit wet/dry - rinsed and soaked in water

Could have quit here and just finished up with some lubricated 0000 steel wool as this was already a huge improvement, but I wanted to see how far I could go.

Step 7 - Black Emery bar on a cloth wheel in a cordless drill. Started with Black Emery bar on a sisal wheel then switched to a cloth wheel to reduce scratching.
Step 8 - White Diamond bar on a cloth wheel in a cordless drill
Step 9 - Red Rouge bar on a cloth wheel in a cordless drill
Step 10- Green Polishing bar on a cloth wheel on outside rim edges only in a cordless drill
Step 11 - Final buff/polish with Autosol

Thanks for all the comments guys!
 
Last edited:
Thanks Bob! ROTFL

I've said it before, I'll say it again......I Yam what I Yam!
 
Back
Top