So git 'er Done

I've got a problem. Wake up America.

IMG_2387.JPG

The new main jets look fine. (I did have a slight episode when I saw the "flats" on what I thought was the main jet.)

But the other jets are surely wrong?

This is what I ordered. Has the supplier screwed up or have I?

IMG_2388.JPG


N424 - 25B and then the size … 038

I've searched the EX500 thread and its mentioned a couple of times.

Have I got the wrong jet out? I can't see anything else brass with a slot.
 

Its taken me a while to get around to screwing the in jets in and re-mount the carbs. (Work and life keeps getting in the way.) It fired right up, although I'll need some sort of choke mechanism.

I've not checked the valve lash? We say tappets. Or the cam chain adjustment. It sounds little rattley in the video, but the exhaust is pretty quiet and I was in the garage (sound bouncing off the walls) so I'm not overly concerned. Unless you guys are?

It seems pretty willing to tick over and I haven't checked the balance or the air screws yet. I have 38, 138 and JJJ needles.
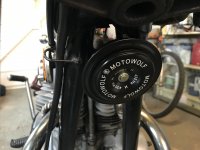
I'm going to have the tank off again and sort out all the things now hanging in mid air, not routed or tie wrapped down. The clutch is OKish to pull but I can see how it could be routed better. The air horns were broken and are now on my bench. I've got a replacement horn from China ready to go on. The PO kindly left the bolts on the bottom of the frame but they look rusted in. Ho hum. The two leads for the front brake light are hanging in mid air. You'll spot that there's no neutral light showing. I managed to pull the over-short wire off the switch after repeatedly fitting and re-fitting the carbs.

When I was reassembling the brake calliper there were two anti-squeal? shims. The more I lie in bed thinking about it the more I'm convinced I've fitted them wrongly. So I'll check. I need to check that I've fitted cups at the bottom of the forks properly when I refitted the wheel after a new tyre. There was a thread about it recently and it told me some stuff I didn't know. (The studs versus and allen bolts thread.)

After that a check that I haven't left anything finger tight and a try out down the lane. Clocks go on next week so I'll be coming home in the dark. Bugger.

Thanks for all the encouragement everyone. :)
 
Last edited:
She sounds very nice Dave - and boy, she starts right up!

The only real way to check the tappets is to check them (always done cold) with a feeler gauge. As for the timing chain, what I’ve been told is to remove the chain adjuster cover and run the bike at idle while observing the little plunger inside the adjuster screw.

Adjust the screw (10mm wrench I think) until the plunger juuuuussstt stops oscillating - and you’re done.

Well done!

Pete
 
Cheers @MaxPete. It was nice of to take time to encourage me.
@gggGary , @Jimbo W , @JimD54 , @59Tebo and @TwoManyXS1Bs all commented or liked.

and there early in the thread was Weekendrider. I didn't say anything about Dan earlier because I didn't know him. You all did. My loss.

She sounds very nice Dave - and boy, she starts right up!
Pete

To be fair she was nice and warm. The castellated washer is from the taps I rebuilt twice.
 
Its raining here and although I knew I wasn't keen in working in the garage I knew I certainly wasn't going shopping.

"Nah, I can't. I'm going in the garage."

So I've done a little tidying of my wiring.

IMG_2461.JPG

I was going to ask on the forum what this was and was it needed, but I see from an old post that No, it isn't.

I'd idly stripped off the worn layer of wrapping from the loom as I thought it wasn't original and wanted to tidy it up. I see now that it probably was original just a bit worn and messy (adhesive-free plastic wrapping?).

See post http://www.xs650.com/threads/trouble-identifying-new-harness.19521/

IMG_2466.JPG

There were loads of wires which were kinked and doubled back on themselves. So I straightened them out as best I could. This was the least worst of them.

IMG_2465.JPG

This one was actually welded, I hope not by heat. I've not pulled it apart and it goes to the flasher assembly. Its been like that for forty years so it'll stay as it is. If the flashers go off at least I'll know where to start.

IMG_2469.JPG

This is the end result. Not much, mostly unplugging and re-routing and a few cable ties and some crimping and new connectors. (Must practice my crimping. I'm pants at it.)

Oh, and the clutch cable now goes between the carburettors and lower down. Its feels a little smoother but I'm having it off to clean and oil as it doesn't exactly feel slick when there's no load on it.
 
Last edited:
Looks good - but how does it sound Dave?

As I've said elsewhere, I would going for the OUT OF CONTROL / AIRBRAKES FAILED CONCRETE MIXER COMIN' AT YOU type of sound rather than the wimpy little "excuse me" ...put out by the stock meep-meeper.
 
IMG_2470.JPG

My next wiring task is to do something about this.

It starts off with stock (red) wire, goes via thicker pink, fuse, then another bit of non-stock? pink. Finally finishes with some fabric covered stuff. Four different cable lengths, two crimps and a fuse box of unknown condition. It also hangs down. Where the fabric covered cable is the crimp feels like it is about to snap.
 
YUK!

I would strongly recommend replacing that inline "glass" type fuse holder with a modern blade fuse and holder. They are MUCH more robust and way easier to find on a dark and stormy night in UpperRubberBootville.
 
Your bike originally only had that one main fuse, although it was done a bit more "elegantly", lol. Adding a 4 fuse block will take some wiring changes and studying of later diagrams to see how they wired them in.

For cam chain adjusting while idling, you want the plunger to move in and out just slightly. If it doesn't move at all, you've set it too tight. You can tighten the adjuster down until the movement stops, just be sure you then back it off a little so some in-out movement returns. This is by far the easiest and most fool-proof way to set the cam chain tension. Using the "static" method with the engine off, like the manuals instruct, is very easy to screw up.
 
Re. tappet clearance, it's good idea to compare the reading you get from a feeler gauge with the reading from a dial indicator and note any difference as a correction factor. The tips of the valve stems cup with wear. The feeler gauge will read the edges of the cup, not the true clearance to contact.
 
Back
Top