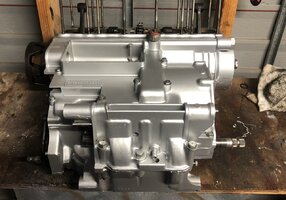
Cb750k0 - any interest?

Probably the most difficult motor I’ve ever had to clean.

I don’t think Mr. Honda thought about having to clean between the fins inside the cylinder head. Absolute pain. But getting there. Lots of wire bottle brushes, and soaking in some witches brew. I think when I take it out in the morning I’ll call it good.

6D8CD18D-5DCF-42F7-9055-D441AFDDF3C2.jpeg

29D6B415-5AF7-4AE8-80A9-D851892FF2CC.jpeg


D5B54ADD-4010-4F01-99C9-444A68130CE9.jpeg
83CC6277-4310-4F87-8209-1398125E8391.jpeg


And 4 rounds through the ultrasonic with lots of picking and prodding at the oil passages in the pistons. They were baked shut with oil. All my force with a pick did nothing to open them up. A first.

905B9F85-88BF-4BC2-A264-4FA062A0BA2B.jpeg


And a little scrubbing of the cases before I start to pull em apart to replace the primary, cam chain and tensioners.

66C1CEDE-5A88-48F1-B84B-3B494DB94E48.jpeg


Once I get em apart, I’ll clean em some more, then repaint.

- got rings, gaskets, seals, tensioners and chains on order.
 
well a complete tear down for (1) 10mm bolt haha.

74A97285-8AEC-401D-98F0-73B705490021.jpeg
4F6284F3-75F4-46E1-B927-A081FD4A3E2B.jpeg


1F218BDF-1CDE-442C-BC43-8D7580B7CF79.jpeg

A0EEC647-C163-4304-B63C-9CE2049D2342.jpeg

68060F57-59CE-442C-846F-6F6CFEF40020.jpeg
Still waiting on parts but the inside of the motor looks good. Bearings are good, no chipped gears, nothing floating inside.

Only hick up was a stripped screw that had to be drilled out, but if I had to pick any bolt in the motor to have to drill out, this one would probably have been it.

F070D796-C296-4EDA-ABE7-A663C6B30859.jpeg

60EE0CF9-8AE0-46E6-A55D-4FA61F276BBE.jpeg


Honed my cylinders and now just waiting for parts to arrive so I can get it all back together.


66E20EBE-4EE1-410C-A635-19856A8289AF.jpeg
061F13CC-FDF9-496F-A1CC-2C3FE929B177.jpeg
 
Parts arrived! All of em at once! And a few days early!

3262A345-2205-4EF3-BB3B-FE9398E0816D.jpeg


5679BE92-8E55-4E43-9FE7-0980D75B3DE9.jpeg
F9B8AD94-51A6-4A27-BBE6-8F7E526108E0.jpeg


I was a little hesitant ordering a few “kits” (they sell package deals of chains, tensioners and rollers) from CMS as they did not say who made the parts and the prices were very good. I took a chance as they usually only sell quality parts and was very surprised when everything was genuine Honda.

I got my cases all cleaned and prepped for paint. I used a steamer flush all the nooks and crannies after scrubbing and it worked pretty well. I use it at work every once and a while.

3A29056C-BC49-4DC6-B816-07F5D42A6029.jpeg


Then I started assembling my cylinder head to test for any leaks. All seemed well so hopefully start getting cases painted tomorrow and maybe start assembling.

7BB291C5-E66E-45A9-B9AF-A91232DCC407.jpeg


216BD1ED-2514-4DFB-8472-4BFC363F2921.jpeg
EB7CB3BC-5004-4408-AFF1-F9A3B3CB3457.jpeg


Left em for about an hour and didn’t loose any fluid.
 
Is that paint method a tested lasting durable one.
I have a set XS650 cases that needs attention

I’d imagine the duplicolor works just as good as any other high temp engine paint. Once it takes a few heat cycles it should stick pretty good.

I shoot 2k clear over because I was it bullet proof when it comes to gas and oil.

I’ve painted 4 motors with 2k paints and they all have held up nicely.

I think it makes em a little easier to clean too, but that’s just me.
 
Got all my rings gapped and got the top end together.

E0E84995-6B84-4868-8511-C019A78B389A.jpeg


Got the head all the way back on an torqued down, then went to install these internal screws and wouldn’t you know, just screwing it in like normal and all the sudden it’s super easy to trust the driver, just snapped the head. Bummer!!

5C95587F-4FBC-4567-AD73-8BCF0ED20931.jpeg


I seriously debated just leaving as is but instead, I left it all buttoned up for a few hours until the hondabond on the base gasket could set up. My worry was that if I took the head back off, I’d disturb the base gasket and have to start the top end all over again.

Well once dry, loosened the head and just have it a little pry and tap. Popped right up and didn’t mess with the base gasket at all.

Snapped screw came right out. Got lucky.

Chased the threads and put the head back on and torqued it back down.

All good.

4098B9A3-B338-4097-8B2F-3674400516F8.jpeg
A205B81E-7A90-4129-8315-56AB97186786.jpeg

1060008F-23D1-413B-BEDA-069689704977.jpeg
 
There is always something that goes wrong .. at least for me ..
How do you enter the Pistons and Rings into the bores .. do you use ring compressors
the outermost both at the same time or slanting the block a little ?
Any wooden blocks as distance or so
 
I put blocks under the center two pistons and did those ones first.

I just did them like all the others I’ve done, one ring at a time with popsicle sticks to depress the rings.

It’s slow but I’ve never had any issues.

I put the base gasket on dry, put the barrels on, then propped it up a bit to use a small paint brush to get Hondabond on both sides of the base gasket.

I spent about a week scouring the interweb for definitive answers as to exactly which size orings need to be used because if you use the stock size, your motor will absolutely leak. The head and base gaskets that came oem were thinner than what’s available today.

I ultimately never found a definitive answer. Did some math based on my gasket thickness compared to oem and went from there.

There are also additional orings that one can choose to use around all the stud holes for the head gasket because the heads were changed later in production, as well as the gaskets and the later gaskets are all that’s made anymore.

A lot of research for some orings let me tell ya haha.

I really don’t want this thing to leak because if the head leaks it’s gotta come out of the bike to do any sort of work to it. Even retorquing.
 
That’s too bad about that broken screw, but glad you were able to fix it without too much hassle. 👍🏻

The fact it didn’t really have any resistance and still snapped off, I suppose it’s good it did now putting it back together as I’m sure it would have broke soon anyways and then well… possibly a head leak and the motor back out.

Got lucky it broke now.
 
Got all my rings gapped and got the top end together.

View attachment 219214

Got the head all the way back on an torqued down, then went to install these internal screws and wouldn’t you know, just screwing it in like normal and all the sudden it’s super easy to trust the driver, just snapped the head. Bummer!!

View attachment 219213

I seriously debated just leaving as is but instead, I left it all buttoned up for a few hours until the hondabond on the base gasket could set up. My worry was that if I took the head back off, I’d disturb the base gasket and have to start the top end all over again.

Well once dry, loosened the head and just have it a little pry and tap. Popped right up and didn’t mess with the base gasket at all.

Snapped screw came right out. Got lucky.

Chased the threads and put the head back on and torqued it back down.

All good.

View attachment 219216View attachment 219217
View attachment 219219
Nice work Wideawake; love these engines.
 
The fact it didn’t really have any resistance and still snapped off, I suppose it’s good it did now putting it back together as I’m sure it would have broke soon anyways and then well… possibly a head leak and the motor back out.

Got lucky it broke now.
Hahahaha been there done that
You tighten and no response ..You continue tighten still no response it gets softer and it gets softer and there you go the threads came out or the bolt broke.
That is a major reason vehicles that has not been worked on are commanding higher prices.

Every bolt tightened with a 4 ft extension and Silicone by the Multiple Pounds Inside .. And parts no longer available or parts into the 4 digits in US Dollar to buy a piece..
A lemon .as the say about cars. Sold off as parts 3 years later ..
 
rocker baskets in, cams in, rockers on, timed, gapped and ready to go!

Fought me a bit on the baskets, all the threads had been previous drilled and inserts ran in em which is apparently quite common but they all gave up the ghost and one by one pulled out and crumbled as I tried to tighten everything down. So it came back apart and new inserts went in. All good to go.


2262C789-9883-44FC-8212-1997C4AB56A0.jpeg
9EF17B3A-75C3-423C-A142-3F7C7E32B88A.jpeg
E8028A40-B1F5-4E5C-94B7-EF3B69CA4F6B.jpeg


Some of my rockers had a little bit of damage so I tracked down some good used ones and they all seemed to polish up nicely.

C22C23BC-52E0-4064-97B5-31F2B1DD96AD.jpeg


1DAE438C-839B-43F2-B600-40918D6DD58A.jpeg
6C3B056D-A954-484C-9693-CE863D7A7A1C.jpeg
000917E7-ECC9-4FB3-AE6C-9395B7BD2860.jpeg


Also, got a few more bits and bobs polished up.

I know there are some folks here who enjoy the sadistic nature of cleaning and polishing. I am not one of those individuals haha. I’ve flung enough parts across the room on the polishing wheel to satisfy myself till the end of my days but I’m sure I’ll have to polish some more parts before then.

78B95547-DD88-44C9-B1C5-FB6A60947DD3.jpeg


I am not sure how I’m gonna get this back in the bike, but I’ll figure that out when I can get a helping hand over to aid in the lifting.
 
Back
Top