I fixed this a few weeks ago and never wrote it up, so I thought I’d do it now. My tachometer used to be very smooth, then it started wavering a bit, then really jumping, then finally it stuck and wouldn’t return to zero.
This was a slow progression over several months time.
Time to fix it then. Honestly I hate to have to do this.
The process is hard on the tach. This was meant to be a sealed unit, it wasn’t built to be opened, you have to pry and bend and stretch it open. Metal distorts and stretches and fatigues, it never looks or fits quite like it did originally.

I don’t know.....you think this looks like a problem? My needle hanging up, the needle is not touching the dial face, the problem is internal.

I put a reference mark with a marker, unsure if orientation would be an issue later.

Also, I can’t stress enough how important it is to take reference photos for later when you go to reassemble these parts, for me anyways , I use them constantly.
Here’s the first indication of the problem I’m dealing with, see all of the brass filings?


The upper needle assembly has somehow dropped down and is making contact with the brass bushing that it spins in. Contact right here,

In this image , I have turned it upside down so you can see how much play is in there, you can see how that gap opened up.

Here is a super short video showing how that bushing has wallowed out.
To take the assembly apart you must take a sharp chisel or a screwdriver and carefully drive these four staked edges back.

Then you can carefully pry the two halves apart.

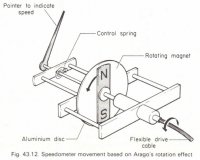
In the photo below, you can kinda get an idea how this thing works. The cable spins that cup in the lower part of the housing. Inside that cup is a strong magnet , the magnet has space all the way around, it does not touch the cup. The upper assembly , that turns the needle also has a cup, that drops down into that space between the magnet and the outer steel cup. The upper assembly and the lower assembly do not touch each other. And here is the part I don’t understand, the cup in the upper assembly is aluminum, how is that driven by magnetism?

When I first pulled it apart, I could see that there was gummy, oily residue and dirt on all the surfaces,

Here you can see , at the center, the brass staked surface that was rubbing on that bushing and creating the brass filings.

And here I’ve removed for cleaning, the culprit, this super tiny brass bushing has worn out and allowed the whole upper assembly to drop down until it made contact.

What I believe happened was just a cascade of events, over time any grease that had been in there has dried out, add a little dust and suddenly it started grinding open, that small hole that the shaft spins in.
The whole assembly then started wobbling and then things quickly accelerated.
At first, I was thinking that maybe if I cleaned everything up really well and greased the contact points, that I could get a few more years outa this. I did exactly that. Here I made a little video of me testing the reassembled parts. Nothing has been done except clean and grease and put it back together.
In the end, I rejected this idea, because the root problem was not addressed. It would work , only as long as the grease held up.
At this point my repair stalled out.
My tach sat on my bench for a couple of weeks, while I tried to figure out how to repair this. 2M has the most experience with these old tachs, So I went to see The Oracle !
Steve recommended replacing that little brass bushing, but how? He said it could be done by a hobby machinist, he even offered to do it. ( He really is the best ! ). But I had been reading a lot and found someone here ( I’m sorry I forgot who ) who had drilled out that little bushing and tapped the hole and replaced it with a brass screw which he then worked into a bushing. So I had considered doing that.
At this point GLJ ( Greg, kindly offered to supply me with a used tach, but I know he has the bones to maybe make another XS2 someday, so I didn’t accept his kind offer )
Jim also said he had a tach from an XS1 that he couldn’t use, so I did accept that one from him.
So....

Thank you Jim!
Jim actually opened his up and sent me the internal parts. Here is a little photo essay of the differences between the XS1 and the XS2 internal drive. Some physical differences, but the drive component is the same.
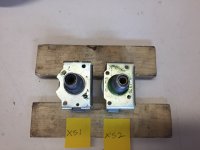
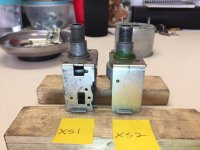
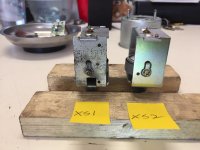
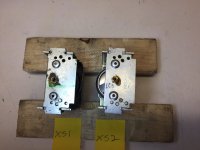
Here is the money shot. Notice how much higher his tach needle shaft sits above the top plate. That’s because his bushing isn’t worn out. Yay!

I ran a little test with the drill to confirm that it did indeed work, then I tore it apart for cleaning. And I discovered some wear on the spinning cup. So all I wound up using was the little arm that has the brass bushing in it. Everything has been cleaned, lubed and reassembled and here is my final bench test.
Stick a fork in this one because it’s done! It’s been back on my bike and ridden a few times and all is well.
That’ll do.....that’ll do.

Later, Bob
This was a slow progression over several months time.
Time to fix it then. Honestly I hate to have to do this.
The process is hard on the tach. This was meant to be a sealed unit, it wasn’t built to be opened, you have to pry and bend and stretch it open. Metal distorts and stretches and fatigues, it never looks or fits quite like it did originally.
I don’t know.....you think this looks like a problem? My needle hanging up, the needle is not touching the dial face, the problem is internal.
I put a reference mark with a marker, unsure if orientation would be an issue later.
Also, I can’t stress enough how important it is to take reference photos for later when you go to reassemble these parts, for me anyways , I use them constantly.
Here’s the first indication of the problem I’m dealing with, see all of the brass filings?
The upper needle assembly has somehow dropped down and is making contact with the brass bushing that it spins in. Contact right here,
In this image , I have turned it upside down so you can see how much play is in there, you can see how that gap opened up.
Here is a super short video showing how that bushing has wallowed out.
To take the assembly apart you must take a sharp chisel or a screwdriver and carefully drive these four staked edges back.
Then you can carefully pry the two halves apart.
In the photo below, you can kinda get an idea how this thing works. The cable spins that cup in the lower part of the housing. Inside that cup is a strong magnet , the magnet has space all the way around, it does not touch the cup. The upper assembly , that turns the needle also has a cup, that drops down into that space between the magnet and the outer steel cup. The upper assembly and the lower assembly do not touch each other. And here is the part I don’t understand, the cup in the upper assembly is aluminum, how is that driven by magnetism?
When I first pulled it apart, I could see that there was gummy, oily residue and dirt on all the surfaces,
Here you can see , at the center, the brass staked surface that was rubbing on that bushing and creating the brass filings.
And here I’ve removed for cleaning, the culprit, this super tiny brass bushing has worn out and allowed the whole upper assembly to drop down until it made contact.
What I believe happened was just a cascade of events, over time any grease that had been in there has dried out, add a little dust and suddenly it started grinding open, that small hole that the shaft spins in.
The whole assembly then started wobbling and then things quickly accelerated.
At first, I was thinking that maybe if I cleaned everything up really well and greased the contact points, that I could get a few more years outa this. I did exactly that. Here I made a little video of me testing the reassembled parts. Nothing has been done except clean and grease and put it back together.
In the end, I rejected this idea, because the root problem was not addressed. It would work , only as long as the grease held up.
At this point my repair stalled out.
My tach sat on my bench for a couple of weeks, while I tried to figure out how to repair this. 2M has the most experience with these old tachs, So I went to see The Oracle !
Steve recommended replacing that little brass bushing, but how? He said it could be done by a hobby machinist, he even offered to do it. ( He really is the best ! ). But I had been reading a lot and found someone here ( I’m sorry I forgot who ) who had drilled out that little bushing and tapped the hole and replaced it with a brass screw which he then worked into a bushing. So I had considered doing that.
At this point GLJ ( Greg, kindly offered to supply me with a used tach, but I know he has the bones to maybe make another XS2 someday, so I didn’t accept his kind offer )
Jim also said he had a tach from an XS1 that he couldn’t use, so I did accept that one from him.
So....

Thank you Jim!
Jim actually opened his up and sent me the internal parts. Here is a little photo essay of the differences between the XS1 and the XS2 internal drive. Some physical differences, but the drive component is the same.


Here is the money shot. Notice how much higher his tach needle shaft sits above the top plate. That’s because his bushing isn’t worn out. Yay!
I ran a little test with the drill to confirm that it did indeed work, then I tore it apart for cleaning. And I discovered some wear on the spinning cup. So all I wound up using was the little arm that has the brass bushing in it. Everything has been cleaned, lubed and reassembled and here is my final bench test.
Stick a fork in this one because it’s done! It’s been back on my bike and ridden a few times and all is well.
That’ll do.....that’ll do.
Later, Bob


