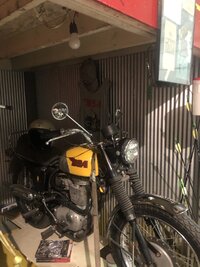
Nice to see one actually out and about... eh?
-
Enjoy XS650.com? Consider making a donation to help support the site.
XS650.com receives a small share of sales from some links on this page, but direct donations have a much greater impact on keeping this site going.
You are using an out of date browser. It may not display this or other websites correctly.
You should upgrade or use an alternative browser.
You should upgrade or use an alternative browser.
'68 BSA Victor Build..... Bloody 'el mate... You 'effin daft or sommat?!?
- Thread starter Jim
- Start date
Love the simplicity of those bikes. Didn’t hang around long enough to hear it run.. he said he converted it to electronic ignition and it has a small battery where the air cleaner was. Asked how the exhaust was held in the head and he replied you just push it in the opening and that’s it. No gaskets or seals!

Poor Victor's engine has been forlornly lookin' at me every time I walked by it. Decided to brighten 'is day. No point in both of us bein' miserable in this heat. Garage was just under 90° this morning... 'bout as good as it's gonna get in the near future. Set him on a bench and started disassembly.
First thing I noticed when I pulled the rocker box was all the little snakes of clear RTV. Yeah, decidedly NOT factory.... it's been into before. And look at this. Like the XS, there's no gasket for the rocker box. Any guesses why it weeped here?

Not a major show stopper, but I'll have to remove the studs and do a backyard resurface on the head mating surface as well as the rocker box.
Head and cylinder off. Cylinder actually looks quiet good. No scoring to speak of. Piston has absolutely no scoring... jus' a ton of carbon.

Same with the head, loads of carbon.

The cylinder fins were home to about a gazillion Mud Daubers...

Dug all of 'em out, scrubbed in the Stoddard tank, bead blasted, scrubbed some more and it looks as good as new.

Did a light hone and the cylinder cleaned up nicely. Haven't mic'd it yet, but I suspect it's well within limits. Bagged it and put it on the shelf for now.

The head on the other hand.... looks like it want's some money. Valve seats look good, but the valve stems/guides are shot. Didn't measure anything yet, but just lookin' at the stems as I rocked 'em looked like a good 5-10 thousands play... way too much. Found some new guides on Ebay that use a new blend of bronze.... about 30 bucks for the pair. Valves should I need 'em, are still available NOS. Counting new rings, looks like the heads gonna want about $125... give or take. I'll know more after I drag the book out and do some measuring.

First thing I noticed when I pulled the rocker box was all the little snakes of clear RTV. Yeah, decidedly NOT factory.... it's been into before. And look at this. Like the XS, there's no gasket for the rocker box. Any guesses why it weeped here?
Not a major show stopper, but I'll have to remove the studs and do a backyard resurface on the head mating surface as well as the rocker box.
Head and cylinder off. Cylinder actually looks quiet good. No scoring to speak of. Piston has absolutely no scoring... jus' a ton of carbon.
Same with the head, loads of carbon.
The cylinder fins were home to about a gazillion Mud Daubers...
Dug all of 'em out, scrubbed in the Stoddard tank, bead blasted, scrubbed some more and it looks as good as new.
Did a light hone and the cylinder cleaned up nicely. Haven't mic'd it yet, but I suspect it's well within limits. Bagged it and put it on the shelf for now.
The head on the other hand.... looks like it want's some money. Valve seats look good, but the valve stems/guides are shot. Didn't measure anything yet, but just lookin' at the stems as I rocked 'em looked like a good 5-10 thousands play... way too much. Found some new guides on Ebay that use a new blend of bronze.... about 30 bucks for the pair. Valves should I need 'em, are still available NOS. Counting new rings, looks like the heads gonna want about $125... give or take. I'll know more after I drag the book out and do some measuring.
scrubbed in the Stoddard tank, bead blasted, scrubbed some more and it looks as good as new.
Boy I’ll say! It’s interesting to see this old thumper being rebuilt!
 I’m surprised you can still get NOS valves for such an old bike.
So am I. There's literally enough NOS bits out there to build a bike. They musta made tons of spares.I’m surprised you can still get NOS valves for such an old bike.
I’m still communicating with an old friend across the pond that liked and played the same old guitars and used the same old amps.He/we about shit years ago.His father and on & on built Lucas parts.He has old OEM.Jim,let me know if I can help.So am I. There's literally enough NOS bits out there to build a bike. They musta made tons of spares.
Attachments
-
 FEF02EE8-5DD0-44B6-80BE-52BD9C1E4139.png931 KB · Views: 35
 -
 879E5F37-2FAE-4AFB-86E1-D9B43398FB62.jpeg319.2 KB · Views: 34
 -
 204BF43A-34C1-4401-A96A-3ED26241937E.jpeg269.5 KB · Views: 35
 -
 0DFC6F45-F2D9-4D88-B70D-51ACBD79B086.jpeg302.1 KB · Views: 35
 -
 20D545B0-3145-4781-A33B-87521B062CC5.jpeg247.6 KB · Views: 32
 -
 D12EA2E7-58D4-428F-8350-4B3C540B62FC.jpeg273.2 KB · Views: 36
Thanks Don. Will do.
Nice to see the Beezer getting some attention; that motor looks in quite good shape under the muck.
Yep, it does Raymond. Took a red rolock disk to little bits of it yesterday just to see what I'm up against. Was pleasantly surprised to see it's not bad at all.Nice to see the Beezer getting some attention; that motor looks in quite good shape under the muck.
Here's a little tech tip for you guys and gals...
The top of the head where the rocker box mates up was dinged from previous owner(s) incorrectly removing the valves...

The other end is the same. So anyway, I'm sure a lot of you know how to do a backyard surfacing job, take some wet or dry sandpaper (800 in this case), WD40 and a flat surface. I have an ancient table saw with a cast iron table... it's machined flat and perfect for the job. Tape the paper down, spray on some oil and gently work the head (or whatever you're dressing down) in circles or figure 8's. Every 10-15 seconds, rotate the part 90° in your hands and do it again. After you've gone full circle, wipe it off and see where you're at.
In this case I knew the dings were deep and likely still there. They were...

There's enough machined surface there that it most likely would seal just fine... but we can do better.
Just as some PO moved the metal away from the surface, we can move some back. I used a body hammer, but any smooth finish hammer will work.
You just start tapping at the edge of the sealing surface and move some metal back where it belongs. Take your time... gentle taps... tap tap tap and look it over.

As you tap, you'll be pushing the metal back in and up above the machined surface. Now flip it over and go back to sanding. It might take two or three tries, but you can get there....

Once you're happy with the surface, go over the edge you tapped on with a fine tooth single cut file and Bob's you're uncle.
Saving 50+ yr old parts that otherwise would have been leaky junk is very satisfying.... pure Zen you might say.")

The top of the head where the rocker box mates up was dinged from previous owner(s) incorrectly removing the valves...
The other end is the same. So anyway, I'm sure a lot of you know how to do a backyard surfacing job, take some wet or dry sandpaper (800 in this case), WD40 and a flat surface. I have an ancient table saw with a cast iron table... it's machined flat and perfect for the job. Tape the paper down, spray on some oil and gently work the head (or whatever you're dressing down) in circles or figure 8's. Every 10-15 seconds, rotate the part 90° in your hands and do it again. After you've gone full circle, wipe it off and see where you're at.
In this case I knew the dings were deep and likely still there. They were...
There's enough machined surface there that it most likely would seal just fine... but we can do better.
Just as some PO moved the metal away from the surface, we can move some back. I used a body hammer, but any smooth finish hammer will work.
You just start tapping at the edge of the sealing surface and move some metal back where it belongs. Take your time... gentle taps... tap tap tap and look it over.
As you tap, you'll be pushing the metal back in and up above the machined surface. Now flip it over and go back to sanding. It might take two or three tries, but you can get there....
Once you're happy with the surface, go over the edge you tapped on with a fine tooth single cut file and Bob's you're uncle.
Saving 50+ yr old parts that otherwise would have been leaky junk is very satisfying.... pure Zen you might say.

Thanks Tom. Patience is a state of mind. Anyone can get there... Just slow down and enjoy the task. The task is it's own enjoyment.
Thank you, now I can restore all the parts I have butchered...Here's a little tech tip for you guys and gals...
The top of the head where the rocker box mates up was dinged from previous owner(s) incorrectly removing the valves...
View attachment 250072
The other end is the same. So anyway, I'm sure a lot of you know how to do a backyard surfacing job, take some wet or dry sandpaper (800 in this case), WD40 and a flat surface. I have an ancient table saw with a cast iron table... it's machined flat and perfect for the job. Tape the paper down, spray on some oil and gently work the head (or whatever you're dressing down) in circles or figure 8's. Every 10-15 seconds, rotate the part 90° in your hands and do it again. After you've gone full circle, wipe it off and see where you're at.
In this case I knew the dings were deep and likely still there. They were...
View attachment 250073
There's enough machined surface there that it most likely would seal just fine... but we can do better.
Just as some PO moved the metal away from the surface, we can move some back. I used a body hammer, but any smooth finish hammer will work.
You just start tapping at the edge of the sealing surface and move some metal back where it belongs. Take your time... gentle taps... tap tap tap and look it over.
View attachment 250074
As you tap, you'll be pushing the metal back in and up above the machined surface. Now flip it over and go back to sanding. It might take two or three tries, but you can get there....
View attachment 250075
Once you're happy with the surface, go over the edge you tapped on with a fine tooth single cut file and Bob's you're uncle.
Saving 50+ yr old parts that otherwise would have been leaky junk is very satisfying.... pure Zen you might say.
View attachment 250076
I do really like this tutorial, thanks.
Interesting technique! I thought for sure you were headed for a JB Weld repair, I like what you did a lot better! 
A friend in the Marine Corp removed his barracks window to lay it down and flat sand his Norton clutch plates...Here's a little tech tip for you guys and gals...
The top of the head where the rocker box mates up was dinged from previous owner(s) incorrectly removing the valves...
View attachment 250072
The other end is the same. So anyway, I'm sure a lot of you know how to do a backyard surfacing job, take some wet or dry sandpaper (800 in this case), WD40 and a flat surface. I have an ancient table saw with a cast iron table... it's machined flat and perfect for the job. Tape the paper down, spray on some oil and gently work the head (or whatever you're dressing down) in circles or figure 8's. Every 10-15 seconds, rotate the part 90° in your hands and do it again. After you've gone full circle, wipe it off and see where you're at.
In this case I knew the dings were deep and likely still there. They were...
View attachment 250073
There's enough machined surface there that it most likely would seal just fine... but we can do better.
Just as some PO moved the metal away from the surface, we can move some back. I used a body hammer, but any smooth finish hammer will work.
You just start tapping at the edge of the sealing surface and move some metal back where it belongs. Take your time... gentle taps... tap tap tap and look it over.
View attachment 250074
As you tap, you'll be pushing the metal back in and up above the machined surface. Now flip it over and go back to sanding. It might take two or three tries, but you can get there....
View attachment 250075
Once you're happy with the surface, go over the edge you tapped on with a fine tooth single cut file and Bob's you're uncle.
Saving 50+ yr old parts that otherwise would have been leaky junk is very satisfying.... pure Zen you might say.
View attachment 250076
Thanks guys.
Guides are out. two hours at 350° in the grill and they tapped right out. New ones on the way and JP has graciously loaned me his seat cutters. I should have the right reams around here somewhere....  gotta whole box of 'em.


gotta whole box of 'em.