Carburetors

David Toll

Reliving my youth?
Top Contributor
Messages
587
Reaction score
1,778
Points
143
Location
Gold Coast Australia
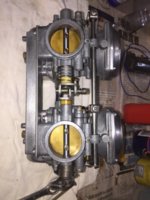
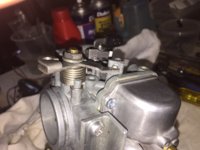
Pulled the carburetors down, cleaned them up and reassembled with new jets, floats, needle valves and gaskets. I have stuck with the standard size jets even though I am running a 2 into one exhaust. Figure I can fool with jet size when I finally get the old girl running and try to tune her up. I saw that the throttle lever isn't hitting the adjustment screw squarely. It appears to be off to one side. Was going to bend it out a little when I noticed that the whole throttle lever appears to be a little skewed. Is there supposed to be a collar washer between the return spring and the back of the throttle lever. I can't see one on mine. Suppose it is possible that the PO reassembled it wrong, (I haven't had this part off). Should there be a washer between the lever and the spring? Should I simply bend the lever so it strikes the centre of the adjustor screw?
 

Attachments

  • IMG_0263.JPG
    IMG_0263.JPG
    171.7 KB · Views: 105
  • IMG_0264.JPG
    IMG_0264.JPG
    176.4 KB · Views: 119
  • IMG_0261.JPG
    IMG_0261.JPG
    102.1 KB · Views: 117
  • IMG_0259.JPG
    IMG_0259.JPG
    76.3 KB · Views: 113
  • IMG_0262.JPG
    IMG_0262.JPG
    131.3 KB · Views: 103
Yes, there is a washer with a special shaped hole through it under the cable arm. I can't tell from your pic if it's there or not. Pull the cable arm off and see. If it's there then yes, just bend the arm so it sits on the adjusting screw better.

KZeLaFc.jpg
 
I dismantled the throttle arm and everything was there so I put it back together and centred the arm on the adjusting screw with a pair of multi-grips. Barbaric but effective. 5T was correct,(again!), the washer under the vacuum port screw was missing. I replaced it with a copper one left over from my oil pump refurbishment. Never throw anything away!
Cheers.
 

Attachments

  • IMG_0265.JPG
    IMG_0265.JPG
    127.3 KB · Views: 79
  • IMG_0266.JPG
    IMG_0266.JPG
    148.3 KB · Views: 91
One more thing I'll mention to you that may ward off possible problems in the future is the lengths of your carb top screws - they look a bit short. And once you install the butterfly shaped plate between the carbs and the throttle cable bracket, the screws holding those will definitely be too short. They're much easier to strip if only grabbing by a couple threads. I add a lock washer to all mine and use M5 x 16's wherever there is a bracket attached, M5 x 14's where there are no brackets. You will need five 16's and three 14's.
 
David, I used stainless hex head screws/bolts on my float bowls. Much easier to take the bowls off while carbs are mounted if need be. Cheap as beans.

Also, when your ready to mount the carbs, take out the smallest drill bit in your index, mines a 1/16. Working from the engine side of the carbs, use the bit as a feeler gage and adjust the Idle screw where the shank of the bit just slides under the butterfly of #1 carb with no play. Now, without moving the Idle adjust screw, adjust the right carb butterfly using the center adjustment (you had to bend into position) to set the # 2 carb butterfly. Think of this as Static Timing your carbs. All things equal, they will be real closely married. Now move the main Idle screw back to where you want it. This is much easier than trying to see and judge a band of light at the bottom.
Thu
 
I prefer the "band of light" method, but I do it a little differently, so that I'm actually not comparing two bands of light. I agree, that would be difficult. Instead, I back off the throttle lever speed adjuster screw all the way until it's not touching or holding the lever open at all. This closes the butterfly plates completely. If in sync, you will see no light around either. If not in sync, one plate will show light, the other won't. Simply adjust the sync screw until no light shows on either plate.

To "fine tune" my setting, I go a step further. Let's call the partially open plate #1 and the closed plate #2. Once adjusting completely closes plate 1, I continue to turn the screw until plate 2 begins to open. This shows me I've gone too far and thrown the sync off again. So, I turn the screw back in the other direction until plate 2 closes and plate 1 begins to open again. Best setting will be about midway between the spots where each plate begins to open. That's usually about one turn of the adjusting screw. Once I have the plate setting "fine tuned" in where I want it, I screw the throttle lever speed adjusting screw back in until both plates crack open a sliver.
 
Oh, cool beans! Yep, that works! Important step is: "Once adjusting completely closes plate 1, I continue to turn the screw until plate 2 begins to open. This shows me I've gone too far and thrown the sync off again." :agree:
 
Excellent advice Gentlemen. I could throw my manual in the bin! Just about ready to mount the carbs, still waiting on some electrical bits from the land of Bat Fricassee. Suppose they'll have to sit in isolation for a year or so. Won't even be able to unwrap them. Every time I get a delivery from the home of Chiroptera Chowder I expect to find the postie expired on the lawn. Should have bought a Harley and got my bits from the land of the brave!
Regards
Hahaha, Bat Fricassee, like that Bat soup over there, ( looks like some of the ole lady's cooking) and Green Monkey brains, Jumped species my aunt Gerty's moustache - They were probably eating the things! :rock:
 
Back
Top