PART II
FORK TUBE REMOVAL
Now that the leg is drained and the damper rod bolt out - carefully slide the fork tube up out of the lower slider and remove the damper rod from the tube. It should simply slide out when you invert the tube - but
DO NOT let it hit the floor.

Make note of how all the parts fit together - and then set the tube and damper rod parts aside.
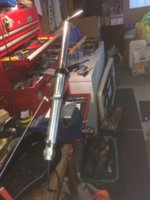
If your tubes are pitted like Lucille's, they are basically scrap - unless you can get them re-plated with hard chrome. I looked into this - but it wasn't easy to find a supplier and XS650 Direct (MikesXS) sells fork tubes for $180 CDN. I checked them out at the warehouse and the tubes appear to be identical to the stock OEM tubes removed from Lucille - so I bought them and they're fine. Here is a photo of a pitted fork tube which, I am sure was one of the reasons why my fork seals got chewed up.

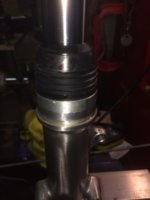
Once the fork tube is out - you can see the fork seal down in a pocket in the top of the lower fork slider. It is under a thin steel back-up washer (its called a "guide" in Fig. 4-2 of my Haynes manual - page 89) which is retained by a wire spring circlip.

 NOTE
NOTE:
BOTH the circlip and the back-up ring
MUST be removed before attempting to remove the fork seal itself.
FORK SEALS - Preliminary Steps - DO NOT OMIT
Remove the little spring circlip and back-up washer with a little pick tool as shown in the photos above - and DO NOT scratch anything with the pick.
Invert the fork tube and remove the little alloy damper rod seat which will still be down in there. Be sure to make note of how that little seat comes out - NOTE that it is tapered toward the top as shown in the assembly photo below.

Set those parts aside and again -
BE SURE to note how they went in and keep them clean!
SEAL REMOVAL & CLEANING - the good, the bad and the ugly...
- NOTE: do NOT try to remove a fork seal until you have removed the spring circlip AND the thin steel back-up ring/washer!!
Now comes the
really fun part! You need to remove the old seal, which should not be too hard, but you may run into some difficulty (I sure did). I tried a method suggested by our very own
Baron of Baraboo - Gary - on the Forum. He suggested using a tire lever/spoon mounted in a vise. This method worked fine for the RH leg (which I did
after the LH leg) but the LH leg seal would not budge - so I had to resort to a seal puller (see photo). Some folks have actually cut the seal out with a Dremel tool and a cutting wheel - and that was next on my list (but NOT recommended).
The Good - Gary's Method of Fork Seal Removal
I found that Gary's method of mounting a tire spoon in a vise and using the nicely rounded end of the spoon to pop the old seal out worked
absolutely great on Lucille's RH fork leg (see photo below). He also suggested mounting the spoon low in the vise and using a piece of aluminium as a fulcrum across the end of the fork tube to protect it from being dented by the hard steel tire spoon.
I was surprised to find grease in under the dust boot on top of the spring clip and back-up washer on the RH leg. There had been NO grease at all in the LH leg - so somebody had definitely been into the forks on this bike before, and after they f@cked up the LH leg, they tried something different on the RH leg.


The BAD & UGLY - a Harbor Fright - Princess Auto Seal Remover Tool
I
DO NOT recommend using one of these
nasty metal-eating seal puller/remover tools on soft aluminium parts like fork sliders - it is just too easy to scratch the he!! out of the seal pocket - as had been done
very thoroughly by my PO on Lucille's LH leg. The inside of the LH leg seal pocket had several very deep gouges and the burred material
had been left in there 
- from a previous seal change which is why the old seal would not come out with a normal level of effort. Holy cow - what a pain!

Anyhow, I finally got the old seal out using a seal puller - VERY carefully - and then I polished-out the gouges as best I could with a fine stone and a die-grinder plus some 400 & 1000 grit emory cloth which came out OK. Fortunately, none of the gouges went all the way from the bottom of the pocket to the top edge and so I wasn't too worried about the oil leaking past the new seal - but I was concerned about installing the new seal on the somewhat rough inside surface of the pocket. I didn't want to polish it too much for fear of increasing the diameter excessively and winding up with a loose seal and a leaky leg.
Once you have the seal out of the leg - clean everything thoroughly using brake cleaner and clean rags. It actually wasn't too big a job, but I did go through an entire can of brake cleaner on the two legs and stank up the Disaster Central Workshop for a little while. The fumes sort of took me back to the mid-70's...
 RE-ASSEMBLY
NOTE: I searched the XS650 Forum for advice on fork seals and one persistent question is -
which way does the seal go in? Well, boys & girls, it goes back in exactly the same way it came out -
assuming the last person did it right. Just to be sure though, here is the correct way:
- look at the new seal;
- see the coil spring up inside it?
- that spring side faces DOWN into the fork seal pocket and the side with the printing faces up.
Now, here we come to a fork (
get it?? ) in the road. There are two ways to proceed when installing the new fork seals and re-assembling the forks:
- put the fork tube into the lower slider and install the new seals using some sort of seal driver. Bike shops/on-line sellers market these in various ID sizes to suit different bikes. The installer is used like a slide hammer over top of the upper fork tube BUT you need to be careful to NOT scratch up the outside of your nice new fork tube when driving the new seal back into place.
- you can leave the fork tube out and pull the seal into place in the lower fork slider using a piece of threaded rod and some suitable washers and back-up plates. Simply grease the seal and pocket, and screw the seal in till it seats in the seal pocket in the lower fork slider.
The key issue is to
NOT get the seal cocked in the seal pocket. That could damage the seal and/or the lower fork slider. Also - when driving the seal into place - don't go
Neanderthal and risk cracking the slider (
as at least one XS650 Forum member has done recently). Some people advocate using a suitably sized socket as a driver - but the risk of getting the seal cocked in the pocket is much too high in my view (
my hands and eyes just don't work that well together, I guess).
On Lucille's LH (i.e. damaged) leg, I borrowed a proper tool from a buddy and tried the slide hammer method - but the seal still got stuck (it was straight, but it simply would not move down into the pocket likely due to the roughness from the prior damage). Soooo, I used a piece of 3/8" dia. threaded rod and some suitable nuts and washers etc. - and pulled the seal down the rest of the way (see photos). In the end, it worked out just fine.


I found that on the undamaged RH leg, I could literally push the seal nearly halfway in
by hand - (photo) - but then I needed to use the threaded rod to gently pull it down the rest of the way.

You will know that you have the seal fully seated when:
a)
turning the threaded rod nuts or driving it with the slide hammer tool gets really hard, and
b)
the slot for the spring clip is fully exposed at the top of the fork slider tube.
If you cannot fit the back-up ring and the circlip - you need to pull the seal down a little bit further into the pocket. Don't overdo it though.
My overall assessment is that the threaded rod method is superior and safer on old, slightly fragile, hard-to-replace components - and that is how I will do it in the future. The components for using this method are cheap and simple and easy to find plus you can go slowly and not risk damaging anything.
FORK TUBE & DAMPER ROD INSERTION
GRIZLD1 & GARY:
this is where I simply forgot to measure the danged damper rod holes - sorry about that! I took some photos of the rod and holes but got a phone call in the middle of the job and muffed the next step which was to make those measurements.
Now pour some fork oil down the
inside of the fork tube and then put some more oil on the top piston of the damper rod and that assembly down into the fork tube until it pokes out the end of the tube. Then slip the little alloy damper rod seat (that tapered thingy) onto the bottom end of the damper rod and push it back up into its little pocket in the fork tube until the bolt seat is flush with the end of the fork tube. The oil you put on the seat will help stick it into place.


 Feels good when it's done huh? I'd much rather do fun things instead of forks, like changing the rear tire on a full dress GoldWing. The tire is off. I really enjoy the tire and rim part, assembly aint too bad either, Stripping the bike is the part I don't care for. Ah, and I get to use a few "special" tools.
 ....dammit.

 ) - and be sure to use a piece of wood or aluminium jaw covers on your vise jaws to protect the fork. The aluminium of the lower slider is quite soft (as we shall soon see....
 .
. ).
).


 - but I hate that sort of thing and so here is what I noted from my research on forks and fork oil: