My BS38's came in today!!

suthpaw22

XS650 Addict
Messages
248
Reaction score
5
Points
16
Location
Orlando, Florida
So I just got home from picking my lil man up from school to find my BS38's have came in the mail today. I'm wondering what course of action I should take now. I know very little about carbs. People on here have posted some good info about them and I will be looking it over, but I'm currious as to what people in my position would do.

All I know that my bike needs is the carbs, petcocks, filters, gas cap, and the battery charged. Should I put the carbs on and gravity feed fuel to them to see if they work and the bike fires?

People please keep in mind that I am a novice before you stone me to death. I want to learn and appreciate the feedback, but it isn't anything to get your blood preasure worked up over. I'm new to mechanics and I can't spell. Thats it.

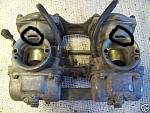
Looking at the carbs there is obviously oxidation and I plan to soda blast them later to clean them up a bit. Peeking inside they look to be clean. I am concerned with the choke. I don't know how much the range of motion is suppose to be, but there isn't very much here.
 
1 - blow test. Blow (gentlyish) in the upper mouth shaped entry. The slider should rise, then when you stop, close back up again.

2 - choke - "isn't very much" isn't descriptive. When you push the choke lever, does it click to it's open position? If the plungers don't raise at all - replace them. Or you could try taking them out and getting them moving again.

3 - pull the bowls, check for crap, clean it out. Blow out holes with compressed air. For the love of little green rabbits, use a proper #2 phillips, not one of those goofy multi drivers.

4 - if you failed the blow test, open up the tops, check the diaphragms are seated properly. It's pretty obvious when they are, and when they're not. take this opportunity to spritz some wd-40 on them, let them soak for 10 mins, spritz them some more, and gently massage the oil into them. Actually, i'd probably do this even if you passed the blow test to make sure there isn't a spider nest in there doing weird things to you.

Above all - *be gentle*. Who knows the last time these carbs worked, and they coul dhave been sitting out in the arizona sun for 10 years baking. They'll need some time to wake up. The diaphragms are the most expensive piece of the whole thing - at $80 a side - and the most delicate.
 
Ok. I'm sitting at the kitchen table with them now. This is the view I'm looking at.

carbs.jpg

which one is the upper mouth shaped entry?
 
I'm assuming that the blow test is in the entry's that are shown in the pic. I blew into there and the sliders didn't rise, so I'm going to take the top off now.
 
Nothing happened. I blew and they didn't move. I tried blowing harder, but still nothing. I could move the sliders up with my fingers and they'd slide back down. I took the tops off. Took me a few minutes cause a few of the phillips heads were stripped, but I got them. The diaphragms look good and look to be seated like I pictured they would be. I'm going to soak them now.
 
the diaphragms seat in a little groove around the head.

Hmmmmm. It's very odd that the sliders wouldn't move at all, if the diaphragms were seated, and not ripped or anything.


Did you just hear air escaping when you did that test? Could you feel where it was escaping? That hole is the outside reference breather - essentially, when vacuum goes up on the top of the diaphragm, it's the same effect as putting pressure in the bottom (which is more or less sealed) which is what you're doing by blowing in that hole.
 
Everything looked really clean and it moved well by finger. I still have the diaphramgs sitting in the tub with the wd-40 on them. I am going to re-aply in a few and rub them a little. Could it just be that the slides were a lil dirty as to why it took a little more to move?
 
well, no, it shouldn't.

The only thing i can think of, is that maybe you weren't blowing hard enough. Which is something i'd caution against before taking apart, but afterwards it should be okay. They *have* to rise with a pressure differential.

Attached pic: you're blowing in those holes, right? And when i say "blow", perhaps i'm being a little indirect. Think less blowing a kiss, more blowing up a balloon.
 

Attachments

  • carbs.jpg
    carbs.jpg
    6.7 KB · Views: 265
Ok. I just finished re applying the WD-40 and rubbing that in. The carb guide looks to be a very valuable tool. I'm going to put the diaphragms and tops back on and look more at the guide.
 
So after dinner I took the bottoms off the carbs, removed the floats, and sprayed all the holes with air and then WD-40. Everything looked pretty good. I'm getting ready to put that back together.
 
After I put the little man to bed and got the bottoms of the carbs closed back up. I started looking at the choke a little closer because it just didn't feel right. I noticed that the shaft has forks and pins at each carb that rise and set when you move the leaver. The pin on the choke side was not moving up and therefore not allowing the choke lever its full range of motion. I took the shaft out and freed the pin that was stuck. I put it back together and now the choke moves like I would think it should.

I know there are a lot more to carbs than what I did, but I still feel pretty good about cleaning it up a bit and fixing the choke. Tomorrow I will probably try to put them on the bike and hook up the throttle and get fuel lines so I'll be ready for the petcocks when they come in.

Thank you Sundie for your advice and the references.
 
you have only scratched the surface, bud.
At least your diaphrams are good. Another way to test them when installed is push the slides up with your finger, making sure your finger isnt plugging the little hole ot the bottom of the slide, while holding them up, lick your thumb on your other hand, and seal with all your might, the mouth shaped hole. your slide should fall very slow, if not almost stopped. take your finger off the hole, and will fall quickly. Never haerd of blowing in there though.
 
you could always put enough fuel in the carbs to see if the bike would fire.

Oh - before you put them on the bike, there's a screw in the middle on a bar that links the carbs together. This screw balances your carb butterflies.

The idle adjustment screw (right by where the throttle cable attaches), tighten this until when looking inside the carb throats, at the butterfly side, at the top, you'll see a pinhole exposed. You can use this pinhole as a reference mark to get the carbs in the general vicinity of being synced. I like to look at one side, get the hole half covered by adjusting the throttle stop, then look at the other and turn the balance screw until it matches.

After you've done this, back the throttle stop screw off until it's not touching, then back on until it ip, then a half turn more.

All me that should get you into "it will start" territory. Then you should balance your carbs while the bike's running with a vacuum guage.
 
the "cover the hole" test is the same thing, just in reverse. You're putting a higher pressure below the diaphragm, and a lower one above it.
 
gotcha. Oh, make sure your choke is off. I err....thought I ripped my diaphrams in my 34's last week ,didnt realize my choke was on after rebiuld.
 
Back
Top