Gary tried to warn me.

When I was assembling my XS2, he said that he had seen a number of gas tanks with expensive paint jobs ruined by gas creeping into the paint job around the petcocks and the filler neck. He did a little write up about how he had done this on one of his restored gas tanks.


I had a great reluctance to do this. Frankly the idea of scraping beautiful new paint off of my gas tank WAS a little horrifying to me.
Well I’ve had gas in the tank for five months now and I’ve been keeping a close eye on it and a couple of weeks ago I noticed the paint beginning to swell , right at the edges of the petcocks. UH OH !!


I drained the gas tank and pulled the petcocks off. Oh boy! That’s ugly, I think I’m just in time to do something about it. You can see some blue Hylomar residue there too.


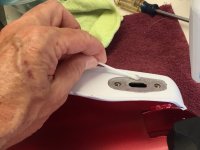
Here I have taken an Xacto knife and done an initial trim around the petcock, the paint is very soft. I trimmed to just past where the paint was soft.

After trimming off the loose material, I put the cleaned up petcocks on and traced the edges. Now I trimmed the paint to about 3mm beyond the edges of the petcocks.


I cleaned the area I intend to seal with epoxy. Be sure to remove any oil film.

I’ll be using JB Weld clear 2 part epoxy. This stuff sets up fast, be prepared to work quickly. I taped a piece of foil on my bench and used a throw away artist brush to apply it. When I was done, just throw it away.

Here it is right after I applied it. As soon as I had both sides done. I moved it out to sit in the sun for a while to help it cure.

I was careful to coat the bare metal and just over the edge of the paint. Leaving the entire area that the petcock sits on bare metal.
Here is the finished job , it’s really not visible , even from a low angle like this.

I am hopeful this will be an effective and permanent repair. I went on the JB Weld website and they claim it to be gas and oil resistant. But hopefully gas will not even touch it. The gas filler neck was already done by the painter.
Edit: Read down to post #9 where I explore the possibility that I contributed to the paint failure.
A Cautionary Tale: After reinstalling the petcocks, I put the gas tank back on my bike and filled the tank back up. I had the petcocks apart when I was working on the tank and when I re assembled them, I had something outa alignment on one of them and gas started dribbling out of it and going all over my painted case! Crap Crap Crap!! You should’ve seen me running around like a chicken with my head cut off, trying to catch the gas that was spilling and quickly remove my tank , so I could drain it again! Then I had to quickly wash the gas off of my cases before it wrinkled the paint.
Drained the tank....fixed the petcock....refilled the tank ( this time off of the bike until I was sure it wasn’t going to leak.) So now everything is back together and no leaks, and I didn’t have to make my tank ugly to do the epoxy job. So whadya think?
Gary approves!

When I was assembling my XS2, he said that he had seen a number of gas tanks with expensive paint jobs ruined by gas creeping into the paint job around the petcocks and the filler neck. He did a little write up about how he had done this on one of his restored gas tanks.
I had a great reluctance to do this. Frankly the idea of scraping beautiful new paint off of my gas tank WAS a little horrifying to me.
Well I’ve had gas in the tank for five months now and I’ve been keeping a close eye on it and a couple of weeks ago I noticed the paint beginning to swell , right at the edges of the petcocks. UH OH !!
I drained the gas tank and pulled the petcocks off. Oh boy! That’s ugly, I think I’m just in time to do something about it. You can see some blue Hylomar residue there too.
Here I have taken an Xacto knife and done an initial trim around the petcock, the paint is very soft. I trimmed to just past where the paint was soft.
After trimming off the loose material, I put the cleaned up petcocks on and traced the edges. Now I trimmed the paint to about 3mm beyond the edges of the petcocks.
I cleaned the area I intend to seal with epoxy. Be sure to remove any oil film.
I’ll be using JB Weld clear 2 part epoxy. This stuff sets up fast, be prepared to work quickly. I taped a piece of foil on my bench and used a throw away artist brush to apply it. When I was done, just throw it away.
Here it is right after I applied it. As soon as I had both sides done. I moved it out to sit in the sun for a while to help it cure.
I was careful to coat the bare metal and just over the edge of the paint. Leaving the entire area that the petcock sits on bare metal.
Here is the finished job , it’s really not visible , even from a low angle like this.
I am hopeful this will be an effective and permanent repair. I went on the JB Weld website and they claim it to be gas and oil resistant. But hopefully gas will not even touch it. The gas filler neck was already done by the painter.
Edit: Read down to post #9 where I explore the possibility that I contributed to the paint failure.
A Cautionary Tale: After reinstalling the petcocks, I put the gas tank back on my bike and filled the tank back up. I had the petcocks apart when I was working on the tank and when I re assembled them, I had something outa alignment on one of them and gas started dribbling out of it and going all over my painted case! Crap Crap Crap!! You should’ve seen me running around like a chicken with my head cut off, trying to catch the gas that was spilling and quickly remove my tank , so I could drain it again! Then I had to quickly wash the gas off of my cases before it wrinkled the paint.
Drained the tank....fixed the petcock....refilled the tank ( this time off of the bike until I was sure it wasn’t going to leak.) So now everything is back together and no leaks, and I didn’t have to make my tank ugly to do the epoxy job. So whadya think?
Gary approves!
Attachments
Last edited:

")
 Well...I’ve got the bumbling, confused persona down anyways!