Correct, I used the nylon screws because I used the least expensive reg.
Using the one you have you won't need the nylon screws.
Leo
Using the one you have you won't need the nylon screws.
Leo
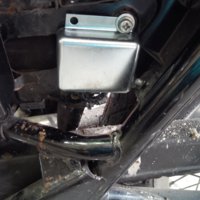
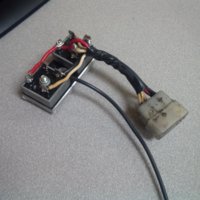
 I also noticed that you can see my new rectifier in this same photo mounted in the stock location. I re-used the stock bolt with the "keyway" type notch in it so that worked out well.
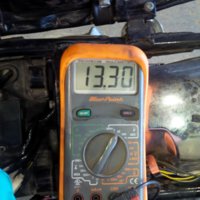
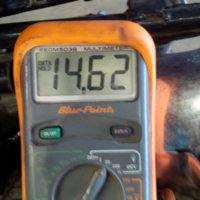
I thought I'd get back with a quick update. I've installed the AMC regulator/"Radio Shack" style rectifier/previously enjoyed alternator rotor and the charging system seems to be working great. I'm getting 13.3V at ide and 14.5v at 2000 rpm so I'd say that's a great improvement over the zero charge that I was getting prior to these mods. As I think I mentioned before my stock rotor was measuring virtually zero resistance and my stock regulator was shorted internally (I'm assuming due to the rotor failing) so both of those items needed to go anyway and I thought I'd do the rectifier at the same time.
Now the next issue that I need to address is the right exhaust is puffing black at idle and it seems to be running a bit rough at idle as well so im thinking the coil is the next place to stop. I should mention that I replaced the spark plugs as well when I changed the regulator. I will test the coils tomorrow and see what I find. It will idle choke off now which is an improvement but with this right cylinder doing the "put put put" at idle with black clouds on each "put" im assuming that the fuel isn't getting burned for whatever reason.
*note i've mounted the reg by 1 screw for now just for testing. i'll button that up properly later
PS - thanks to all for your help so far. Retiredgent, Leo and everyone else
Yeah, I have a 77 d and it has the old green/black brushes out of the engine and the new 7 wire reg/rec combo. So after I replace brushes with nylon screws, I should treat the existing stator ground black as a hot wire? Last time I was looking at a diagram and thought someone just used the wrong color and put hot to black, and you know what that means. This why I am rewiring now.JNizza92,
Whether or not you need the nylon screw mod has nothing to do with your ignition system. There are two kinds of voltage regulators for the XS650. The early mechanical regulators provided battery on the green wire brush with the other brush grounded. The later models regulator provides a ground on the green wire brush and the other brush goes to switched battery (brown wire). If you are using a late model regulator or an after market regulator that provides a ground on the green wire brush, then you have to isolate the grounded brush with nylon screws and apply brown wire voltage to that brush.
OK then you don't need the nylon screws, nor do you want the black wire to the inner brush to be power, keep it as a ground. The brown wire shouldn't be a direct power feed from your battery, it should be switched power. Tap into a power feed somewhere after the key so it is switched on and off with the key. The red wire from the combo unit is what goes directly to the battery. It is the power out feed from the rectifier portion of your combo unit and it feeds the charging output to the battery.
I do have the early 70-79 brushes, and even put in new ones while I had it apart, but hooked up the direct way I am getting no charge and it will not magnetize while in the harness. I unplugged it and put power directly to the stator wires and it magnetized, so I have to change something in the wiring, unless I am missing something. What is the best way to test the charging system after it is hooked up?The black wire on the early brush set-up becomes brown only if you switch to a later style combo unit for the electronic ignition models that contains a ground switching regulator. Then you have to do the nylon screw mod as well. But that's not what you're doing. You have a new combo unit but it is the correct one for the early brush set-up. It contains the correct power switching regulator. It will get wired in just like the original separate regulator and rectifier. That would be like the box on the left in your drawing. It shows the wiring as I described it - brown after the ignition switch so power on it will be switched on and off, red before the switch so it feeds directly to the battery.
But, parts are easily swapped on these bikes. You should probably positively I.D. you stator and brush set-up to make sure it is the earlier '70-'79 version. It would look like this. Brush wires will be green and black, and the timing marks will be cast into the stator housing .....


On the later style stator, the brush wires will be green and brown, and the timing marks are on a separate little plate attached to the stator housing with a screw .....


Sorry, direct way meant the picture with the black wire. I have it hooked up the way the diagram i got from mikes xs says to. This is supposed to be with my original black wire setup. And sorry I know how to check the charging, was more looking at how to find what is not working. Like I said, replaced the brushes, it gets magnetized through direct current, and diode check seems to be ok, but other than that have no idea what else to check.I don't know what you mean by "... hooked up the direct way ...". Simplest way to test the charging system is to measure the voltage at the battery. Start the bike and at idle, you should be seeing around 12 volts or so. Rev the bike up to 3K or 3500 RPMs and the voltage should increase to around 14 to 14.5. No change in voltage when you rev the bike indicates you're not charging. The charging output is RPM based. You don't get much at low RPMs.