browndawg
XS650 Member
Hi Guys,
I'm having a charging issue with my '81 XS650 Special. It began cutting out on me yesterday while riding. Came home and found the battery to be down to 8 volts, and the headlight is not brightening when bike is revved. I have begun going through Curly's charging tests (http://xs650temp.proboards.com/thread/3461), but I need a little help interpreting the results.
TROUBLESHOOTING STEPS:
1. First charge your battery to at least 12.5-12.7V. Charged battery up to 12.65V. Also had it load-tested at auto parts store and it checked out fine.
2. Slap-Test. Here things get strange. This morning it failed the test, no magnetism. A couple of hours later, it passed with flying colors, slapping wrench to case. Now, it is failing again. Don't know if this means something?
3. Bypass the regulator by jumping to ground. This caused no change in battery voltage when revving bike. When revved, battery stays at 12.4-5 volts. Also, headlight does not brighten.
4. Voltage at positive brush of alternator. Seems to be an acceptable voltage drop, still getting sufficient juice to positive brush: 12.65V (battery itself) --> 12.51V (red wire into keyswitch connector) --> 12.48V (brown wire coming out back of keyswitch connector) --> 12.51V (positive brush at alternator). These were measured key-on.
5-7. Stator Checks. About to continue with these, but had some questions first (below).
QUESTIONS:
1. Does my intermittent slap-test indicate anything important to you guys? It just seems like it might point to something obvious, but I'm not sure what.
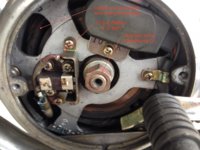
2. For step 4, did I check the right wire to the right brush (see picture)? I couldn't find an actual brown or black wire, but what I checked looked close and gave me a logical reading of 12.51 volts.
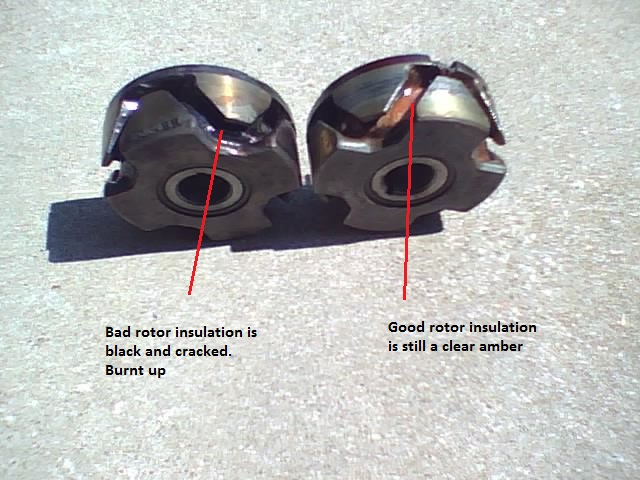
3. The copper wires in my alternator are black with grime. You cannot even tell they're copper--that's how blacked they are. Could this be an obvious part of my issue?
4. At the end of Curly's troubleshooting guide, he says "dirty connections and worn brushes account for most of the charging system problems." However, nowhere in the trouble-shooting guide do I see a step saying to check the brushes. Is this something I should do?
Thank you guys so much. I'm learning as I go with this bike, and I know next-to-nothing when it comes to electrical stuff. I just wanted to check with you guys and make sure I'm not missing anything obvious with my findings so far. The only thing remaining in Curly's guide for me to do are the stator checks.
Thank you again!
I'm having a charging issue with my '81 XS650 Special. It began cutting out on me yesterday while riding. Came home and found the battery to be down to 8 volts, and the headlight is not brightening when bike is revved. I have begun going through Curly's charging tests (http://xs650temp.proboards.com/thread/3461), but I need a little help interpreting the results.
TROUBLESHOOTING STEPS:
1. First charge your battery to at least 12.5-12.7V. Charged battery up to 12.65V. Also had it load-tested at auto parts store and it checked out fine.
2. Slap-Test. Here things get strange. This morning it failed the test, no magnetism. A couple of hours later, it passed with flying colors, slapping wrench to case. Now, it is failing again. Don't know if this means something?
3. Bypass the regulator by jumping to ground. This caused no change in battery voltage when revving bike. When revved, battery stays at 12.4-5 volts. Also, headlight does not brighten.
4. Voltage at positive brush of alternator. Seems to be an acceptable voltage drop, still getting sufficient juice to positive brush: 12.65V (battery itself) --> 12.51V (red wire into keyswitch connector) --> 12.48V (brown wire coming out back of keyswitch connector) --> 12.51V (positive brush at alternator). These were measured key-on.
5-7. Stator Checks. About to continue with these, but had some questions first (below).
QUESTIONS:
1. Does my intermittent slap-test indicate anything important to you guys? It just seems like it might point to something obvious, but I'm not sure what.
2. For step 4, did I check the right wire to the right brush (see picture)? I couldn't find an actual brown or black wire, but what I checked looked close and gave me a logical reading of 12.51 volts.
3. The copper wires in my alternator are black with grime. You cannot even tell they're copper--that's how blacked they are. Could this be an obvious part of my issue?
4. At the end of Curly's troubleshooting guide, he says "dirty connections and worn brushes account for most of the charging system problems." However, nowhere in the trouble-shooting guide do I see a step saying to check the brushes. Is this something I should do?
Thank you guys so much. I'm learning as I go with this bike, and I know next-to-nothing when it comes to electrical stuff. I just wanted to check with you guys and make sure I'm not missing anything obvious with my findings so far. The only thing remaining in Curly's guide for me to do are the stator checks.
Thank you again!
Attachments
Last edited: