Wolfchen
Ace of dogma
If its one weak point all XS bikes have its the single pot disc brake caliper.
I've read the new to XS650 Checklist post and a few others but these do not address a particular maintenance issue. How to get the rear disc brake common to all XS models to work as designed and more effectively. The information also applies to the XS650 front caliper assembly as well.
Assuming the caliper piston is not seized or pitted and the lip seal is intact we can proceed. It is also understood the pads are to be replaced for safety sake.
I first thoroughly clean all debris / paint and gunk from around the caliper housing, pads, steel slider clips and Y fork. A hand-held stainless steel pool cleaning brush is most effective in cleaning yet gentle enough to leave parts undamaged. Pad shims need to be rust free.
Afterward these parts must be polished in order that the brake pads are able to move fractionally left & right < ---- > on the steel slider clips freely (inside the Y fork) as the piston acts upon them. We can't expect the brake to function properly if parts cannot interact smoothly.
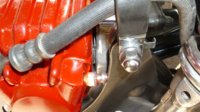
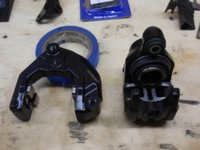
The caliper housing (portion containing the piston) needs to be able to seat completely vertical into the Y carrier e.g. the "fork". See the first pic.
Carefully remove all paint from beveled angles and gently polish the intersecting surfaces. The caliper needs to be able move fractionally fore & aft while seated; slightly - by only 1 or 2 degrees. Excess paint will hamper this slight movement.
Once the slider clips are brushed and polished they'll permit easier pad movement.
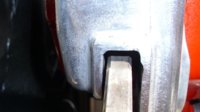
Make absolutely certain the caliper Y fork is equally centered over the disc. See the second pic to view the clips.
The steel caliper mounting bolt requires deep cleaning & mirror-like polishing so the caliper can slide < ----- > along its length freely. This is a key issue.
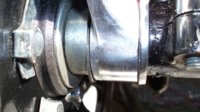
Carefully re-assemble the now VERY clean Y fork, caliper and install new pads. The caliper / pad assembly drops down over the disc. See pics.
Apply Ant-seize paste on the polished caliper mounting bolt along its entire 2" length.
Make certain the covered slider barrel is clean inside. The two parts locate the caliper onto its carrier; e.g. the Y fork. Use the factory recommended torque limit on all fasteners and apply Locktite or other thread glue.
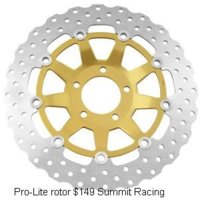
Brake disc(s) should be free of defects; grooves, rust, galling or glaze.
If it cannot be cleaned with emery cloth & solvent / steel wool it should be re-surfaced. Most auto parts stores can cut rotors.
Make sure the master cylinder operates properly with new DOT fluid. Brake lines often need to be bled before the brake can be used effectively. Afterward the brake pedal or hand lever should feel firm and apply enough pressure to activate the brake so the bike comes to a complete & safe stop. Test the brake's action before riding off by pushing the bike and firmly applying the brake(s).
Defective or leaking master cylinders should be replaced or rebuilt.
This is a key safety issue.
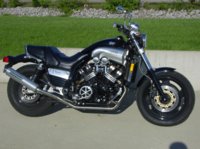
With proper set-up and maintenance the stock XS disc brake system will do a good job of stopping these decades old machines. This comment doesn't apply to road racer machines of course.
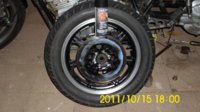
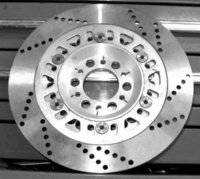
In the repaint (blue taped) pic the rear brake disc is grooved.
Its headed for a brake lathe at the earliest opportunity.
Ride safe.
..........
I've read the new to XS650 Checklist post and a few others but these do not address a particular maintenance issue. How to get the rear disc brake common to all XS models to work as designed and more effectively. The information also applies to the XS650 front caliper assembly as well.
Assuming the caliper piston is not seized or pitted and the lip seal is intact we can proceed. It is also understood the pads are to be replaced for safety sake.
I first thoroughly clean all debris / paint and gunk from around the caliper housing, pads, steel slider clips and Y fork. A hand-held stainless steel pool cleaning brush is most effective in cleaning yet gentle enough to leave parts undamaged. Pad shims need to be rust free.
Afterward these parts must be polished in order that the brake pads are able to move fractionally left & right < ---- > on the steel slider clips freely (inside the Y fork) as the piston acts upon them. We can't expect the brake to function properly if parts cannot interact smoothly.
The caliper housing (portion containing the piston) needs to be able to seat completely vertical into the Y carrier e.g. the "fork". See the first pic.
Carefully remove all paint from beveled angles and gently polish the intersecting surfaces. The caliper needs to be able move fractionally fore & aft while seated; slightly - by only 1 or 2 degrees. Excess paint will hamper this slight movement.
Once the slider clips are brushed and polished they'll permit easier pad movement.
Make absolutely certain the caliper Y fork is equally centered over the disc. See the second pic to view the clips.
The steel caliper mounting bolt requires deep cleaning & mirror-like polishing so the caliper can slide < ----- > along its length freely. This is a key issue.
Carefully re-assemble the now VERY clean Y fork, caliper and install new pads. The caliper / pad assembly drops down over the disc. See pics.
Apply Ant-seize paste on the polished caliper mounting bolt along its entire 2" length.
Make certain the covered slider barrel is clean inside. The two parts locate the caliper onto its carrier; e.g. the Y fork. Use the factory recommended torque limit on all fasteners and apply Locktite or other thread glue.
Brake disc(s) should be free of defects; grooves, rust, galling or glaze.
If it cannot be cleaned with emery cloth & solvent / steel wool it should be re-surfaced. Most auto parts stores can cut rotors.
Make sure the master cylinder operates properly with new DOT fluid. Brake lines often need to be bled before the brake can be used effectively. Afterward the brake pedal or hand lever should feel firm and apply enough pressure to activate the brake so the bike comes to a complete & safe stop. Test the brake's action before riding off by pushing the bike and firmly applying the brake(s).
Defective or leaking master cylinders should be replaced or rebuilt.
This is a key safety issue.
With proper set-up and maintenance the stock XS disc brake system will do a good job of stopping these decades old machines. This comment doesn't apply to road racer machines of course.
In the repaint (blue taped) pic the rear brake disc is grooved.
Its headed for a brake lathe at the earliest opportunity.
Ride safe.
..........


")