-
Enjoy XS650.com? Consider making a donation to help support the site.
XS650.com receives a small share of sales from some links on this page, but direct donations have a much greater impact on keeping this site going.
You are using an out of date browser. It may not display this or other websites correctly.
You should upgrade or use an alternative browser.
You should upgrade or use an alternative browser.
New petcocks leaking on 1979 XS650
- Thread starter 1979Special
- Start date
1979Special
XS650 Member
Yeah, that's why I went with new. Easier to source, but they bring their own hassles (see "this thread").All those different versions is what drove me crazy with rebuild kits because they differ.
Holes in the diaphragms from one version don't align with another version.
I swore I'd never go back to a carb bike, but here I am again.
Yeah, I understand what you are saying about carb and points ignition bikes - but once you get them sorted out, they are fine.
My 1978 XS650E starts and idles like the day it was built and everything is original and so does my 1983 BMW R100RS. The key thing is that I can fix them without thousands of dollars in fancy diagnostic tools.
My 1978 XS650E starts and idles like the day it was built and everything is original and so does my 1983 BMW R100RS. The key thing is that I can fix them without thousands of dollars in fancy diagnostic tools.
rhkansas
XS650 Enthusiast
The repair kit from Dime City / Mike's XS is part # 20-0014. New filters for the stand tubes are part # 20-6419 (set of two filters). The petcock is super easy to rebuild. I used a soft bristle wire brush to clean up any oxidation / deposits from behind the rubber valve disc, then made sure the sealing face of the turn valve was clean, flat and smooth (make sure there are no sharp edges around the passage channel). The original valve disc that was in the petcock that I rebuilt was black in color - indicating it was probably a nitrile / buna material. The replacement in the kit was a reddish - maroon color, indicating that it was probably viton or variant thereof, which should give longer service life. There is a screen and plug in the valve body that are easy to remove and clean - overall rebuild of this manual petcock is a very simple task. I did add a wire clamp to each prefilter so they would stay on the pickup tubes - they are made of nylon or similar material, which does not have good elastomeric memory, and I found mine floating loose in the tank after they had slipped off the stand pipes. I wound some stainless steel wire around the threads of a bolt (I don't recall exactly whether it was a 5/16-18 or 1/4-20) - then clipped a couple of windings and fit them around the lower part of the filter - had to work them over the plastic, but the result was a tight fit over the standpipes.@rhkansas, do you still have the stuff you sent me for this repair? Full disclosure, that was the procedure I followed.
I use Parker O Lube on that sealing disc and o'ring liberally. 3K miles on my rebuild of said petcock and it's still buttery smooth. I hypothesize that dielectric grease may do the job as a substitute, but I have no need to try it.Description
Parker Olube lubrication of all types of ORing seals is extremely important for installation of all types, operation of moving and seating of static seals. The specific rule for installation is: The greatest benefit in using a lubricant is obtained during the installation of the Orings.
PARKER O-LUBE is an outstanding general purpose grease intended for use with seals that perform in hydrocarbon service. It can also be used in pneumatic service. Its useful temperature is -20° to 180°F(-29° to 82°C). PARKER SUPER-0-LUBE is an exceptional all purpose lubricant. It is not a grease, but a high viscosity silicone oil. It is especially useful as a seal lubricant. Its temperature range is -65° to 400°F (-54° to 204°C).

Vacuum Petcock update here
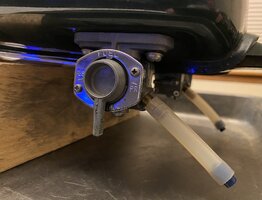
A few days ago I so confidently posted the successful remount of this set of 78/79 Vacuum Petcocks which lived here on my kitchen counter not leaking for a day and a half. So I moved the tank back out to the garage. Now here we are in a bitter cold spell and the garage is probably 40 deg? After work yesterday, you guessed it, the left petcock started a steady drip out of the body. Fuel vapors filling the garage! This required almost immediate action of course.
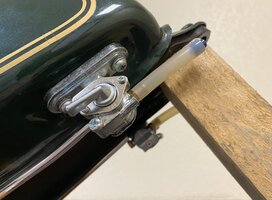
Last night I prepared those manual after market petcocks for replacement following suggestions in this thread to “flatten” the valve face on glass with emory paper, sticking those filters on more securely. etc.
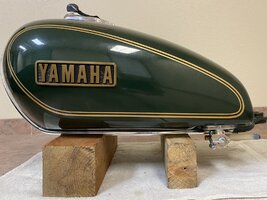
The tank was precariously stored at an angle of which the fuel would not spill in the warm basement room. Petcocks warmed, Re- Using the mount washer/gaskets slathered lightly with YamaBond. (wish I had new but no time)
update: manual petcocks proven dependable for now.
So now the aftermarket petcocks are on tight and functional in storage mode.
I’ve lost trust in the vacuum petcocks because fuel leaks are dangerous. Very much hoping these manual petcocks prove out good soon.
Waiting for the arctic cold blast to leave.
Attachments
Last edited:
There is an excellent post on refurbishing vacuum Petcocks reposted from the XJ site. Gives a good descriptive with accompanying pics showing the cleaning up of casting marks and tips on cleaning. @gggGary posted this and may know where it is.
Looked in the tech menu but it hasn't been added.
Vacuum petcocks need to b used or the diagram will dry out and if that has happened the chances are it will leak when used. Kinda ironic that those who complain about the "notorious" bad vacuum petcocks leaking, buy aftermarket manual petcocks then have to fix poor casting so they don't leak.
I used that thread to learn about the vacuum petcock on my '80SG. Rebuilt it about 5 yrs ago. Still working fine.There is an excellent post on refurbishing vacuum Petcocks reposted from the XJ site. Gives a good descriptive with accompanying pics showing the cleaning up of casting marks and tips on cleaning. @gggGary posted this and may know where it is.
'Course, I used OEM bits and not the Chinese rubber crap Mikes sells.
Found it. All the way back in 2012.Looked in the tech menu but it hasn't been added.
@Travis , add it to Tech?
https://www.xs650.com/threads/rebuilding-yamaha-vacuum-operated-fuel-valves-petcocks.20662/
Done!Found it. All the way back in 2012.
@Travis , add it to Tech?
https://www.xs650.com/threads/rebuilding-yamaha-vacuum-operated-fuel-valves-petcocks.20662/
where do you guys buy the 4-hole repalcement seals for non-vacuum petcocks? https://www.mikesxs.net/yamaha-xs65...z7f3SjXqcYdEx7ncOj3Uhi4ISr-E88R8aAryYEALw_wcB
This is it.where do you guys buy the 4-hole repalcement seals for non-vacuum petcocks? https://www.mikesxs.net/yamaha-xs65...z7f3SjXqcYdEx7ncOj3Uhi4ISr-E88R8aAryYEALw_wcB
https://www.dimecitycycles.com/yama...12-00-90202-05187-801-24437-00-447-24522.html
It's the same part number at MikesXS.
What about the seal only. Not the whole rebuild kit?This is it.
https://www.dimecitycycles.com/yama...12-00-90202-05187-801-24437-00-447-24522.html
It's the same part number at MikesXS.
Good luck with that one.What about the seal only. Not the whole rebuild kit?
Similar threads
- Replies
- 5
- Views
- 362
- Replies
- 7
- Views
- 815


