new xs650 owner - build started
This is my first post here. I have previously been a frequent user of dotheton.com while I was restoring and modifying my cb200 and cb360. Now I am the proud owner of an XS650- figured I should join the best XS650 forum around, so here I am!
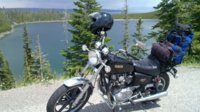
Anyways, I wanted to start out by asking some opinions on this bike that i purchased. Its a 1981 XS650 special. It was purchased for $200 and it included title. The owner didn't really know what he had. He placed it on craigslist and I literally saw the ad within 10 minutes and purchased it immediately. During the course of the first day, he had 30 texts and calls about it. He was actually about ready to simply drag it to the dump and give it away.
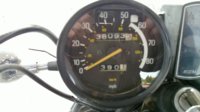
Anyways, he said the bike was running fine last year. He put about 20 miles on it and then basically parked it in the garage and didn't ride for a year. The mileage is 4600 and he claims its original. The tires were both flat and cracked. Two turn signals were broken off. The bike had been painted and they did a terrible job. It looks like they painted the engine with it in the frame. Its all peeling off. The battery was toast and there was still gas in the tank.
I dragged it home. I put in one of my other batteries and the lights work, as does the horn. The starter turned over very sluggishly, but I suspect my battery might have been partially drained. It easily goes into neutral and thru all the gears. After this cursory check, I then proceeded to completely take the bike apart and pulled engine.
So, after this long, drawn-out ramble, I get to my question: How do I know if should rebuild the bike if I haven't started it? I considered trying to start it, but I wanted to rebuild carbs because they had been sitting for so long. Maybe I should have cleaned carbs, left bike together and gotten it running first but its too late for that. I did a compression check with the engine cold and the carbs off. I got 160 PSI on both cylinders. I drained the oil and it looked very clean without any metallic particles in it. Seems like it should run fine. My plan is to strip the old paint off the motor and polish it. Do you think I should just leave motor as is and not rebuild it? How else can I determine whether or not a rebuild is necessary? Obviously for the sake of cost and time saving, I would prefer to not have to rebuild the motor. My end-game plan for the bike is a brat style, sort of like deus/ wrenchmonkey type.
Thanks for the help.
This is my first post here. I have previously been a frequent user of dotheton.com while I was restoring and modifying my cb200 and cb360. Now I am the proud owner of an XS650- figured I should join the best XS650 forum around, so here I am!
Anyways, I wanted to start out by asking some opinions on this bike that i purchased. Its a 1981 XS650 special. It was purchased for $200 and it included title. The owner didn't really know what he had. He placed it on craigslist and I literally saw the ad within 10 minutes and purchased it immediately. During the course of the first day, he had 30 texts and calls about it. He was actually about ready to simply drag it to the dump and give it away.
Anyways, he said the bike was running fine last year. He put about 20 miles on it and then basically parked it in the garage and didn't ride for a year. The mileage is 4600 and he claims its original. The tires were both flat and cracked. Two turn signals were broken off. The bike had been painted and they did a terrible job. It looks like they painted the engine with it in the frame. Its all peeling off. The battery was toast and there was still gas in the tank.
I dragged it home. I put in one of my other batteries and the lights work, as does the horn. The starter turned over very sluggishly, but I suspect my battery might have been partially drained. It easily goes into neutral and thru all the gears. After this cursory check, I then proceeded to completely take the bike apart and pulled engine.
So, after this long, drawn-out ramble, I get to my question: How do I know if should rebuild the bike if I haven't started it? I considered trying to start it, but I wanted to rebuild carbs because they had been sitting for so long. Maybe I should have cleaned carbs, left bike together and gotten it running first but its too late for that. I did a compression check with the engine cold and the carbs off. I got 160 PSI on both cylinders. I drained the oil and it looked very clean without any metallic particles in it. Seems like it should run fine. My plan is to strip the old paint off the motor and polish it. Do you think I should just leave motor as is and not rebuild it? How else can I determine whether or not a rebuild is necessary? Obviously for the sake of cost and time saving, I would prefer to not have to rebuild the motor. My end-game plan for the bike is a brat style, sort of like deus/ wrenchmonkey type.
Thanks for the help.
Last edited:
") , I have found 2 problems with that, these day
, I have found 2 problems with that, these day  .
.