Lance Weersma
XS650 Enthusiast
Good evening gents!
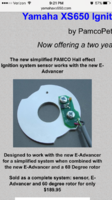
Had the 72' running great and just recently it would occasionally bog down and sputter. I installed a Pamco with eadvancec. About 3 months ago. It was working well for roughly 300 miles and is now not producing spark. Today it finally died and would not turn over due to lack of spark.
I did a search and found the following test.
Testing the coil:
1. Using the lowest scale on the meter, measure the resistance between the primary terminals with the wires removed. Should read from 2.5 to 4.5 Ohms.
Mine was 2.2Ohms
2. Using the highest scale on the meter, measure between one of the primary terminals and the center core of the coil. Should be infinite resistance. (open)
Mine open
3. Measure between one of the primary terminals and one of the plug wire terminals. Should be infinite resistance. (open circuit)
Mine Open
4. Measure between one of the plug wire terminals and the core of the coil. Should be infinite resistance (open circuit)
Mine open
5. Measure from one plug terminal to the other. Should be 15,000 to 20,000 Ohms
Mine 16.2k
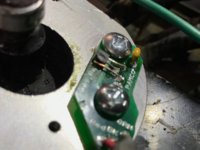
Testing the PAMCO
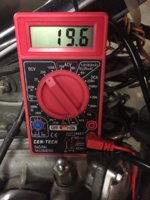
1. Use a voltmeter and check for battery voltage on each of the red/white wires with the key and kill switch are turned on.
18.6v
2. The dual output coil has to have both spark plug wires connected to a spark plug at all times.
3. To test for spark, connect one of the spark plug wires to a spark plug that is grounded to the engine.
To test for spark without having to turn the engine over, do this procedure:
1. Remove the PAMCO rotor.
2. Remove the locating pin in the advance rod.
3. Reinstall the rotor, but without the pin.
4. Replace the nut holding the rotor on loosely. This will allow you to spin the rotor to produce a spark without having to turn the engine over.
5. Connect one of the spark plug wires to a spark plug that is grounded to the engine, but not installed in the engine.
6. Make sure that the other spark plug wire is connected to a spark plug in the engine.
7. Turn on the ignition switch and the kill switch.
8. Spin the rotor while looking at the gap in the spark plug for a spark.
9. Turn off the kill switch and the ignition switch.
Mine- no spark produced
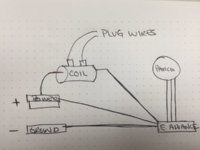
When I checked. Voltage out of the coil it was 13.6v for the green and red. Going into the e advance it hold true but coming out of the advancement unit the red is 13v and the green is 4.5v. Same is true at the Pamco rotor.
Any advice or recommendations?
Had the 72' running great and just recently it would occasionally bog down and sputter. I installed a Pamco with eadvancec. About 3 months ago. It was working well for roughly 300 miles and is now not producing spark. Today it finally died and would not turn over due to lack of spark.
I did a search and found the following test.
Testing the coil:
1. Using the lowest scale on the meter, measure the resistance between the primary terminals with the wires removed. Should read from 2.5 to 4.5 Ohms.
Mine was 2.2Ohms
2. Using the highest scale on the meter, measure between one of the primary terminals and the center core of the coil. Should be infinite resistance. (open)
Mine open
3. Measure between one of the primary terminals and one of the plug wire terminals. Should be infinite resistance. (open circuit)
Mine Open
4. Measure between one of the plug wire terminals and the core of the coil. Should be infinite resistance (open circuit)
Mine open
5. Measure from one plug terminal to the other. Should be 15,000 to 20,000 Ohms
Mine 16.2k
Testing the PAMCO
1. Use a voltmeter and check for battery voltage on each of the red/white wires with the key and kill switch are turned on.
18.6v
2. The dual output coil has to have both spark plug wires connected to a spark plug at all times.
3. To test for spark, connect one of the spark plug wires to a spark plug that is grounded to the engine.
To test for spark without having to turn the engine over, do this procedure:
1. Remove the PAMCO rotor.
2. Remove the locating pin in the advance rod.
3. Reinstall the rotor, but without the pin.
4. Replace the nut holding the rotor on loosely. This will allow you to spin the rotor to produce a spark without having to turn the engine over.
5. Connect one of the spark plug wires to a spark plug that is grounded to the engine, but not installed in the engine.
6. Make sure that the other spark plug wire is connected to a spark plug in the engine.
7. Turn on the ignition switch and the kill switch.
8. Spin the rotor while looking at the gap in the spark plug for a spark.
9. Turn off the kill switch and the ignition switch.
Mine- no spark produced
When I checked. Voltage out of the coil it was 13.6v for the green and red. Going into the e advance it hold true but coming out of the advancement unit the red is 13v and the green is 4.5v. Same is true at the Pamco rotor.
Any advice or recommendations?
")