Where did get the paint?Painting a bit of my tins ……tangerine metalflake and candy over black base.
And it’s rattlecan.
-
Enjoy XS650.com? Consider making a donation to help support the site.
XS650.com receives a small share of sales from some links on this page, but direct donations have a much greater impact on keeping this site going.
You are using an out of date browser. It may not display this or other websites correctly.
You should upgrade or use an alternative browser.
You should upgrade or use an alternative browser.
Painting Tins. No really...
- Thread starter Jim
- Start date
https://rothmetalflake.com/Where did get the paint?
That’s plum beautiful! 
So.... 'splainin' time....
This was Jessee's tank a few weeks ago....

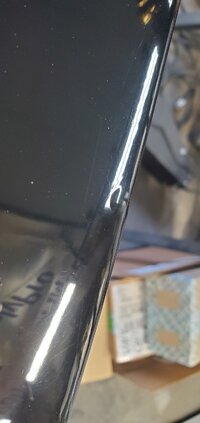
Had a few dust nibs to take out, but otherwise done. While I was cuttin' the nibs out, I noticed this.....

Fuck me.... a bubble in the paint.
It ain't gonna go away all by itself. Time for surgery...

As y'all can prolly guess, I was spittin' nails....
So, I walked away from it for a while.
Finally came back to it.... feathered it out, reprimed and filled it back in.


Candy's aren't receptive to blending. At least I've never mastered 'em. I masked off just on the edge of the inner white stripe and re-shot the candy. I'd already masked a line just inside the large white line. Pulled the inner mask off and shot clear to the overlap on the large middle white.

Sumbich if it didn't work.... better than I hoped actually. Just spent half a day feathering out the clear overlap and doing a cut and buff over the entire tank.


Took it out in the sunlight.... the top's an exact match to the sides.
When I first saw the bubble I thought I was truly fucked..... sand it down and start over.
@JesseeS , it'll be on it's way to the shippers first thing in the morning.
Never say die....
This was Jessee's tank a few weeks ago....
Had a few dust nibs to take out, but otherwise done. While I was cuttin' the nibs out, I noticed this.....
Fuck me.... a bubble in the paint.
It ain't gonna go away all by itself. Time for surgery...
As y'all can prolly guess, I was spittin' nails....
So, I walked away from it for a while.
Finally came back to it.... feathered it out, reprimed and filled it back in.
Candy's aren't receptive to blending. At least I've never mastered 'em. I masked off just on the edge of the inner white stripe and re-shot the candy. I'd already masked a line just inside the large white line. Pulled the inner mask off and shot clear to the overlap on the large middle white.
Sumbich if it didn't work.... better than I hoped actually. Just spent half a day feathering out the clear overlap and doing a cut and buff over the entire tank.
Took it out in the sunlight.... the top's an exact match to the sides.
When I first saw the bubble I thought I was truly fucked..... sand it down and start over.
@JesseeS , it'll be on it's way to the shippers first thing in the morning.
Never say die....
Well done.  .........and people generally/often complain about how much a good paint jobs costs...........
Was wondering if you were doing the stripes..........kinda think another unusual colour would have gone with the purple to add to an unusual concept of the whole thing
.........and people generally/often complain about how much a good paint jobs costs...........Was wondering if you were doing the stripes..........kinda think another unusual colour would have gone with the purple to add to an unusual concept of the whole thing
Thought you'd like seeing this Jim, been meaning to get a pic. finally did today.

Thought you'd like seeing this Jim, been meaning to get a pic. finally did today.
View attachment 218374
R5A?
Jim that’s the first time I’ve seen that paint in a really bright light, yowza! The purple metal flake really pops! 
Nice save on that bubble repair. That was a difficult fix.
Nice save on that bubble repair. That was a difficult fix.
Awesome repair!
You've given me some hope that I can get a similar result on a "spot repair". I've got two (~4mm) spots (one each tank) on my homemade tank that the paint has bubbled. It’s been several weeks and they’ve not grown or changed. The spots are along the top and side panels’ weld seam. I pressure-tested to 10psi before first primer (epoxy), but apparently fuel vapor found a way (IDK). It’s solid black base coat – easier than your candy. If I’m lucky, I’ll avoid stripping the whole thing.
You've given me some hope that I can get a similar result on a "spot repair". I've got two (~4mm) spots (one each tank) on my homemade tank that the paint has bubbled. It’s been several weeks and they’ve not grown or changed. The spots are along the top and side panels’ weld seam. I pressure-tested to 10psi before first primer (epoxy), but apparently fuel vapor found a way (IDK). It’s solid black base coat – easier than your candy. If I’m lucky, I’ll avoid stripping the whole thing.
Attachments

Thanks! If I may....Awesome repair!
You've given me some hope that I can get a similar result on a "spot repair". I've got two (~4mm) spots (one each tank) on my homemade tank that the paint has bubbled. It’s been several weeks and they’ve not grown or changed. The spots are along the top and side panels’ weld seam. I pressure-tested to 10psi before first primer (epoxy), but apparently fuel vapor found a way (IDK). It’s solid black base coat – easier than your candy. If I’m lucky, I’ll avoid stripping the whole thing.
You can re-pressurize 'em and watch the bubbles. If they start growing, you've got a weld to fix.... if not, feather 'em out and re-shoot.
Fwiw, we NEVER went higher than 2.5psi when checking tanks in the airplane world.
Amazing work Jim! I’m so glad it didn’t need a complete redo I would’ve felt so bad. Can’t wait to get it on the bike
Thanks. Will do.
It was maybe 3 weeks from painting to introducing first fuel. I was thankful for no leaks. Bubbles appeared a few days later after 2nd test ride. Now just over 100 miles, no change.
I only want to redo this once if possible, so I'll pressure to 2psi and watch as you suggest. Pressurize for what time period please?
Standard procedure is to pressurize then start spraying soapy water over the welds and connections. If there's a leak, bubbles will form immediately.Thanks. Will do.
It was maybe 3 weeks from painting to introducing first fuel. I was thankful for no leaks. Bubbles appeared a few days later after 2nd test ride. Now just over 100 miles, no change.
I only want to redo this once if possible, so I'll pressure to 2psi and watch as you suggest. Pressurize for what time period please?
I think if I were you, I'd pressurize, soap the (paint) bubbles and watch 'em for a min or two. If there's no bubbles from the bubbles...
 .... stick 'em with a pin and soap again. If the seam's leaking, you'll get (soap) bubbles immediately.
To answer your question, there's no time limit... as long as it takes.
I don't know about you, but when crap like that happens to me, I drive myself nuts analyzing it trying to prevent it from happening again. Most times I can't find a reason. Thankfully, if you're using quality products, it's a pretty rare occurrence. Nice save!So.... 'splainin' time....
This was Jessee's tank a few weeks ago....
View attachment 218360
Had a few dust nibs to take out, but otherwise done. While I was cuttin' the nibs out, I noticed this.....
View attachment 218361
Fuck me.... a bubble in the paint.
It ain't gonna go away all by itself. Time for surgery...
View attachment 218362
As y'all can prolly guess, I was spittin' nails....
So, I walked away from it for a while.
Finally came back to it.... feathered it out, reprimed and filled it back in.
View attachment 218365
View attachment 218366
Candy's aren't receptive to blending. At least I've never mastered 'em. I masked off just on the edge of the inner white stripe and re-shot the candy. I'd already masked a line just inside the large white line. Pulled the inner mask off and shot clear to the overlap on the large middle white.
View attachment 218367
Sumbich if it didn't work.... better than I hoped actually. Just spent half a day feathering out the clear overlap and doing a cut and buff over the entire tank.
View attachment 218369
View attachment 218370
Took it out in the sunlight.... the top's an exact match to the sides.
When I first saw the bubble I thought I was truly fucked..... sand it down and start over.
@JesseeS , it'll be on it's way to the shippers first thing in the morning.
Never say die....
Thanks!I don't know about you, but when crap like that happens to me, I drive myself nuts analyzing it trying to prevent it from happening again. Most times I can't find a reason. Thankfully, if you're using quality products, it's a pretty rare occurrence. Nice save!
Yeah, I did a LOT of head scratchin'....

Dunno... like you said, most times you can't figure out a reason. Thankfully that's something that rarely happens.
Great save!
That reminds me of a series of blisters I saw once on a hood. There were 4 oval spots about 3/8 of an inch in diameter, fairly evenly spaced, but in a slight arc. Finally figured out that it was finger prints caused by skin oil/salt. Since then, right before I shoot, I wash it down with an alcohol/waterborne cleaner or a good foaming glass cleaner without ammonia. Takes skin oil off far better than wax and grease remover. Haven't had a fisheye in years.Thanks!
Yeah, I did a LOT of head scratchin'....
Dunno... like you said, most times you can't figure out a reason. Thankfully that's something that rarely happens.
Pressure; yupper way back when, I ballooned a cb900 f tank. The tunnel spread like cheap hussy seeing a 100 bill. Inflation .. wink.
1+ on that.or a good foaming glass cleaner without ammonia.
I'm prolly a little too anal, but I use Rustoleum tar and wax remover and 3M glass cleaner.
Similar threads
- Replies
- 214
- Views
- 26K