XS 850 Re Model

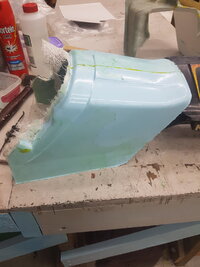
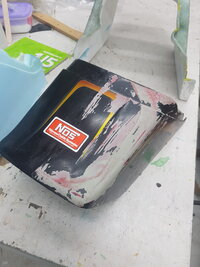
The mould turned out ok ,but I was too mean with the PVA or forgot to apply it to one side any how I wrecked the paint on the tail piece. The owner was not bothered and asked if I would make him one from my mould. The blue one is for him.There was some bubbling of the gel coat in one place I think it was to thin but will talk to a local who has been doing this stuff for years to find the fix.
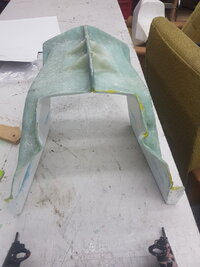
The next one out of the mould will be for the 850 and will be wider and not have gel coat as I want to lay the seat pan up to it. 20230514_164651.jpg20230514_164700.jpg20230514_164711.jpg
 
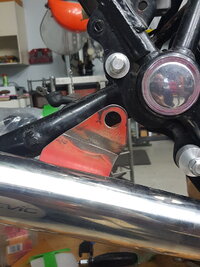
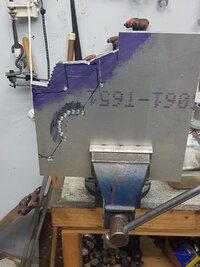
I have been side tracked a bit working on the RD ignition but was able to make the rear exhaust bracket. It needs welding at the bends but I am out of gas at the present. I also have started making the RHS foot peg hanger rear brake master cylinder mount. Wish I had a band saw.
Slowly making progress but another interesting project is looming so this will go on the back burner for a while. As Jim says the 850 will glare at me when I go in the shed.
bracket.jpgPlate.jpg
 
Hi. Just looking to see if there were any updates and pics on this thread.
I have a similar XS850 project underway, looking at R6 front end, 80’s cafe look to it.
You said you fitted the rear R1 calliper bracket with only a slight mod and the xs disc. Can you enlighten me as the R1 disc is smaller.
Cheers.
 
Hi Eugene, it has been such a long time since I did this I am struggling to remember. I did make a large spacer to bring the XS disc out further, and drilled the new hanger to suit the larger 850 axle.
I cant remember what year the caliper and hanger came off but if you look at post number 18 you can see it has a casting for a torque arm. Most of the ones that come up in google images dont have this casting.
From memory all I did was drill the casting, move the disc to compensate for the off set and make a torque arm that fitted to the XS rear brake hanger bracket mount.
I don't remember having to compensate for the R1 having a smaller disc.
Thanks for the info. I just can’t find any hangers for a larger 265mm disc only the 1998 R1 at 245mm, was considering getting the XS disc turned down.
Nice work you’ve done there, are you keeping the wire wheels?
 
Thank you and yes I will keep the wire wheels. They came with the package of 1 bike and 1 parts bike I bought. They are from a Japanese market GX 750 that was not sold in NZ and pretty rare. They have been rebuilt with new rims and spokes. The cost was eye watering.
 
That’s a shame. Yes, they are like rocking horse poo. But the bike looks the absolute business with wire wheels. I’m looking into getting a one off hub done , but like wise it gives me heartburn.
 
For the front use a wire wheel XS 650 hub. For the rear a friend of mine's son got a rear hub from a XV500 virago (some models had wire wheels) for his XV500. No idea if it would fit an 850 rear drive but given that a lot of parts do interchange it could be worth researching.
Check the part numbers on CSML might give you a clue
 
Update on previous question. For anyone else looking at fitting BlueSpot rear calliper.
I’ve sourced bracket and calliper.
XJR1300 rear hanger and bluespot to fit.
FZR1000 also uses same calliper.
Bracket off this model hangs wrong way around in my opinion.
The R1 bluespot will not fit,too small c to c on mounting bolts, nor is the hanger suitable.
Spacers required to bring disc out by about 10mm and spacer required to make spindle correct diameter for XJR bracket.
I’ve just used a square ally arm to hold calliper in position.
Think that’s it. Just need to rebuild bike now 😖.
 

Attachments

  • 3E771F8C-40CA-44BD-9396-43E306A426E7.jpeg
    3E771F8C-40CA-44BD-9396-43E306A426E7.jpeg
    440.6 KB · Views: 45
The rear caliper I have must be from an XJR1300 as it looks the same as yours. I am sorry if the incorrect information I posted sent you on a wild goose chase.
I haven't been back at this bike for a while I will post updates when I do.
Are you going to start a thread for your 850?
 
The rear caliper I have must be from an XJR1300 as it looks the same as yours. I am sorry if the incorrect information I posted sent you on a wild goose chase.
I haven't been back at this bike for a while I will post updates when I do.
Are you going to start a thread for your 850?
No apologies needed my friend.
If it wasn’t for your post I wouldn’t have given it a thought. The research is always interesting.
Both callipers look the same/identical. Only difference is the size. The only big problem is availability, the R1 calliper is quite common and well priced, the XJR calliper is like rocking horse poo and at least double the price £200 +++
I’ll probably do a finished build on the XS850 site, if I ever get there 🤣. I’ve had so many hold ups, one being the engineers I use. Their workshop complex went up in flames and a lot of my stuff was trapped inside for months and I lost a bit of interest at that point. But we’re on the move again now.
 

Attachments

  • 87AC48AA-FD06-4A36-8EE5-86F5FB9BF5BF.jpeg
    87AC48AA-FD06-4A36-8EE5-86F5FB9BF5BF.jpeg
    395.6 KB · Views: 46
Wow lucky you got your parts back. I got fed up waiting for parts to be made by professionals. They were invariably wrong so I bought a mill and with no experience got stuck in. I made lots of mistakes but also made some useable stuff as well. If you are in a position to do so I highly recommend getting your own machines.
I hope your 850 project goes more smoothly from now on.
 
The stuff of dreams. I’ve got a small lathe and have done all the small aluminium bits, rear wheel and disc spacers etc, It’s a start.
Thanks for your help, I will post a picture when done.
 
Over the last month or so I have been able to put some solid effort into the 850.

I have made proper mounts for the fairing it was a bit fiddly but got there eventually.

Also made the dash for inside the fairing, just need to go visit a mate with a bender to put the set in it. Then need to decide on a finish for the surface the front runner was engine turning, then thought about carbon fibre vinyl wrap. Todays winner is satin black textured paint. I have plenty time to decide.

20250125_174227.jpg

I have now made 3 rear exhaust mounts but have got one now that I can live with.

Finished of the rear sets, I have lost count of the hours in these, just waiting on some shims to space the bearings off the faces so the levers move freely. Very upset with myself as I drilled the hole for lock wiring the toe lever cap screw on the top instead of underneath. I got it right for the brake but not the gear lever. I want to lockwire and Loctite the lever parts as I don't want to be on a ride and have them fall off it will also make it easier for warrants.
Speaking of which now I have decided to go for a double seat I will need rear pegs . No intention to take passengers so will mount them off the lower rear shock mounts for inspection time and remove them.
20250125_172856.jpg20250125_172913.jpg
No entirely convinced that the master cylinder is far enough inboard. If it proves to be a pain I can remount it closer to the frame and make a right and part to the lever to operate it. Also the lever may need a return spring but have thought of how to neatly achieve this. The kick start mechanism is going to be removed and blanked off.


Made some progress on the seat side cover combo. Lesson I learned from this was to weld the mounts for seats on the underside of the frame rail not the top. I need to do more shaping to get the side covers to match the tank.
CB 900f side covers have 3 pseudo vents near the tank , I think I will cut 3 real slots and glue some mesh on the inside.20250125_173006.jpg

Still need to make a seat base and get some foam and shape it. I imaging a stepped seat like some of the super bike racers had back then.
 
Last edited:
Over the last month or so I have been able to put some solid effort into the 850.

I have made proper mounts for the fairing it was a bit fiddly but got there eventually.

Also made the dash for inside the fairing, just need to go visit a mate with a bender to put the set in it. Then need to decide on a finish for the surface the front runner was engine turning, then thought about carbon fibre vinyl wrap. Todays winner is satin black textured paint. I have plenty time to decide.

View attachment 343089

I have now made 3 rear exhaust mounts but have got one now that I can live with.

Finished of the rear sets, I have lost count of the hours in these, just waiting on some shims to space the bearings off the faces so the levers move freely. Very upset with myself as I drilled the hole for lock wiring the toe lever cap screw on the top instead of underneath. I got it right for the brake but not the gear lever. I want to lockwire and Loctite the lever parts as I don't want to be on a ride and have them fall off it will also make it easier for warrants.
Speaking of which now I have decided to go for a double seat I will need rear pegs . No intention to take passengers so will mount them off the lower rear shock mounts for inspection time and remove them.
View attachment 343086View attachment 343087
No entirely convinced that the master cylinder is far enough inboard. If it proves to be a pain I can remount it closer to the frame and make a right and part to the lever to operate it. Also the lever may need a return spring but have thought of how to neatly achieve this. The kick start mechanism is going to be removed and blanked off.


Made some progress on the seat side cover combo. Lesson I learned from this was to weld the mounts for seats on the underside of the frame rail not the top. I need to do more shaping to get the side covers to match the tank.
CB 900f side covers have 3 pseudo vents near the tank , I think I will cut 3 real slots and glue some mesh on the inside.View attachment 343088

Still need to make a seat base and get some foam and shape it. I imaging a stepped seat like some of the super bike racers had back then.
Looking good. Glad to see you’re making progress.
Great write up.
 
Still plugging away, wanting a change from fibre glassing I fitted the spoked front wheel and found that I needed to relieve the back of the calipers a bit to get clearance for the spokes.

That done next was to correctly size the hardware. The cap screws for the discs had to be shortened and also have the underside of the heads turned down to clear the lower caliper adaptor plate bolt. Also had to shortened the nuts holding the bolts.

After that I nickel plated all the bits that had been machined to stop them rusting.
20250301_202449.jpg

Next up was a pick up for the speedo, this is being driven of the rear disc bolts. I am using non stock bolts with raised ID on them and thought that the irregular surface would cause problems with the pickup. I machined the heads flat and plated them as well. Not 100% happy with my bracket but it will do for now.

I also bought some bushes for the handlebar mounts (the same parts as an XS 650) so was able to measure and buy the bits to assemble the brake lines.

On track bikes I use AN fittings but this is a road bike and only certain types of line are accepted at inspection luckily there are lots of options, so you buy the parts you need and assemble them.

Pulled the brake calipers apart and was pleasantly surprised that the pistons and seals were all in good shape. Many people use a special tool to remove the blue spots to get the pistons out. I did consider buying the tool but opted for my trusty XS master cylinder and meths method. It was easy to get the first piston out on the front but after that it became harder. I very carefully used compressed air in combination with clamps, old brake pads and fingers to block holes to pop the others. Pretty easy really so if you have these calipers save your money.
In one photo you can see the small amount of metal removed for clearance.
20250301_103532.jpg20250301_103805.jpg20250301_112724.jpg20250301_112740.jpg


The calipers have been cleaned and painted. While on the job I polished the stainless cover plates and plated the brake pad holder pins. While fiddling with the wheels I decided to replate the ends of the axles and the nuts.

Next was to sort rear foot pegs, after a rummage round I found some XS ones so sorted out their mounting and pulled them apart for a bit of a refurb.

The clevis pin holes are ovals but can be drilled to 8mm for bigger pins to remove slop so they should be ok. 8mm pins on order.

Still so much to do.
 
Still plugging away, wanting a change from fibre glassing I fitted the spoked front wheel and found that I needed to relieve the back of the calipers a bit to get clearance for the spokes.

That done next was to correctly size the hardware. The cap screws for the discs had to be shortened and also have the underside of the heads turned down to clear the lower caliper adaptor plate bolt. Also had to shortened the nuts holding the bolts.

After that I nickel plated all the bits that had been machined to stop them rusting.
View attachment 345042

Next up was a pick up for the speedo, this is being driven of the rear disc bolts. I am using non stock bolts with raised ID on them and thought that the irregular surface would cause problems with the pickup. I machined the heads flat and plated them as well. Not 100% happy with my bracket but it will do for now.

I also bought some bushes for the handlebar mounts (the same parts as an XS 650) so was able to measure and buy the bits to assemble the brake lines.

On track bikes I use AN fittings but this is a road bike and only certain types of line are accepted at inspection luckily there are lots of options, so you buy the parts you need and assemble them.

Pulled the brake calipers apart and was pleasantly surprised that the pistons and seals were all in good shape. Many people use a special tool to remove the blue spots to get the pistons out. I did consider buying the tool but opted for my trusty XS master cylinder and meths method. It was easy to get the first piston out on the front but after that it became harder. I very carefully used compressed air in combination with clamps, old brake pads and fingers to block holes to pop the others. Pretty easy really so if you have these calipers save your money.
In one photo you can see the small amount of metal removed for clearance.
View attachment 345037View attachment 345038View attachment 345039View attachment 345040


The calipers have been cleaned and painted. While on the job I polished the stainless cover plates and plated the brake pad holder pins. While fiddling with the wheels I decided to replate the ends of the axles and the nuts.

Next was to sort rear foot pegs, after a rummage round I found some XS ones so sorted out their mounting and pulled them apart for a bit of a refurb.

The clevis pin holes are ovals but can be drilled to 8mm for bigger pins to remove slop so they should be ok. 8mm pins on order.

Still so much to do.
Pleased to have re-found this project. More pleased you are still plugging away at it. I’m back on board..
 
The seat base is finished. If I ever do this again I will make the seat are flat, this one has a rise underneath and it just makes it more complicated. There must be a reason why I did it but cant remember.

Next came shaping the foam, the upholsterer suggested for the passenger seat I use denser foam on the bottom as the softer foam at that depth would crush under use and be uncomfortable. I have no intention of taking passengers but thought it was good advice.

I found a new fine toothed hacksaw blade worked well for roughing out. I was then told to use a disc grinder for the final shaping.
I was very sceptical of this but it works better than I could have imagined. Very messy though.
20250324_142545.jpg20250324_142530.jpg20250324_142451.jpg


The brakes are back together with new pads and I have the lines sitting on the bench.

20250324_142658.jpg
The new bushes are in the handlebar mounts.

The rear foot pegs have been refurbished new larger clevis pins have taken all the slop out and they had a trip to the zinc tank as well.
The old rubbers came up ok with a good clean and wipe down with rubber grease.
Does anyone else find that rubber grease perks up old fittings?
20250324_142802.jpg

Also cut some mesh to fit in the park light lens on the bikini fairing. its a late model Lawson replica one with the park light above the headlight. At least I think its a park light.

Next up is the number plate/ rear indicator mount , getting the seat covered and final shaping of the sidecovers and tail piece.
I want the seat shape finalised before shaping the lower tail piece.
Still thinking about vents a la 900 BolDor on the sidecovers.
I think then I will assemble it (but leave it dry) check for any errors fix them then pull it apart for clean up and painting. The wiring will be the last thing.Oh yes and tyres need tyres.
 
Back
Top