-
Enjoy XS650.com? Consider making a donation to help support the site.
XS650.com receives a small share of sales from some links on this page, but direct donations have a much greater impact on keeping this site going.
You are using an out of date browser. It may not display this or other websites correctly.
You should upgrade or use an alternative browser.
You should upgrade or use an alternative browser.
What have you done to your XS today?
- Thread starter I am Carbon
- Start date
-
- Tags
- maintenance
Good. Hopefully, he will respond and pull the adverts before some poor person gets sucked in.
That Seller has made the following promise to customers:
"Any major flaws in any parts are DISCLOSED to YOU, to the best of our ability."
I reminded the Seller of this.
"Any major flaws in any parts are DISCLOSED to YOU, to the best of our ability."
I reminded the Seller of this.
highboy_coupe
XS650 Addict
Done me clutch!
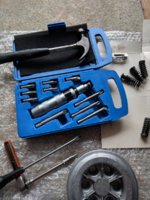
Got one of these, which worked like a dream BTW, was £13 on Amazon branded "Bergen":

To smash the cover off this:

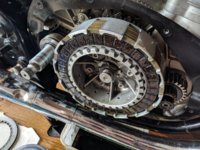
So I could put in new things:

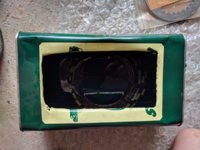
Along with some stronger springs:

(Note the old friction plates, very smooth)
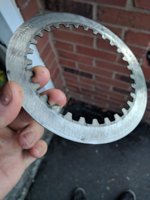
The removed steel plates where quite notched:

You can't really see, but anyway; on my old Rotax engined Harley MT350 we used to lightly file down the notches on the basket, my XS basket wasn't notched per say, but there were some rough areas, is it advisable on these bikes to file/sand/wet and dry the basket?
P.S thanks for the tips, much appreciated
Got one of these, which worked like a dream BTW, was £13 on Amazon branded "Bergen":

To smash the cover off this:

So I could put in new things:

Along with some stronger springs:

(Note the old friction plates, very smooth)
The removed steel plates where quite notched:

You can't really see, but anyway; on my old Rotax engined Harley MT350 we used to lightly file down the notches on the basket, my XS basket wasn't notched per say, but there were some rough areas, is it advisable on these bikes to file/sand/wet and dry the basket?
P.S thanks for the tips, much appreciated
Attachments
Getting the last bits bolted on to my mix'n match 77 Standard. I was going to use a 2 into 1 exhaust that I had but this set looks nicer. In a couple days it will be ready to advertise for sale. Muffler mount will need to be finalized and trimmed !

Last edited:
highboy_coupe
XS650 Addict
Can I replace the springs without taking the whole clutch out? I’m planning on buying these along with the ebc clutch springs.
I've literally just done this 2 posts up, you can see the springs removed using an impact driver, and the clutch plates still in place. Everyone will tell you you MUST use an impact driver... You have been warned
Last edited:
The impact driver works extremely well on these screws. I could not get them undone with a screwdriver but the impact worked first time with only a soft strike of the hammer. Just make sure the bit you use fits the screw head perfectly. My Sealy impact surprisingly had the perfect bit for these.
... I re-adjusted my valve clearances this evening to 006 and 012, and took the bike for a test ride. It ran noticably better at idle, and acceleration was not hampered the way it had been with the tighter tolerances. It is WAY louder and clackety, but for the performance difference, I’m fine with that...
Great!
I ran mine at 0.005" and 0.010" for a long time.
Something to try next time you're in there...
Yup if You are the first one in and use an impact driver the stock clutch spring screws are completely reusable. Actually even if Primitive Pete (sorry MaxPete) was in before you if you take the time to reform the heads with a #3 philips and hammer even rather boogered up heads will be quite usable.
I guess there's a trade off with increasing clearance causing more impact damage to valve stems and adjuster tips?Great!
I ran mine at 0.005" and 0.010" for a long time.
Something to try next time you're in there...
I guess there's a trade off with increasing clearance causing more impact damage to valve stems and adjuster tips?
Makes sense to me.
But, my valve tips are still good 'n flat after all these years.
Go figure...
I’ve got an impact driver.  I guess this will be a convenient opportunity to replace the RH gasket and address this new leak. Good thing I proactively ordered both LH and RH gaskets months ago. I’ll be on the phone with the local power sports store later this morning to order another cam seal.
 I guess this will be a convenient opportunity to replace the RH gasket and address this new leak. Good thing I proactively ordered both LH and RH gaskets months ago. I’ll be on the phone with the local power sports store later this morning to order another cam seal.
Last edited:
I thought running them too tight is what caused damage. ???I guess there's a trade off with increasing clearance causing more impact damage to valve stems and adjuster tips?
I thought running them too tight is what caused damage. ???
Well, that, too. Too tight risks oil starvation in the thin gap of the cam lobe and rocker pad, and valve leakage from being held off the seat too long.
Too loose and the rocker's adjuster tip hammers on the valve stem tip.
There's a "sweet spot" in valve lash, allowing sufficient oiling and avoiding hammering.
http://www.xs650.com/threads/xs650-valve-and-clutch-adjusters-resurfacing.41639/page-2#post-461255
http://www.xs650.com/threads/us-custom-650-1981-bike-tappet-settings.46648/#post-467125
http://www.xs650.com/threads/shell-cam-and-mikes-xs-bb-kit-project.48486/
WT100
100 countries or bust!
I road her about 100 miles including about 20 miles of dirt!

I read through all those links. Looks like loud and clattery will run better and preserve the bike longer, so that’s probably what I’ll run. I Might try 5 and 10 here this week to see if I can quiet her down a little. I should also note that I noticed a big difference in heat coming off the engine after my initial valve adjustment to the tighter specs. It may be wishful thinking, but I’m pretty sure that the looser 6-12 specs have remedied that problem as well. I suspect that the excessive heat may have been a contributor to my RH cover gasket leaking.
I read through all those links. Looks like loud and clattery will run better and preserve the bike longer, so that’s probably what I’ll run. I Might try 5 and 10 here this week to see if I can quiet her down a little. I should also note that I noticed a big difference in heat coming off the engine after my initial valve adjustment to the tighter specs. It may be wishful thinking, but I’m pretty sure that the looser 6-12 specs have remedied that problem as well. I suspect that the excessive heat may have been a contributor to my RH cover gasket leaking.
You might be interested to read Post #3
http://www.xs650.com/threads/a-collection-of-xsjohns-mods.2426/
@ WT100, Where are you at? Between 65 and Rogersville?
650Skull, great link you included here!! Great tips on everything and I liked the one about applying high temp silicone then letting it cure before assembling the head. Equally good, the link within through to dansmc.com is very interesting on numerous topics.
Try this link:
http://www.dansmc.com/mcmaking.htm
Try this link:
http://www.dansmc.com/mcmaking.htm
Last edited:
Similar threads
- Replies
- 32
- Views
- 1K

