1973 Super Rustbucket Resurrection

That is cool.
Your rat bike is pretty special.
Mostly because it is authentic and the maintenance/upgrades you have done were accomplished by embracing and staying true to what is. You clearly have a great eye and feel for the genre evidenced by the masterful touches such as the skateboard and blanket. The faded light as above and on and on. That bike just like "The Jerk" has a special purpose. It is as cool as the helmet it was awarded.
 
00i0i_d7YwhJ0VwQcz_0CI0t2_1200x900.jpg 00m0m_jZkDA0wWMk9z_0CI0t2_1200x900.jpg
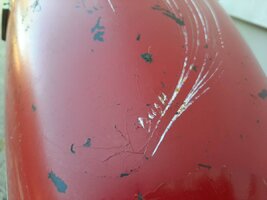
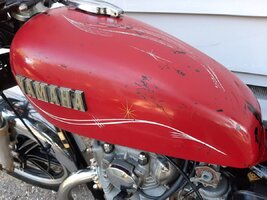
From the local Craigslist. Another example of 45-year-old, Old School Texas pinstriping on an XS650. Signed "BUSH."
 
DSC03279.JPG

Method of last resort for removing a fork damper.

DSC03278.JPG

Note that screwing in the easy-out partially pushed the roll pin at the top of the damper out.

DSC03280.JPG

Yes, I do have the correct damper holding tool (far left), a 12mm socket with 4 of the six flats ground round. It broke the damper head. Crap.
Next try was a long piece of metal, tapered to a blade shape (top). The idea being to wedge it between the damper and the tube wall. This has worked in the past when I didn't have the correct damper holding tool. But, it was too soft, and wouldn't hold.
Moved onto a small easy-out, held in a small 6-point socket. Aimed it at the hole, with the intention of wedging it against the roll pin. Problem was, while it seemed like a good fit, the 4-flat easy-out rotated in the 6-point socket. But, not until it had become stuck. Double crap. After much dicking around with the long metal blade and other objects, managed to free it.
So, I soldered the small easy out into the small 6-point socket (I wish I had a welder). It soldered up good. But, the solder wasn't strong enough, and once again, the easy-out rotated in the socket. Only now, it was really stuck. Triple crap. After shoving all kinds of long, thin objects down the tube, was finally able to break the easy-out.
I was about to give up, but I had already invested a spectacular amount of time on this POS, so after a little rest, I gave it one more try. This time, an easy-out that was big enough to fit my smallest 8-point socket -- that's a socket for square-head bolts. Aimed it at the hole, hammered it in, and finally broke the damper rod bolt free.

DSC03271.JPG

This all started when I decided to show the Superior RustBucket a little love. Been riding the hell out of it for two years, and pretty much done zero to it during that time. Have a pair of good stanchions. Thought that maybe refurbing the forks so that they actually hold oil might make the bike a little safer at highway speeds. It's a shame that I'll lose the patina (rust) on the old stanchions, but I'm trying to save as much of all the rest of the grunge as possible.
 
View attachment 327667
Method of last resort for removing a fork damper.

View attachment 327668
Note that screwing in the easy-out partially pushed the roll pin at the top of the damper out.

View attachment 327669
Yes, I do have the correct damper holding tool (far left), a 12mm socket with 4 of the six flats ground round. It broke the damper head. Crap.
Next try was a long piece of metal, tapered to a blade shape (top). The idea being to wedge it between the damper and the tube wall. This has worked in the past when I didn't have the correct damper holding tool. But, it was too soft, and wouldn't hold.
Moved onto a small easy-out, held in a small 6-point socket. Aimed it at the hole, with the intention of wedging it against the roll pin. Problem was, while it seemed like a good fit, the 4-flat easy-out rotated in the 6-point socket. But, not until it had become stuck. Double crap. After much dicking around with the long metal blade and other objects, managed to free it.
So, I soldered the small easy out into the small 6-point socket (I wish I had a welder). It soldered up good. But, the solder wasn't strong enough, and once again, the easy-out rotated in the socket. Only now, it was really stuck. Triple crap. After shoving all kinds of long, thin objects down the tube, was finally able to break the easy-out.
I was about to give up, but I had already invested a spectacular amount of time on this POS, so after a little rest, I gave it one more try. This time, an easy-out that was big enough to fit my smallest 8-point socket -- that's a socket for square-head bolts. Aimed it at the hole, hammered it in, and finally broke the damper rod bolt free.

View attachment 327670
This all started when I decided to show the Superior RustBucket a little love. Been riding the hell out of it for two years, and pretty much done zero to it during that time. Have a pair of good stanchions. Thought that maybe refurbing the forks so that they actually hold oil might make the bike a little safer at highway speeds. It's a shame that I'll lose the patina (rust) on the old stanchions, but I'm trying to save as much of all the rest of the grunge as possible.
The one time I had to refurbish forks on a ‘73, I was able to remove the damper rod bolts by jamming the tapered end of a broomstick into the top of the damper rod. I guess I got real lucky.
 
DSC03281.JPG

Got the fork seal out!
You're probably thinking I don't know what the bleep I'm doing. Well, take a look at my previous post, what was required to break the bottom fork nut free, and what the over-all state of the bike is.
I was guided by Gary's excellent Fork Seal Removal Post, linked HERE.
With a couple little changes. Instead of a hair dryer, I used a hand-held propane torch for heat, and I got that thing smoking, I mean really hot.

DSC03282.JPG

And, instead of hitting it with a big socket to loosen the seal's grip on the tube wall, I used a punch -- you can see the round marks above -- after the rubber was burned and scraped off so that I could see what I was doing. That finally got the seal moving.
Trust me, I didn't want to spend an hour removing one lousy seal. I started out conventional, and ended up with this.
The good news is zero damage to the fork lip or seal area.

DSC03273.JPG

One more bit of added work -- broke one of the M6 fender mount bolts. All the others, including the M8s, came out with no problems.
Getting this broken bolt will be nothing compared to what I've already dealt with. Then, I can start in on the other fork leg...
 
Last edited:
DSC03284.jpg

So, the other damper rod also broke when I used the CORRECT tool to try to get it out. And, after I broke the first one, I was trying to be a little more careful, but this was inevitable. Had to use the easy-out again.
Lest you think I was ham-handed, I have successfully removed lots of early damper rods. This one snapped like a twig, and it took considerable torque to break the bottom damper rod bolt free.
Note that the part that broke is actually threaded onto the rod shaft, and the roll pin holds it in place. A machinist could make just that the top part, with a stouter 6- instead of 2-faced bolt head, out of steel, instead of Zamak, and a lot of early damper rods would be saved.

x'77 Fork Tool.jpgx'77 Tool Inserted.jpg
You'd have a hard time getting something like 5twins rod-holding tool to work on a badly stuck early damper rod...

DSC03348.jpg
...because the I.D. of an early rod is only 8mm, vs. 13mm for later rods. You could modify the tip of an extra-long flat-tip 1/4" screwdriver, but you'd really need to already have an early damper rod in hand to be sure you modified it correctly. And then, you'd need to weld a handle at 90 degrees to the extra-long screwdriver shaft so you could hold it and keep if from spinning.

DSC03288.jpgDSC03289.jpg
Went straight to the torch to get the fork seal out. This is my new favorite method for fork seal removal when you think it might give you trouble. Set a torch on it for 5 minutes while you do something else, and then the burnt rubber scrapes right off of the steel super-easy. Whack the steel all-around with a pin punch to break it free, and then it pops right out with a tire iron and a protective piece of aluminum a la Gary's method. Easy and no damage to the fork tube.
 
DSC03270.jpgDSC03292.jpg
New (old) fork stanchions, before and after.

DSC03290.jpg
More love: Installed the highway pegs I got from Jim. They're too nice for this bike, and my intention is to put them on one of the other bikes I'm working on, but this is a good place for them till then.

DSC03264.jpgDSC03291.jpg
Before and after: While I was at it, I took a page out of GLJ's playbook, and installed galvanized RMC conduit nipples between the front motor mount brackets. This is really great idea, and everyone with a 70-73 should do it.
I'm not much of a handling or suspension aficionado, but I gotta say, forks with oil in them, and stiffened front frame down tubes, and there is a world of difference in how this bike rides.
(Note to future me: 1972 XS2 and 1973 TX650 fork stanchions and all internals, are identical. Spring length is 400mm.)

DSC03293.jpg
Final word. Two years later, and the Aprilia Hydraulic Clutch Mod is working flawlessly. I've not touched it until now -- opened the fluid reservoir, and the mineral oil I'm using looked brand-new, unlike DOT3 which is always nasty.

That should do it on this bike for another couple of years.
 
View attachment 328408View attachment 328409
New (old) fork stanchions, before and after.

View attachment 328410
More love: Installed the highway pegs I got from Jim. They're too nice for this bike, and my intention is to put them on one of the other bikes I'm working on, but this is a good place for them till then.

View attachment 328411View attachment 328412
Before and after: While I was at it, I took a page out of GLJ's playbook, and installed galvanized RMC conduit nipples between the front motor mount brackets. This is really great idea, and everyone with a 70-73 should do it.
I'm not much of a handling or suspension aficionado, but I gotta say, forks with oil in them, and stiffened front frame down tubes, and there is a world of difference in how this bike rides.
(Note to future me: 1972 XS2 and 1973 TX650 fork stanchions and all internals, are identical. Spring length is 400mm.)

View attachment 328415
Final word. Two years later, and the Aprilia Hydraulic Clutch Mod is working flawlessly. I've not touched it until now -- opened the fluid reservoir, and the mineral oil I'm using looked brand-new, unlike DOT3 which is always nasty.

That should do it on this bike for another couple of years.
It’s still plenty rusty and crusty. I love it.

I met Hugh (Hugh’s Handbuilt) seven or so years back, at the Meltdown in Hendersonville, NC. He was riding an extremely crusty XS-1B he had found leaning up a barn. It was wearing all of its rust and crust with pride. The only giveaway was the visible fresh green gaskets. I’d say you two are birds of a feather.
 
I'm not much of a handling or suspension aficionado, but I gotta say, forks with oil in them, and stiffened front frame down tubes, and there is a world of difference in how this bike rides.
Just having fork oil had to make a difference. Like you I'm not a suspension/frame expert. Do you think you can feel a difference in the fame stiffness. There has to be some merit to tying the down tubes together as that's what Yamaha did starting in 74 with the redesigned frame.
1718312190997.png
 
Do you think you can feel a difference in the fame stiffness.
It's all going to depend on how you ride and what other changes you make. Usually, making a change or improvement exposes another shortcoming or flaw. Frame is now better, so get better springs and shocks. Got tighter springs, now need fork brace. Sometimes the best course of action is to raise your wallet and drive a new bike under it. OTOH, where's the fun in that?
 
Last edited:
It's all going to depend on how you ride and what other changes you make. Usually, making and a change or improvement exposes another shortcoming or flaw. Frame is now better, so get better springs and shocks. Got tighter springs, now need fork brace. Sometimes the best course of action is to raise your wallet and drive a new bike under it. OTOH, where's the fun in that?
Just trying to improve what one has. A 50+ year old mass produced bike is not going to handle as good as a new mass produced bike. If you can improve it for not a lot of money why not?
 
If you can improve it for not a lot of money why not?
Agree. Also agree that you adding the cross tubes at the eng mount will help a lot... that's why Yamaha added the monster cross piece on later models.

Triangulation. from joined at the head, down the tubes.... and joined at the eng mount. Makes a triangle. In engineering, that's about the strongest most rigid structure you can get.
 
Last edited:
Just trying to improve what one has. A 50+ year old mass produced bike is not going to handle as good as a new mass produced bike. If you can improve it for not a lot of money why not?
Certainly, I agree. I went down the rabbit hole some years back with my XS11 suspension. I ended up spending 3X or 4X $$$ on trying to get it right. I can't say how many times I had the forks completely apart. It works quite well, but it ended up being expensive, frustrating and time consuming. As far as improving Rustbucket's frame, I am all for it! I wasn't trying to be a Debbie Downer, I just bellied up to the bar to make conversation.
 
View attachment 192114
Preparing the rear wheel for new rubber.
The wear on this sprocket makes more sense if you know that it is aluminum. What makes less sense is that the folding tab "lock-washers" appeared to be original and unmolested. It's correct, stock 34 tooth, 530 size. Is it possible that 1973 bikes came with aluminum sprockets???

View attachment 192117
Credit goes to 5twins for this. It's easy to pop off sealed bearing covers that are plastic in order to re-pack the wheel bearings. Steel covers are trickier. I've done this a couple of times, and you get better with practice. You need a super-thin prying tool. I like a teeny, soft steel screwdriver that you hammer flat to a knife edge. Works better than an actual knife. Pry from the center. You WILL distort the cover.
Re-grease using a grease gun and a grease needle to get under the bearing cage. Again, thanks to 5twins.
BTW, has anyone else noticed that the factory used brown grease? It makes it look like the bearing has become rust contaminated.

View attachment 192119
Here I have replaced the steel cover after getting it back in shape using large sockets as hammering dollys. When you tap it back onto the hub, you have to be very careful that you don't tap it in too far, or it will rub on the bearing cage. Easy to do, and then you have to start over.
Note that the grease seal also got distorted when I pried it off. A steering bearing race, shown at the top of the pic, makes a prefect dolly for getting the grease seal straight.

View attachment 192120
The finished, serviced wheel bearing. Who's to know?
Tires just arrived today.

View attachment 192123
https://www.amazon.com/gp/product/B0059HJKQ4/ref=ppx_yo_dt_b_asin_title_o00_s00?ie=UTF8&psc=1
This grease needle is only $3.40.
:hijack: Reading through your thread found this today.
Gonna get one anyway, it's a great idea. :thumbsup:
1718367246498.png

My how times have changed.
 
Rebuilding the forks and stiffening the frame at the front engine mount were done at the same time, so I don't know how big a change either one would have made individually.

The forks weren't actually dry. One was about half full of very old, but otherwise normal-looking oil. The other was about half full of a brown liquid. Half-full is a guess -- I wish I'd thought to measure what came out of each leg, would have been interesting.
I’m sure this bike will now run out well. Just make sure both shocks are working. Your bike can operate like new while at the same time looking like you dragged it out of a damp basement. I particularly like the skateboard seat. It’s one of those things I would never dream up.
 
Back
Top