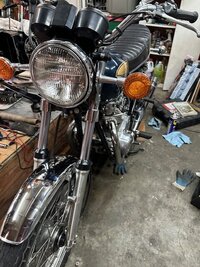
1977 XS650

These forks work much better with slightly more than the stock amount of oil (about 5.7oz.) in them. I go about 6.5 oz., 7 if the forks were stripped and totally cleaned out (really, truly empty). Or you can use the old tried and true method of setting the oil level 6" from the tops of the tubes with the springs out, forks fully compressed. That will result in about 6.75 oz. of oil in there.
Good to know. Pressing one down after they were back together, i thought they felt a bit soft. I tried to get the 168cc / 5.7oz listed in the manual, but it's hard to be that precise so I tried to go a bit over and used a fork oil tool with a syringe to make sure they were each at the same level. I don't want to pull the forks off again, but I can just pull the caps and just add 1oz more to each leg. That should get me close to the 7oz number.
 
Good to know. Pressing one down after they were back together, i thought they felt a bit soft. I tried to get the 168cc / 5.7oz listed in the manual, but it's hard to be that precise so I tried to go a bit over and used a fork oil tool with a syringe to make sure they were each at the same level. I don't want to pull the forks off again, but I can just pull the caps and just add 1oz more to each leg. That should get me close to the 7oz number.
I do similar to @5twins. I use a setting from the top, spring out and fork collapsed. This affects dampening at the end of travel. Most notably, it reduces dive when you brake. You actually tune that with the oil level. 5twins knows exactly where his belong. YMMV. Be advised, too little air space will cause fork seal failure.
 
Yes, the measuring method is the best way to insure the amount of oil is equal in both forks. This is especially true when you do your basic fork oil change, a simple drain and refill, because you never get all the old oil out. And it seems the amount left in each leg is never exactly the same.

Yes, go ahead and add another ounce to each leg. That's what I did the first time I serviced my forks and discovered the stock amount of oil wasn't enough. Besides the excessive fork dive when braking, the forks made a "squishing" sound when you'd grab the front brake and pump them. Adding that extra oil solved both issues.
 
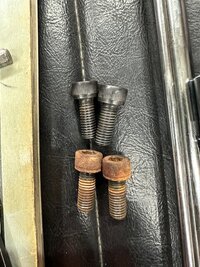
Ok, extra ounce of oil in each fork, tach and headlight back on. No time tonight and it's supposed to rain all day tomorrow, but hopefully a window opens up Friday to go for a shake down run. The VME (Vintage Motorcycle Enthusiasts) have an "Old Bike Night" next Wednesday. Hoping to show it off then. In the meanwhile, I'll do some more cleaning and polishing. Here is a what the handle bar clamp bolts looks like before and after :D
 

Attachments

  • IMG_2699.jpg
    IMG_2699.jpg
    158.3 KB · Views: 40
  • IMG_2698.jpg
    IMG_2698.jpg
    94.4 KB · Views: 35
Had a nice little window of opportunity for a shake down run this afternoon. Almost shook the right turn signal off 😅. I think when I was in the headlight bucket, I must have rotated it just enough to loosen the nut and it was vibrating off. After I got back I tried to adjust the rear view mirror and it doesn't seem to want to secure in spite of the nut being tight. I suspect that someone overtightened it previously as the little collar that the mirror rod is supposed to tighten against has two saddles pressed into it and the end against the handle bars has a bit of a split. I kind of hate this style of mirror and if this was my bike, I'd probably get some nice bar ends, but that will be for its future owner to decide.
 

Attachments

  • IMG_2707.jpg
    IMG_2707.jpg
    594.7 KB · Views: 34
If those handlebars are original they may be weighted in the ends. Poke the grip to see ?
I like the style of bar end mirrors as well but cheap ones can be problematic. Mounts need to be of good quality or the mirrors may not stay put in adjustment which is dangerous.
If cost is worth it to you , Halcyon, English made polished stainless mirrors mount very rigid and look very nice.
IMG_5612.jpeg
 
Back
Top