I’m unsure of the now days prices for sure on most parts. I thought the same but gotta have em.Hopefully they be what I’m paying up for.Wow, that's a lot of money for 2 dust boots and 2 fork seals, lol. $42.05 for a fork seal, that's robbery.

I’m unsure of the now days prices for sure on most parts. I thought the same but gotta have em.Hopefully they be what I’m paying up for.Wow, that's a lot of money for 2 dust boots and 2 fork seals, lol. $42.05 for a fork seal, that's robbery.
")
I just wouldn't pay that. As long as they're a standard size, good quality fork seals are readily available.Wow, that's a lot of money for 2 dust boots and 2 fork seals, lol. $42.05 for a fork seal, that's robbery.
That happened to me twice with Shinko tires. I had to really clean and polish up the inner lip and use plenty of lube And put about 100 lbs of pressure to get it to pop out. Went with a set of Kenda’s for my last tires and no issues. Of course those were also steel rimsWow, I surely did a hurried half-assed job mounting a new tire shortly after I acquired this bike.
Good to know.Worked on many an xs but new to the roller bearing steering update.I’ve reviewed many other’s experiences with this subject here in the site and foresee no issues. ThanksThat is a good set! I used two of those and then used the XS Performance set last time. They worked fine but the bearings aren’t as heavy duty IIRC.
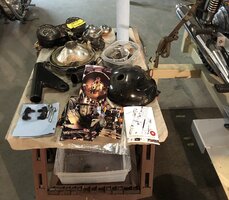
The waiting on parts list is growing.Presents to me from me.Early Christmas.lol
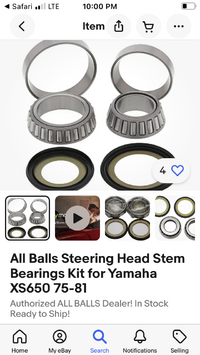
All Balls also has a fork seal kit that's a lot cheaper, if it's not too late to cancel the Partzilla order.
They've worked fine for coming up on five yrs now on my bike.
https://www.allballsracing.com/56-177.html
View attachment 261252
Shipped yesterday from Partzilla. I’ll definitely keep these in mind in case I do in fact do another set. Thanks JimAll Balls also has a fork seal kit that's a lot cheaper, if it's not too late to cancel the Partzilla order.
They've worked fine for coming up on five yrs now on my bike.
https://www.allballsracing.com/56-177.html
View attachment 261252
I shoulda tried that when I did my frame on my 1970 CB350. I spray bombed it with VHT Rollbar and Frame paint. It turned out pretty good, but its much more satin looking than I had hoped it would be.This is all I’ve used for over 50years on frames.Tried a few with the older acrylic enamel with hardener on some when requested when I ran my shop but seemingly customers would scratch or chip reassembling and expect it was easy to redo. I went back to rust oleum only and always have great results. I spray it on complete bare frame projects.For minor touch up or dressing up like this brushing works well.It’s forgiving and flows out fine. I only cut it with acetone.Not mineral spirits nor definitively not lacquer thinner.
Should you do another and use the same R/O black in a rattle can,provided you’re doing over the prepped existing factory black and not bare metal, start with a couple coats of R/O flat black before cover spraying the gloss black.Re;You’ll not be as likely to get a run or many as we’re all after the shine and tend to add a bit extra to keep it shiny while applying.It works.I shoulda tried that when I did my frame on my 1970 CB350. I spray bombed it with VHT Rollbar and Frame paint. It turned out pretty good, but its much more satin looking than I had hoped it would be.