-
Enjoy XS650.com? Consider making a donation to help support the site.
XS650.com receives a small share of sales from some links on this page, but direct donations have a much greater impact on keeping this site going.
You are using an out of date browser. It may not display this or other websites correctly.
You should upgrade or use an alternative browser.
You should upgrade or use an alternative browser.
75b Frontend redo and deep clean
- Thread starter magoo66
- Start date
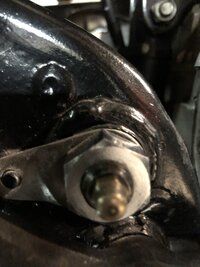
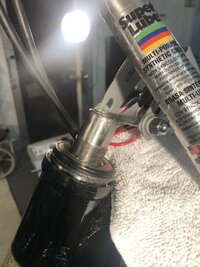
Yes. I am aware now from your recommendations.Thank you.Is that still the old original ball lower race I see on the lower triple stem? If so, that needs to come off before the new roller bearing goes on.
Respectfully asking if I may 5twins,you know the XS/TX650’s I’ve noticed since my joining the group in 2010 very,very well to say the least,did you work for Yamaha?Yes. I am aware now from your recommendations.Thank you.
No, I never worked at any bike shop, just learned on my own. I had always done the basic maintenance stuff like tire and oil changes but years back, I was sadly disappointed a couple of times by shop work I had done. I decided to learn more and do more things myself. I figured if I screwed it up, then I could take it to a shop, lol. With the internet, it's gotten much easier to research and learn. And one of the things I like about the 650 is the abundance of info out there on it. But I was also surprised about the stuff that wasn't out there, stuff I discovered on my own (adjusting the cam chain while the bike idles, TX750 wheels and swingarm swap, TX/XS500 rear wheel swap, Fiat regulator for the '80 and newer models).
No, I never worked at any bike shop, just learned on my own. I had always done the basic maintenance stuff like tire and oil changes but years back, I was sadly disappointed a couple of times by shop work I had done. I decided to learn more and do more things myself. I figured if I screwed it up, then I could take it to a shop, lol. With the internet, it's gotten much easier to research and learn. And one of the things I like about the 650 is the abundance of info out there on it. But I was also surprised about the stuff that wasn't out there, stuff I discovered on my own (adjusting the cam chain while the bike idles, TX750 wheels and swingarm swap, TX/XS500 rear wheel swap, Fiat regulator for the '80 and newer models).
Please keep up with your sharing of what you have learned and knowledgeable objectives.Its admirable trait.Thank you.No, I never worked at any bike shop, just learned on my own. I had always done the basic maintenance stuff like tire and oil changes but years back, I was sadly disappointed a couple of times by shop work I had done. I decided to learn more and do more things myself. I figured if I screwed it up, then I could take it to a shop, lol. With the internet, it's gotten much easier to research and learn. And one of the things I like about the 650 is the abundance of info out there on it. But I was also surprised about the stuff that wasn't out there, stuff I discovered on my own (adjusting the cam chain while the bike idles, TX750 wheels and swingarm swap, TX/XS500 rear wheel swap, Fiat regulator for the '80 and newer models).

fun to read 5twins, I'm far from an expert but have also learned by doing. originally it was out of need for cash to pay someone else to do the work though, later when i could afford it I also learned that whoever work on your stuff do not care as much as you do. My brother and dad thought me a lot, my brother actually is a mechanic and electrical mechanic on all things rolling (was educated in the danish military and a danish utility company). I recall the first bike we overhauled together, I was so worried taking it apart that I had concerns wether it would ever work again, it turned out to serve as a reliable mc for 20 plus year and was still OK when i sold it. Today all I really want (and need) to learn is welding and using a lathe ")
The lathe work is easy as long as you have a good grasp on the tooling and how to use calipers and mics. The welding is more about honing your grinding skills…..Today all I really want (and need) to learn is welding and using a lathe
Everything is easy when you know howThe lathe work is easy as long as you have a good grasp on the tooling and how to use calipers and mics. The welding is more about honing your grinding skills…..
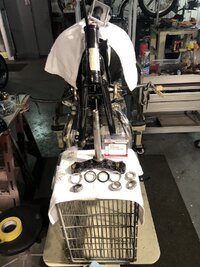
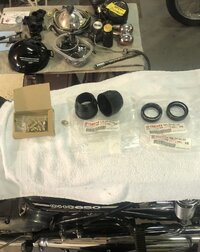
, I don’t own a lathe, if I get to the point where it’s going to be a must have, I’ll have to take classes first so I actually know what the heck I’m doing. Looks easy when someone knows how to do it but I’m far from there. Need to convince my brother to come stay for a couple of months - in house classes The mailman was kind this week.Only thing left to do is make it happen.Granted the dust covers and seals but they are the real deal as Neil’sb referred. I am very pleased.Appreciate the tips and how tos,should go smoothly.
Attachments
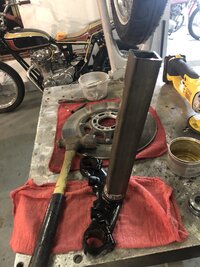
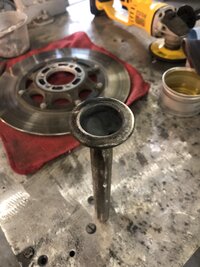
Problem getting the lower racer off? All looks good, I’m in the same process on yet another ‘78
From Partzilla I’d not addedThe mailman was kind this week.Only thing left to do is make it happen.Granted the dust covers and seals but they are the real deal as Neil’sb referred. I am very pleased.Appreciate the tips and how tos,should go smoothly.
About to beginProblem getting the lower racer off? All looks good, I’m in the same process on yet another ‘78
OmgoshWow!Easiest races I’ve ever removed. I do mean scary easy.And I definitely ain’t a complainin’ atall.About to begin


A note on installing those two top notched nuts - if you examine them closely, you'll see the I.D. on one side is beveled much more than the other side .....

Install the nuts with the beveled side facing the beveled side, they will tighten together more progressively and with more "feel" this way. This also presents the flatter side of the bottom nut down to better preload the bearings and the flatter side of the upper nut up to better support the top tree. And for tightening the nuts, you'll want to use two C spanner wrenches, one to hold the bottom nut (and your adjusted setting) and the second to tighten the top nut down against it. Although the nuts measure about 40mm across, this 45-52mm size wrench fits perfectly ......


You can find these wrenches on eBay for less than $10 each .....
https://www.ebay.com/itm/145465158044?hash=item21de66299c:g:uwAAAOSwuMdlWyTr&amdata=enc:AQAIAAAAwGloHbZHOgGc052NhnWnMyctTz3AzICTdEH/VDFdBZB/3oZ+9gabb4aHDqchUMfRrwNtbMI8tYxQRZc434rPXaz+4APkEQPNspOHD9Jt0SvX6ml0t52DEIbd66IITQRMMy14V3A+gilMlHt4lPXj/bBR673P+CTMWARzkim2lqbmY3EiqVKlpu/q8NviwsZIQWxP1TNWAadB/vZ4SmnLqZ46nAYja3SNaNA3/u7tW6DOak3w+kyQNg9l9Bw7H8e05Q==|tkp:Bk9SR9ab9oqyYw
Install the nuts with the beveled side facing the beveled side, they will tighten together more progressively and with more "feel" this way. This also presents the flatter side of the bottom nut down to better preload the bearings and the flatter side of the upper nut up to better support the top tree. And for tightening the nuts, you'll want to use two C spanner wrenches, one to hold the bottom nut (and your adjusted setting) and the second to tighten the top nut down against it. Although the nuts measure about 40mm across, this 45-52mm size wrench fits perfectly ......
You can find these wrenches on eBay for less than $10 each .....
https://www.ebay.com/itm/145465158044?hash=item21de66299c:g:uwAAAOSwuMdlWyTr&amdata=enc:AQAIAAAAwGloHbZHOgGc052NhnWnMyctTz3AzICTdEH/VDFdBZB/3oZ+9gabb4aHDqchUMfRrwNtbMI8tYxQRZc434rPXaz+4APkEQPNspOHD9Jt0SvX6ml0t52DEIbd66IITQRMMy14V3A+gilMlHt4lPXj/bBR673P+CTMWARzkim2lqbmY3EiqVKlpu/q8NviwsZIQWxP1TNWAadB/vZ4SmnLqZ46nAYja3SNaNA3/u7tW6DOak3w+kyQNg9l9Bw7H8e05Q==|tkp:Bk9SR9ab9oqyYw
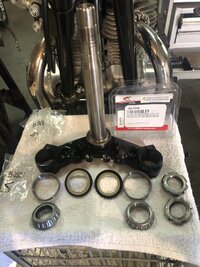
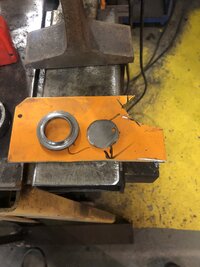
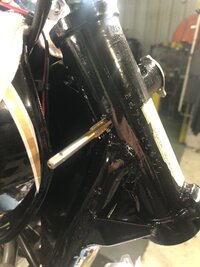
The Allballs tapered bearing’s steering update went very smoothly. It feels as it should.Gary’s suggestion to make a race setting tool using an old race worked well. I have some polishing to do on the headlight ears and bucket and going to paint the inside of bucket white as 5t suggested before mounting then onto the forks.Great evening of progress.
Attachments
-
 IMG_5661.jpeg298.1 KB · Views: 19
 -
 IMG_5660.jpeg349.2 KB · Views: 17
 -
 IMG_5656.jpeg259 KB · Views: 18
 -
 IMG_5659.jpeg240.2 KB · Views: 18
 -
 IMG_5654.jpeg221.9 KB · Views: 18
 -
 IMG_5653.jpeg294.4 KB · Views: 18
 -
 IMG_5652.jpeg244.7 KB · Views: 17
 -
 IMG_5651.jpeg376.9 KB · Views: 17
 -
 IMG_5648.jpeg275.6 KB · Views: 17
 -
 IMG_5647.jpeg203.9 KB · Views: 16
 -
 IMG_5645.jpeg235.9 KB · Views: 15
 -
 IMG_5665.jpeg288.9 KB · Views: 18
You'll want to check the bearing tension a couple times in the first few hundred miles because try as you might, you don't always get the races seated 100%. Bouncing down the road will finish the job for you, lol. but may result in loose bearings.
I’ll definitely do that,thanksYou'll want to check the bearing tension a couple times in the first few hundred miles because try as you might, you don't always get the races seated 100%. Bouncing down the road will finish the job for you, lol. but may result in loose bearings.