Advance doesnt seem smooth with timing light.

Jaymichael

XS650 Addict
Messages
163
Reaction score
13
Points
18
Location
Calgary Alberta Canada
Hey gents, just spent some time reading through threads in relation to this problem. Using a timing light I get a nice consistent view of my timing mark right at the tdc mark on my sticker. When I rev up the mechanical event weights throw out consistently at or around 3000 rpm but my timing mark jumps around a bunch, occasionally its at or around the advance mark but often it is not. Everything seems to be in order, advance snaps back as it should and the weights visually look like they throw out evenly. Would this be normal-ish? or indication that Im having an issue? Secondary problems is above 3000 or so Im getting allot of break up during acceleration... I had initially assumed jetting but ive run through a few jetting configs and while I think its getting better it still feels a long way off from a steady even pull. Ive run main jets from 132.5, 135, 137.5, 140 and a drilled out set which I estimate to be around a 145 or so with no decent smooth pull through the rpm range. This is leading me to think I may have extra issues at play. One thing that strikes me as odd is I also have quite a bit of end play in the advance rod, Im planning on disassembling and trying to shim it to see if that makes any difference. Any thing else I may want to look at?
 
First thing I'd check is sloppiness in the advance unit.

Have someone hold the weights full out, against the stops.

16.jpg


Then, on the other side, rotate the Pamco rotor back/forth.
This tests the slop of the weights' ears in the slotted disc, and anything else keyed to the shaft.
Whatever rotational play you get at the rotor is doubled at the crank.

Edit: You can also get a idea of the amount of spark scatter caused by sloppy advancer parts by gently dragging a finger on the trigger rotor (just a light drag) while shooting the timing light during full advance. Have someone do the timing light, while you do the throttle and finger drag thing. This will simulate the light drag produced by the original points followers, and force everything back to the stops.


Then, do a "Google custom search" on "advance rod play", and digest all them threads...
 
Last edited:
The timing light works best with a negative voltage to the spark plug. The dual output coil produces a positive voltage on one plug wire and a negative on the other. You could be connected to the positive wire which will produce erratic results. Try the other plug wire.
 
Twomany, thank you for the great explanation of your testing method, that makes perfect sense, will try it tonight. Ive got a new shaft and advance mechanism in there so some of the dimensions may be off. My old shaft didn't really have anything wrong with it, I could try it to see if its any better. The old mechanism sadly has a broken pin where the weight attaches.

Racer dave, yup, I'm already using a car battery for the timing light

PamcoPete, thanks for chiming in, Ill play around with this, I am running a rephase pamco, does that change this?>

5twins, thanks for the link, ill give it a read!
 
Jay...,

With the 277 rephase, it could be if the coil primary wiring is reversed which would produce a positive spark plug voltage.
 
Didnt get a chance to run it after my work tonight but I will report that I measured the rod end play with a dial indicator and it was 3mm. I removed the advance shaft and reinstalled the oem shaft and remeasured, now sits at .5mm, thankfully i will not have to mess around with shims. Tomorrow I will run and recheck with the timing light as instructed above to see if this improved anything. I did swing the weights out and checked rod movement, there is a slight amount of play between the weight ears and the notches on the end of the rod.
 
...I measured the rod end play with a dial indicator and it was 3mm...

Good grief, that's enormous. About 0.100" longer than necessary. There's a lot of threads in here about advance shaft endplay and lengths, either too long, or too short. Something's going on. Maybe time for an exhaustive advance shaft thread...
 
Yeah, Im kinda embarrassed I didnt notice it before. I even considered that maybe the pamco rotor wasn't seated all the way but that didn't seem to be the case. Whats important i guess is that new shaft from mikes is on my desk and not in my engine :)
I also found some threads discussing peening the ears on the weights to correct over advancing, not sure if this related to my situation or not but now I'm armed with the knowledge, I will explore tomorrow with a timing light.... god damn this site is awesome, thanks all!
 
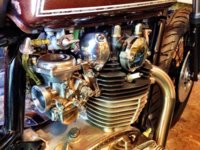
Ok, Looks like I may need a little more help with this. Think I need to take a step back and start at the beginning again. I am posting a picture of my carbs to help with identification. They are as far as I know bs38s, and they are for sure the original carbs from this 74 canadian tx650. I did however have them gone over by oldskoolcarbs, he may have changed the jets based on my description of the modifications I made so I cant confirm they are the original jet sizes. When I first got her running again the jet sizes were

pilots 45
mains 135
needle position 4
needle number unknow, I will double check tomorrow.

Performing dead cylinder method I found that achieving highest idle required my idle screws to be turned in all the way, this made me drop the pilot jet size to a 42.5. Now my idle screw finds highest idle at around 1/2 turn out from all the way in, which feels pretty good to me, idle is nice, off throttle is crisp. At this setting I have also measured exhaust emissions and found CO to be at 5% which should put me at 12.6:1 this is still a bit on the rich side if you compare to other aircooled engines but i am trusting the dead cylinder method more than I am the gas analyzer for the time being.

Now on to my problems. My advance mechanism shaft end play is corrected. Timing light shows my line just right of the fire mark on the sticker for my pma. I have purposely set it here because when my advance comes on my line shows just a hair past the advance line (left) of the mark on the pma sticker. I figured I would try to balance the little bit of too much advance (maybe 1mm) with a little bit of retard off advance (1-2mm). Previous on advance my line would jump around a bunch with the timing light, now with my shaft issue resolved the line is pretty consistent when in the advance position. For all purposes I feel my advance system is working as designed.

Symptoms. Starts and runs sweet, nice crisp throttle response off idle. Driving at low speed is excellent. Up to about 30% throttle twist bike pulls smooth and hard. When I go for more than 30% throttle it breaks apart allot. Doesnt feel like it powers out, such as how it is described when you encounter a lean condition, this is more like quick hard cutting out types of sensations. Pretty much at any throttle position above 30% I get no consistant hard pulling of the engine, sometimes I even get a sharp back fire on hard accel.

I dont have fresh plugs on hand but the ones I am using show a very clean white ceramic tower with a very clean and white-ish electrode. Down low in the bottom of the ceramic it is dark black and sooty... with that said, I think some of this black soot could be left over from idling it allot with the richer pilot jets, as back then my plugs were totally black and sooty. I am using the iridium plugs from mikes.

I have tried, 132.5, 135, 137.5, 140, and 145 mains. All of these jets have seemingly changed my symptoms very little, I still get the break up under mid to hard throttle.

I have also tried positions 3, 4, and 5 on my needle. position 3 may have produced the worst break up on mid throttle.

So in conclusion, im scratching my head a bit. I don't feel much or any of the combinations have yielded much feedback that I am heading in the right or wrong direction. In the carb guide it show a 74 tx650 to have a 127.5 main, a 45 pilot jet and position 4 clip on the needle.

Could I be way too rich on my main? My plugs dont seem to show that but maybe its a possibility? I am going to try position 2 and 1 on my needle over the weekend to see whats up, I am out of main jets to try so I either need to order some some even larger ones and perhaps some smaller ones.

Any body have any thoughts on this? Suggestions?

Feeling frustrated. Here is a short clip showing low speed acceleration, seems to sound pretty good and strong, no missing, surging or stumbling... but like I said, once I grab some more throttle it just falls apart.


Attachments

  • IMG_8656.jpg
    IMG_8656.jpg
    307.6 KB · Views: 276
Do check your needle number. If an aftermarket rebuild kit was ever installed, some contain a generic Y22 needle. It is wrong for your carb set, 5 or 6mm shorter than the original 4N8.

Your older carb set was set up richer than the newer ones. You shouldn't need large jet increases for your mods. I'm thinking maybe 1 to 3 on the mains and maybe 1 on the pilots.

You should probably also check your needle jet. Your '74-'75 carb set uses the short version of a Z-6. It's not available as far as I know. But, you can get a Z-8 or Z-2. There is a long version of the Z-6 available as well. Take a look at the needle jets offered on the MikesXS site and you'll see the difference between the long and short styles. If a Z-2 has been fitted, it would probably be too lean. The long version of the Z-6 would probably be too lean as well as the needle wouldn't lift out of it as much, that's if it could even be fitted into the carb body without holding the slide up.
 
I just looked at your build thread and if the cleaned up set of carbs pictured are yours, the needle jet appears to be the correct short style. But, that doesn't mean it's the right size.
 
In your first post you say "timing mark right at TDC" If at idle and you have it timed to TDC you have the timing wrong, At idle it should be 13-15 degrees BTDC.
That may or may not help with your carb tuning but it should effect the way the engine runs.
Leo
 
Xsleo, sorry type-o there, timing mark flashed at fire... Not tdc

Carbs open, I do have the 4n8 needles. 5twins, so are you saying only 1-3 sizes up on mains from my original 127.5 that my bike should have had? And needle jet? This is different than my needle? I don't even know what that is, more research occurring now!
 
Yes, those are the correct mains for your carbs, nicknamed the small round main. There is also a large round main and that is the style used in the BS34s .....

MainsCompared.png


As you can see, they both have an actual part # and that is what you'd use if searching for real Mikuni jets. The Mike's jets are knock-offs. A fuel jet is a precision part. Although I've read no complaints about the MikesXS knock-offs, who can say whether they flow like a real Mikuni jet does? Once you finally do get the carbs dialed in, you may want to spring for some real Mikuni jets in the size you've ended up with.

The needle jet is the brass part stuck in the carb body that the needle sticks into and works in. The hole through it's center that the needle fits into comes in different sizes just like the holes through main and pilot jets. Here's what they look like removed .....


The short section with the o-ring sticks into the carb body. The long section hangs out into the float bowl. You can see it here. If the slide and needle were still installed, you could look in the bottom of the needle jet and see the needle in there .....

PilotInletBS38.jpg
 
Yes, 1 to maybe 3 or 4 sizes up at most on the mains is probably as big as your carbs will allow. You may have read the recommendations on the MikesXS site about re-jetting for mods. They recommend mains in the 140 to 145 range. This is rather misleading. Those sizes can work in the later carbs, the '78-'79 BS38s and the BS34s, but only because they had larger mains than yours to begin with (135 and 132.5 respectively). The '77 and older BS38s had stock mains from the low 120s up to 130. Trying to bump them up into the 140s is 5 or more sizes and that's just too much. That makes the midrange too rich because of the carb circuit overlaps, too rich to tune out by adjusting the needle.

As an example, I set up some '76-'77 BS38s for use on my '78. They came stock with 122.5 mains. The biggest main I could run without midrange break-up (with the needle leaned a step) was a 132.5. So, it's not the number size of the jet that matters here, it's the number of sizes up from stock. I'm up 4 sizes on this '76-'77 carb set and that's the max I can go. Going up into the 140s on the later carb sets is only 2 to 3 and up to 4 or 5 sizes.
 
5twins, you are a legend!
Confirmed the needle jets are z-6 which should be my stock size.
Looks like I'm ordered some new jets then. I hear you about mikes parts, case in point my wonderful advance rod:)
So I should probably grab all sizes from 127.5 to 135 or so, rather from 135 and up.
Figure I should start with stock and experiment up from there? 127.5 main and position 4 on the needle? 42.5 on my pilot seems to be correct as I get highest idle with around 1/2 turn out on my pilot screws
 
Yes, mains 135 and below should do for you. Yes, start at stock (or one up) and work up from there. Since you're only dealing with a few size increases at most, you want to try them in succession (don't skip sizes). If I didn't mention it already, I will now - the earlier carb sets came set up richer from the factory. There were no pollution concerns back then. They may not need as much of a jetting increase as the later carb sets.

The usual routine is to start with the mains because the lower circuit settings will depend on them. Increase one step at a time until you get break-up through the midrange, usually in the upper portion (4 to 5K RPMs), under heavy throttle applications. This indicates you need to lean the needle. You can then go up on the mains some more but that usually brings the break-up right back. When you get this break-up, that's a pretty good indication that you've maxed out on main jet size. Now, with the needle leaned a step, that may make the upper portion of the idle circuit too lean because of the circuit overlap I mentioned. You may get a flat spot or stumble just off idle. You go up a pilot jet size to cure that.

I will also mention that these CV carbs are rather forgiving, masking over minor jetting glitches if run easy. For jet testing, you want to work them hard. Use big handfuls of throttle to test the idle to midrange transition and even bigger, even full throttle to test the midrange to main transition. I know this isn't the way you will probably be normally driving the bike, but for jet testing, you gotta do it, lol.
 
Back
Top