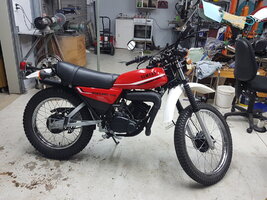
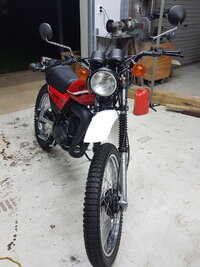
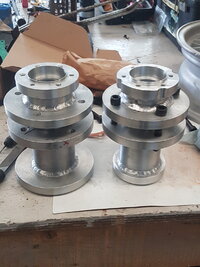
The following has taken place over a number of days since my last post and is in approximate order of events.
Made a rough stand and started on the engine. Taking the head off I found that the head gasket is a thin copper one that can be annealed and used again.
The head looks to be crack free and has no dings in it from past adventures. Although the combustion chamber is not at all smooth, the squish band (area). The combustion chamber is off set so it doesn't have what I would describe as a squish band more sort of an ellipse.
The piston is on the first oversize and apart from a few scuff marks looks good. Pleasingly the piston has generous window on the intake side but not so good was it has not had the sharp corners smoothed. No bother it was soon rectified and the usual black build up came off with oven cleaner and a tooth brush.
The piston marks are probably from not warming the bike up before thrashing. I found a helpful guide to diagnosing destroyed pistons on here:
https://www.thetuningworks.co.uk/assets/Piston Diagnosis.pdf
There was some piston stuck to the bore in places but got this off with oven cleaner and scotch bright.
The crank looks in to be in good order.
The clutch plates are within spec but the springs are not, after rummaging around in the RD parts bin found some RD springs that were a bit stiffer and even better fitted . The basket is not rilled at all so all in all pretty good with a lot to be happy about.
Looking at the barrel the stock ports they are horrible. New reproduction barrels and heads are available at reasonable cost and since a lowly DT is not a Brough Superior I have decided to have at it with the die grinder.
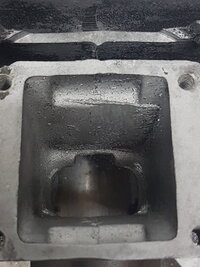
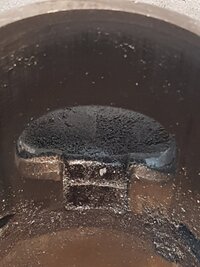
The inlest has a cast ridge all around it and the boost post is so obstructed it would be virtually useless. The metal flakes are there as I took this photo after I had been at the exhaust port.
An encouragement to do this has come from finding an article from Stan Stephens laying out what he does to the DT175 used predominantly for street riding.
https://www.pressreader.com/uk/classic-motorcycle-mechanics/20171113/282480004076255
In the meantime, I have started blasting the head and Barrel for painting after they are cleaned up, I will do the mods then paint. First up is checking the squish, compresssion and port timing.
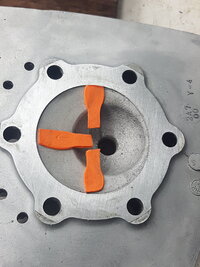
You can see the off set combustion chamber in the photo. To make matters worse the spark plug hole is not square to the head - barrel surface making the set up for lathe work more difficult.
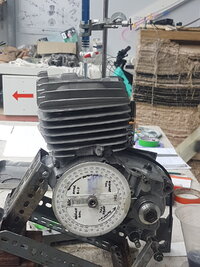
Here is a shot of the degree wheel set up for checking the stock port timing and the burette for combustion chamber volume.
Not going to O ring the head just skim it.
I opted to flycut the head on the mill it still required a lot of set up for a few passes of the fly cutter.
First I used JB weld and lunch wrap to make a epoxy mould of the combustion chamber.
Then the head gasket surface was smoothed on a flat table with wet and dry paper, next stud holes were checked and milled level to the same height.
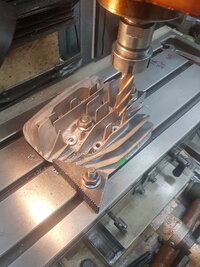
I then cut 6 old gudgeon pins to exactly the same length in the lathe.
After drilling and cutting the epoxy casting of the combustion chamber I used it to fix the head upside down to the mill table.
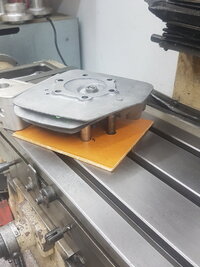
There was also other large block of ally fied to the table to ensure the set up was rigid. I then flycut 0.9mm of the head which according to my measurement would give me 0.8mm squish. This is a little tighter than most writers suggest but I have used with no problems on other 2 strokes.
Sorry no pictures of the flycutting .
The whole process would be lot easier on an IT175 head which has a central combustion chamber and more importantly square plug hole.
If anyone has one I can give it a good home.
While at it I looked at swapping the reed block for a larger one but would need to epoxy the casting to fit a LC 350 reed block in, so decided to enlarge the stock block windows and fit some home cut fiberglass reeds similar to the RD 700.
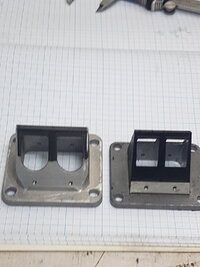
The LC block is on the left.
Having gone that far next the carb was oval bored. Stock it is 27mm but was able to get it out to 28mm. I went for an oval over a taper as the bore is more or less stock at part throttle and bigger at full. The idea is to maintain velocity down low. I also took 1mm off the top of the slide to get it to clear the top of the bore and checked the slide did not come out of the guide which could lead to a lot of discomfort.
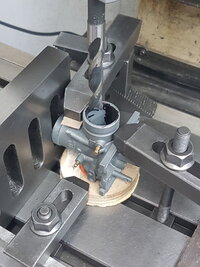
I use a large drill bit in the boring head. The drill bit flutes are all ground off saving for a small part at the tip which does the cutting. I have found although much less rigid this gives a better finish and has a longer reach than the other cutters I have. You just need to be patient and take small cuts and I was being very cautious doing this job.
I raised the exhaust port and made the top oval as opposed to the stock straight and also cleaned up the bottoms of the transfer ports and raised the tops. I also relieved the transition area at the base of the larger transfer ports and general tidy up. The inlet casting ridge was removed and the boost port cleaned up. Will post photos soon but the parts are away being painted in 2 pack satin black.
After checking what I was starting with porting wise I followed Stan Stephens notes with the exception of the tighter squish and relieving the transition area.
After porting I masked up the bore and bead blasted the ports and polished the exhaust, again I didn't go all out on the exhaust as I believe the polish is mostly for show.
When the barell and head were clean I rechecked the port timing and compression ratio and squish. The CR is now 7.24:1 which is gettin up there but I think will be ok since an IT 175 has a CR of 8:1 (although it does have a proper squish band). If I run into problems I will enlarge the combustion chamber.
Also have done a bit more zinc plating of a few fittings and cable clamps on the motor.
The tank has been clear coated and looks great have not got it back yet though.
Getting very close now I think all I need is a chain and a battery.
Made a rough stand and started on the engine. Taking the head off I found that the head gasket is a thin copper one that can be annealed and used again.
The head looks to be crack free and has no dings in it from past adventures. Although the combustion chamber is not at all smooth, the squish band (area). The combustion chamber is off set so it doesn't have what I would describe as a squish band more sort of an ellipse.
The piston is on the first oversize and apart from a few scuff marks looks good. Pleasingly the piston has generous window on the intake side but not so good was it has not had the sharp corners smoothed. No bother it was soon rectified and the usual black build up came off with oven cleaner and a tooth brush.
The piston marks are probably from not warming the bike up before thrashing. I found a helpful guide to diagnosing destroyed pistons on here:
https://www.thetuningworks.co.uk/assets/Piston Diagnosis.pdf
There was some piston stuck to the bore in places but got this off with oven cleaner and scotch bright.
The crank looks in to be in good order.
The clutch plates are within spec but the springs are not, after rummaging around in the RD parts bin found some RD springs that were a bit stiffer and even better fitted . The basket is not rilled at all so all in all pretty good with a lot to be happy about.
Looking at the barrel the stock ports they are horrible. New reproduction barrels and heads are available at reasonable cost and since a lowly DT is not a Brough Superior I have decided to have at it with the die grinder.


The inlest has a cast ridge all around it and the boost post is so obstructed it would be virtually useless. The metal flakes are there as I took this photo after I had been at the exhaust port.
An encouragement to do this has come from finding an article from Stan Stephens laying out what he does to the DT175 used predominantly for street riding.
https://www.pressreader.com/uk/classic-motorcycle-mechanics/20171113/282480004076255
In the meantime, I have started blasting the head and Barrel for painting after they are cleaned up, I will do the mods then paint. First up is checking the squish, compresssion and port timing.

You can see the off set combustion chamber in the photo. To make matters worse the spark plug hole is not square to the head - barrel surface making the set up for lathe work more difficult.

Here is a shot of the degree wheel set up for checking the stock port timing and the burette for combustion chamber volume.
Not going to O ring the head just skim it.
I opted to flycut the head on the mill it still required a lot of set up for a few passes of the fly cutter.
First I used JB weld and lunch wrap to make a epoxy mould of the combustion chamber.
Then the head gasket surface was smoothed on a flat table with wet and dry paper, next stud holes were checked and milled level to the same height.

I then cut 6 old gudgeon pins to exactly the same length in the lathe.
After drilling and cutting the epoxy casting of the combustion chamber I used it to fix the head upside down to the mill table.

There was also other large block of ally fied to the table to ensure the set up was rigid. I then flycut 0.9mm of the head which according to my measurement would give me 0.8mm squish. This is a little tighter than most writers suggest but I have used with no problems on other 2 strokes.
Sorry no pictures of the flycutting .
The whole process would be lot easier on an IT175 head which has a central combustion chamber and more importantly square plug hole.
If anyone has one I can give it a good home.
While at it I looked at swapping the reed block for a larger one but would need to epoxy the casting to fit a LC 350 reed block in, so decided to enlarge the stock block windows and fit some home cut fiberglass reeds similar to the RD 700.

The LC block is on the left.
Having gone that far next the carb was oval bored. Stock it is 27mm but was able to get it out to 28mm. I went for an oval over a taper as the bore is more or less stock at part throttle and bigger at full. The idea is to maintain velocity down low. I also took 1mm off the top of the slide to get it to clear the top of the bore and checked the slide did not come out of the guide which could lead to a lot of discomfort.

I use a large drill bit in the boring head. The drill bit flutes are all ground off saving for a small part at the tip which does the cutting. I have found although much less rigid this gives a better finish and has a longer reach than the other cutters I have. You just need to be patient and take small cuts and I was being very cautious doing this job.
I raised the exhaust port and made the top oval as opposed to the stock straight and also cleaned up the bottoms of the transfer ports and raised the tops. I also relieved the transition area at the base of the larger transfer ports and general tidy up. The inlet casting ridge was removed and the boost port cleaned up. Will post photos soon but the parts are away being painted in 2 pack satin black.
After checking what I was starting with porting wise I followed Stan Stephens notes with the exception of the tighter squish and relieving the transition area.
After porting I masked up the bore and bead blasted the ports and polished the exhaust, again I didn't go all out on the exhaust as I believe the polish is mostly for show.
When the barell and head were clean I rechecked the port timing and compression ratio and squish. The CR is now 7.24:1 which is gettin up there but I think will be ok since an IT 175 has a CR of 8:1 (although it does have a proper squish band). If I run into problems I will enlarge the combustion chamber.
Also have done a bit more zinc plating of a few fittings and cable clamps on the motor.
The tank has been clear coated and looks great have not got it back yet though.
Getting very close now I think all I need is a chain and a battery.

