Finally got a bike after a few setbacks. What oil, plugs, etc?

If i do determine to have bad coils, switching to the single coil dual output would be the better option correct? If i did it correctly this time. It looks like i may be reading 5 ohms on both? :umm:
Prolly best and for sure simplest to just keep on with two coils. Your 5 ohms primary test is well in range of working coils.
For most of this kind of trouble shooting a plain old 12 volt light bulb with alligator clips is the best tester around. It finds 12 volt and the (lack of) brightness shows up poor connections with some load on them. It's perfect for setting points too. I use a turn signal bulb and base.

Just repaired a 24' man lift a museum sold me REAL cheap, cuz electric problems. Mainly used that light bulb, :thumbsup: even though I have 3 or 4 VOMs and several LED voltage meters. :shrug:
 
Yes, you remove the advance rod for cleaning it and the bushings inside the ends of the cam that hold the lube (grease) for it. Pull the little round disc off the advance side and withdraw the rod w/ the little points cam still attached out of the points side. You'll see grooves cut into the I.D. of each outside camshaft bushing. If you've never serviced the rod, you probably won't find much, if any grease remaining in the grooves. This is mine after cleaning, greasing, and running it for about 5 years .....

View attachment 207248

..... and after re-cleaning and packing with fresh grease .....

View attachment 207249

The shop manual recommends a moly grease of some sort. I use VW CV joint grease as it has a very high moly content.
So I'm pulling out the advance rod from the point side and cleaning and greasing etc.
When I pull the advance rod out is there anything I need to be concerned about on the left side of the engine
Your pictures are nice and clear looking
the video not so much
 
Lube and check that the weights move freely, look at the two lobes that fit in the slots on the disk, they should be kind of circles like these and not have flat spots worn into the sides.

lube advance weights.jpg
 
I don't have a way to do video, be happy you're getting pics, lol.

No, nothing to be concerned about on the left side when pulling the advance rod. There is a small lip around the bottom edge of the points cam in some spots that may catch on a points set rubbing block. You may need to open that points set with your finger as you try and pull the advance rod out.

When re-assembling, there is a possible alignment issue. Get it wrong and the timing will be 180° off. There are locating pins in the advance rod for both the points cam and the little disc on the advance side. They need to align, both stick out the same side of the rod .....

Advance Rod.jpg

To help you with this, Yamaha put alignment slash marks on the advance backing plate and the little advance disc. Make sure they point to each other, or nearly do. If you get it wrong, you'll clearly see it, the slash marks will be 180° off .....

AdvanceAlignment.jpg
 
Last edited:
I don't have a way to do video, be happy you're getting pics, lol.

No, nothing to be concerned about on the left side when pulling the advance rod. There is a small lip around the bottom edge of the points cam in some spots that may catch on a points set rubbing block. You may need to open that points set with your finger as you try and pull the advance rod out.

When re-assembling, there is a possible alignment issue. Get it wrong and the timing will be 180° off. There's are locating pins in the advance rod for both the points cam and the little disc on the advance side. They need to align, both stick out the same side of the rod .....

View attachment 207353
To help you with this, Yamaha put alignment slash marks on the advance backing plate and the little advance disc. Make sure they point to each other, or nearly do. If you get it wrong, you'll clearly see it, the slash marks will be 180° off .....

View attachment 207355
Thats exactly what I needed!!!
And a simple explanation to boot
Thanks !!
I've got 3 bike to check with this info and now I believe I know how Plus I will print these out and put them in my 3 ring binder with copy's of the wiring diagrams too
 
Last edited:
I don't have a way to do video, be happy you're getting pics, lol.

No, nothing to be concerned about on the left side when pulling the advance rod. There is a small lip around the bottom edge of the points cam in some spots that may catch on a points set rubbing block. You may need to open that points set with your finger as you try and pull the advance rod out.

When re-assembling, there is a possible alignment issue. Get it wrong and the timing will be 180° off. There's are locating pins in the advance rod for both the points cam and the little disc on the advance side. They need to align, both stick out the same side of the rod .....

View attachment 207353
To help you with this, Yamaha put alignment slash marks on the advance backing plate and the little advance disc. Make sure they point to each other, or nearly do. If you get it wrong, you'll clearly see it, the slash marks will be 180° off .....

View attachment 207355
Thats what I needed was a clear picture
And a simple explanation
Thats exactly what I needed!!!
And a simple explanation to boot
Thanks !!
I've got 3 bike to check with this info and now I believe I know how Plus I will print these out and put them in my 3 ring binder with copy's of the wiring diagrams too
Printed and off to the 3 ring binder
My paper memory
 
Will post some up after I get back from working over the weekend. Off to fit some race car tyres.
Just out in the shed & had a look at the plug caps. These NGK ones don't come apart! I've had others that have a slot across where it goes on top of the plug & that un-screws containing the resistor. These are 5K ohm.
 
Just out in the shed & had a look at the plug caps. These NGK ones don't come apart! I've had others that have a slot across where it goes on top of the plug & that un-screws containing the resistor. These are 5K ohm.
I bought a couple of sets of non resistor caps. Thanks.
 
Back at trying to get these points adjusted. When attempting i know spark is when the points are open. My points stay open and close for a second while hand turning the motor? Seems backwards?
 
The points stay open for about 3/4 of an engine revolution. The dwell value for this motor, which is the time the points "dwell" in the closed position, is 93°.
 
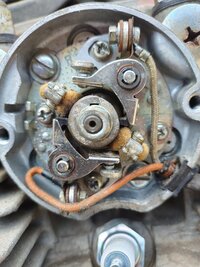
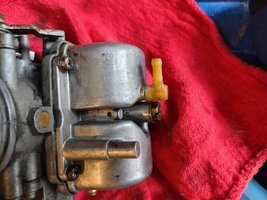
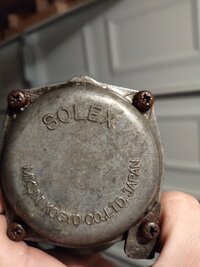
So my "locating pin" is basically a partial oval so im getting another one on the road. Mikes xs has that. Anyone ever tried a similar one from amazon? Pulled the carbs for a "rebuild" and ill go farther into that once i start tearing it apart tomorrow, finding what's bad. Picture 2 here is showing that plastic "bleeder line"? That's missing on my other carb and just pours the fuel obviously i guess. Don't ask me how i know. Is there an easy replacement for that? What is the stock jet size for this carb? Any other recommendations on them while im pulling them out?
 

Attachments

  • 20220215_135025_HDR.jpg
    20220215_135025_HDR.jpg
    326.5 KB · Views: 102
  • 20220216_163926_HDR.jpg
    20220216_163926_HDR.jpg
    244.8 KB · Views: 106
  • 20220216_185750.jpg
    20220216_185750.jpg
    224.2 KB · Views: 104
That plastic nipple on the bottom of the carb is from the overflow tube inside. If gas is pouring out of it, that probably means the float needle is stuck open and not stopping the flow of fuel as it should.
 
So my "locating pin" is basically a partial oval so im getting another one on the road. Mikes xs has that. Anyone ever tried a similar one from amazon? Pulled the carbs for a "rebuild" and ill go farther into that once i start tearing it apart tomorrow, finding what's bad. Picture 2 here is showing that plastic "bleeder line"? That's missing on my other carb and just pours the fuel obviously i guess. Don't ask me how i know. Is there an easy replacement for that? What is the stock jet size for this carb? Any other recommendations on them while im pulling them out?

Perhaps your next best step would be to read the sections of the service manual you ordered which relate to your current diagnostic efforts. This might bring a focus to your questions.
.
.
 
Yes, the 1st 3 sentences in your post are Greek to me, as I'm sure they are to many others. We have no idea what you're talking about, lol.
 
I'll guess one of the pins in the advance rod that "locate" it on both ends. New one coming that's good. but that's not likely to have been a noticeable problem.
Hint please put year and a little bit about your bike into your signature, helps us help you without having to dig way back in the thread to find that info.
The carb guide is very useful, find it in tech. As we like to say read it til your eyes bleed.
650carbspecsreducedsizeey7.png
 
Am i able to form my own bowl gasket out of gasket maker? The first carb im cleaning, the carb bowl diaphragm/ gasket is broken. Was going to pick up a sheet of gasket maker but if it wont work ill have to find some to order?
 
Last edited:
Don't say diaphragm cuz that's at the top of the piston/slide and is 'nother can O worms.
No gasket maker! Float bowl gaskets are rather critical I'd (do) buy new gaskets.
Haven't used these but georgefix has done me well over the years......
https://www.ebay.com/itm/191722982130?epid=171268906&hash=item2ca3948af2:g:E74AAMXQ~6VQ47-3
I have bought other XS650 gaskets from these guys and they were a good fit.
https://www.ebay.com/itm/175138708730?hash=item28c7149cfa:g:76kAAOSwL3xh-cUg
Placed an order with the first link. Thanks.
 
They should be fine, they're the K&L brand. Wet them down with something mild like WD40 when installing, don't install them dry.
 
Back
Top