Help with 77-D fork rebuild.

Slimbob

XS650 Member
Messages
22
Reaction score
3
Points
3
Location
Telford, PA
I credit Punkskalar and his "How to" to get me motivated for this. I have stock 77-D and am taking on rebuilding the front forks for the first time.
I doing this with the upper tubes stil in the trees.
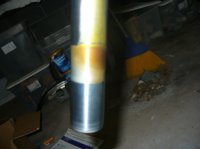
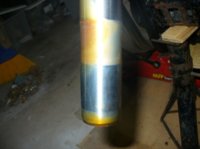
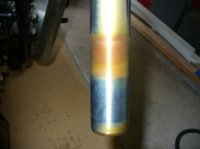
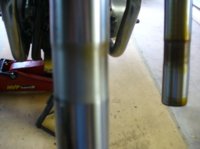
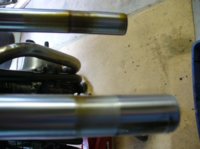
When I got the bottoms off I saw a narrowed section on each of the upper tubes.

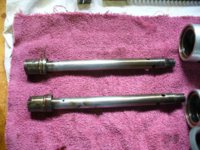
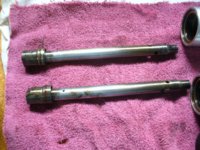
OK, here are some pics of what I was describing on the fork tubes.
Is this indented section unusual?
Also, my dampers already have 4 holes at the bottom and only 1 small hole at the top. I bought this bike with about 4K miles on it in 1981 from the second owner. I know he never had it apart. I thought the factory dampers had only 2 holes on the bottom.

Thanks in advance for any input,
Slimbob:wtf:
 

Attachments

  • P1060081.jpg
    P1060081.jpg
    139.4 KB · Views: 157
  • P1060082.jpg
    P1060082.jpg
    117.4 KB · Views: 120
  • P1060083.jpg
    P1060083.jpg
    111.5 KB · Views: 132
  • P1060084.jpg
    P1060084.jpg
    133.9 KB · Views: 154
  • P1060085.jpg
    P1060085.jpg
    147.1 KB · Views: 130
  • P1060086.jpg
    P1060086.jpg
    175.2 KB · Views: 131
  • P1060087.jpg
    P1060087.jpg
    309.5 KB · Views: 128
  • P1060088.jpg
    P1060088.jpg
    301.4 KB · Views: 136
The taper and reduced area is needed to hold the lowers on the uppers.
Maybe some of the earlier ones did. My 75 had 4 holes in the damper. I did as Minton suggests in his Article On how to improve the XS650. He says drill the holes out to 1/4 inch and add two. I think the early had two holes and the later had four holes but were about 3/16 inch.
Drill the holes out to 1/4 inch and what ever drill you have that just opens the top hole and drill through.
Bevel the sharp edges as well as you can. Polishing the damper can help.
Now when you reinstall the parts and ready to add oil compress the forks add about 8 ounces of oil. Pump the fork up and down to purge the air.
Now compress them.
If you have a tube of some sort put a mark on it 6 inches up from the end. I use a 3 or so foot long piece of clear tubing.
Now insert this six inch end down into the fork till the mark sets at the top of the fork tube. Use some vacuum, Your mouth will work but you might want to use a very long tube. I use my Mighty Vac. Slowly draw out any oil that the tube can. This set your oil to exactly the same and six inches down from the top. Now extend the forks, install your springs and caps.
The stock oil capacity is speced at 5.86 ounces. The six inch down is around 7.5 ounces. This helps the forks. You won't get the slopping noises some get and it makes the air space smaller above the oil. This compresses the air more and acts more like an air fork. This reduces the dive while braking.
You can use many oils to fill the forks. I have tried 10w 30 motor oil, 5w20 motor oil and AFT. The 10w30 was to stiff, The 5w20 and ATF feel pretty close.I may try different fork oils to see if it gets better.
Changing the weight of oil in your forks changes how fast they respond to bumps. A thicker oil slows the fork action, both on compression and rebound. A thinner oil speeds the action. Experiment a bit to find what feels good to you.
The cartridge emulators need simular mods but even more so. With them you don't want the dampers to do any oil control. This lets the emulators do the oil control. I plan on trying a set sometime.
Leo
 
Thanks XSLeo,
That's some great info. What do you make of the darkened rough areas? Clean them up with some emery cloth?

Slimbob
 
If you want. It just looks like discoloration from old oil. A bit of polishing won't hurt.
Leo
 
Thanks again. Will keep posted. I have the MikesXS progressive springs and plan on doing the Minton mods to the dampers tomorrow.

Slimbob:thumbsup:
 
All the later forks I've seen had the 4 lower holes about 3/16", not 2 @ 1/4" as Minton stated. DO NOT drill 2 more like he says, just enlarge the 4 existing holes to 1/4". Drill one more small one at the top. So to recap - enlarge the 4 holes at the bottom to 1/4". Drill through the one existing top hole and out the other side to create a second. Drill bit size #45.
 
Back
Top