I need help. Im an idiot

HOTEL71

XS650 Enthusiast
Messages
99
Reaction score
145
Points
33
Location
USA
Please see attached pic

#1--screw left side (sync?)
I cannot confirm or deny I may have moved this so....
If I turn it all the way in, whats the stock setting
2, 2-1/2, 3 turns out?

#2--Screw right side (idle)
again, I cannot confirm or deny
I may, or may not have touched this.
If I turn it all the way in, how many turns back out is considered stock?

Before ya ask,
17 intelligence agencies and 97% of climate scientist agree
it was due to Russian interference
and not my curiosity or incompetence! LOL

Thanks in advance!
 

Attachments

  • Screenshot from 2021-07-11 01-30-21.png
    Screenshot from 2021-07-11 01-30-21.png
    333.6 KB · Views: 108
turns out it was just 4 intelligence agencies, in a move led by msnbc star and scott free liar to congress brennan. other than that, i can't help you. but hopefully it's a start.

p.s. if it's a bs34 (hopefully) performance really doesn't matter much where any of the screws are, as long as it's still holding together
 
whats the stock setting
If you like the bike and are going to keep it around awhile, fer cryin' out loud, get a factory service manual. They are neither scarce nor expensive. Get a greasy (so what) used one off fleabay. Yamaha will sell you an over-priced copy of the original but avoid it, none of the photos copied well.
 
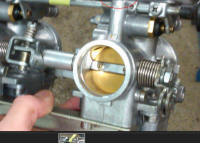
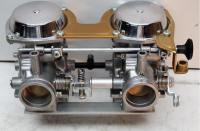
In your pic yes, the left screw is for sync and the right screw is for idle speed adjustment. There is no "stock" setting for these, you just put them where they need to be to accomplish their job. The sync screw controls the opening on the right carb's butterfly plate. You adjust it so it matches the opening on the left carb's plate. This "syncs" the carbs, gets them running at the same speed. Then you set the idle speed with the adjustment screw on the left carb. The butterfly plates are tied together through the linkage so adjusting the idle speed screw moves them both in unison.

OK, so you've messed with the settings. I'll walk you through what's called a "bench sync" to get them back very close to where they need to be. Final adjustment and setting to get them perfect will have to wait until they're back on the bike and it's running. Start by backing off the idle speed screw enough so it's not touching the cable arm at all, so you can actually see a space between the two. This will allow both butterfly plates to close completely. Now, hold the air filter ends on the carbs up to a good light and look in the engine side at the butterfly plates. If the carbs are in sync, both plates will be closed completely and you'll see little, if any, light coming through around the edges. If out of sync, one plate will be open more than the other and show more light around the edges. Now, start playing with the sync screw. Turn it in or out, what ever it takes, to close up the open plate. You'll know in a turn or so if you're going in the right direction because the open plate will begin to close up or open more. Once the open plate closes, continue turning the screw until the other plate just begins to open. Now turn it back in the opposite direction until the 1st plate starts opening again. Sync will be half way between those two points so work the screw back and forth and find that spot as best you can. Now you can re-set the idle speed. Turn the idle speed adjustment screw on the left carb back in until both butterfly plates are cracking open just a hair. This is usually somewhere in the range of one to two turns in after the screw makes contact with the cable arm.

This will get the sync and idle speed very close, good enough to start and run the bike. As I said, the final adjustment to get things perfect will need to be done now (gauges for sync, idle speed setting to 1100-1200 RPMs hot).
 
HOTEL71, in your photo there is half a red circle at the top of the right carb. If this is what you are refering to then this is a Pilot Screw (also called mixture screw) and is used to adjust the fuel mixture for low throttle settings close to and including idle. On my BS34 carbs the value for this screw was between 3 and 3.5 turns out. To set the pilot screw first screw it right in with as little force as possible until it is seated. Too much force will damage it. Then turn it out about 3.5 turns. The final adjustment will depend on how lean or rich that cylinder is running.

For the sync screw, which lies between the two carbs, just follow 5twins very nice set of instructions.
 
Last edited:
I found part of what I was looking for
see pic

Thank you 5twins for always bailing me out LOL
I have screen shot your reply for later
when its tinker time!

again, thank you!!
 

Attachments

  • Screenshot from 2021-07-11 14-50-51.png
    Screenshot from 2021-07-11 14-50-51.png
    265.4 KB · Views: 73
Today I sync'd my Hitachi carbs on the bench using basically the same method 5twins proposed above. It works well and will give you a very good approximation to the perfect setting.
 
HOTEL71, in your photo there is half a red circle at the top of the right carb. If this is what you are refering to then this is a Pilot Screw (also called mixture screw) and is used to adjust the fuel mixture for low throttle settings close to and including idle. On my BS34 carbs the value for this screw was between 3 and 3.5 turns out. To set the pilot screw first screw it right in with as little force as possible until it is seated. Too much force will damage it. Then turn it out about 3.5 turns. The final adjustment will depend on how lean or rich that cylinder is running.

For the sync screw, which lies between the two carbs, just follow 5twins very nice set of instructions.


Sorry for the confusion, this pic shows the sync screw in question (center left)
and YEAH I touched it.
I will follow 5twins instructions to the letter ,later on,
(east coast is way too hot today)

and as always, thank you again!!
 

Attachments

  • Screenshot from 2021-07-11 13-27-23.png
    Screenshot from 2021-07-11 13-27-23.png
    797.5 KB · Views: 86
another way of bench synch'ing is put something like pencils under the plates, push the throttle linkage, and when they're in synch both pencils fall at the same time. final synching with vacuum gauge compensates for stuff you can't see. you'll probably find it's close to on the money.

regarding that idle adjustment plug, i've never pulled mine out and the bike runs fine. there's a wide range over which there no change with the bs34. i've played with upping the jet sizes since running stock is supposedly lean. i can force carb cleaner in that circuit and it comes out the pinholes. if the o-ring is leaking, the plug there block the air, anyway. that said, i probably will take the screws out and give it a thourough cleaning at some point. big caveat though -- the screw is brass and on one bike i had, the screw was impossible to back out without destroying it. maybe judicious application of a mini-torch, since you're going to replace the o-ring anyway
 
Thank you all so much
5Twins you are a genius!
my neighbor and I share a wooden fence.
I took off the carbs and set them on top of the wooden fence post
facing the sun
sure as heck I could see the light you describes or a HALO effect
from the butterfly plates being out of sync.
I turned sync screw as you described till I saw/got the "a-ha moment"
then I set the idle screw.

My gut said to go further!

I had recently installed new jets on the carbs
I went down in size from 135 to 132.5
(due to unburnt gas smell and top end only at 45-50 MPH)
ever since 132.5 jet install, bike has been "OFF"
thus why I touched the carbs in the first place

(since carbs were already off the bike)
I had another set of 135 jets ,brand new
sitting in the tool box and figured, well it ran with the 135's didnt it?
So, I removed the 132.5 and re-installed the 135's

I then
re-installed carbs on Bike
hooked everything back up
closed eyes, hit start button AND
WHAAAALAAAA
she started and sounded good
throttle was responsive!

I have attached a pic with part numbers for the
advertised 132.5 jets circa japan 1981
that I purchased and installed.

possible they were bad or switched or
not the same when packaged?


thanks for listening
Have a great day

5Twins thanks again!!
 

Attachments

  • Screenshot from 2021-07-11 18-43-45.png
    Screenshot from 2021-07-11 18-43-45.png
    182.2 KB · Views: 77
Last edited:
I ran the one part number through google
( 1st number pictured above)
620-14231-77 and got this
same part number, but two diff jet sizes?|
one jet is 132.5
and the other jet is 77.5?

bottom part number ran through google
620-14231-99 see pic #2
seems to be the one (I guess)

so in conclusion I may have had 2 diff size jets
causing me a lot of issues!

Thanks for everything!
 

Attachments

  • Screenshot from 2021-07-11 19-05-26.png
    Screenshot from 2021-07-11 19-05-26.png
    55.8 KB · Views: 78
  • Screenshot from 2021-07-11 19-07-43.png
    Screenshot from 2021-07-11 19-07-43.png
    136.5 KB · Views: 81
Last edited:
There's no need to use "Yamaha" jets. They're just standard Mikuni jets repackaged and priced higher, lol. Just use genuine Mikuni jets. You can usually find them for about $4 each. 135's should work fine, even in an all stock bike. Your running issues were probably related to other aspects of the carb (sync and maybe mix screw settings off).
 
Back
Top