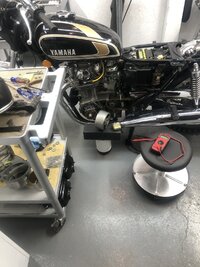
Rewound rotor on and torqued.New(Mikes XS)brushes installed.Stator remounted.New charged battery in,(12.7)with key not on.When key turned on instantly blows fuse(20a),tried twice.Removed stator to the side,turned key on,doesn’t blow fuse,battery (12.3)when key on.Unquestionably I no to STOP.Not going to ruin a new Jim’s rotor.Going to stay on my initial charging system inspection and component/s replacement plan for this 75b.Its coming apart where needed for easier access to probe properly with my tester and address any problem connectors and wires as I go.Ive read and reread old and recent threads. I almost got in a sloppy rush and over my head to get a traditional Easter ride.The riding can and will wait.I’ll feel better about asking for further advice when I get everything more accessible.Until then,thank-you all and Ride Safe Friends.
-
Enjoy XS650.com? Consider making a donation to help support the site.
XS650.com receives a small share of sales from some links on this page, but direct donations have a much greater impact on keeping this site going.
You are using an out of date browser. It may not display this or other websites correctly.
You should upgrade or use an alternative browser.
You should upgrade or use an alternative browser.
Installed Rewound Alternator Rotor, now blowing fuses.
- Thread starter magoo66
- Start date
Just brushes, or the whole brush block?
For starters... is the 20A fuse the only one on the bike?
Was that the initial problem, or is this (blowing fuses) a new problem?
Edit: Removed reference to other thread.
Was that the initial problem, or is this (blowing fuses) a new problem?
Edit: Removed reference to other thread.
Last edited:
I’ll double check this evening.Continuity between green wire brush screw and stator housing?
Only fuse on M/C that I’m aware. I’m gonna look at pictures and records and thoroughly recheck the bike this afternoon before I give a definite only one fuse answer.Never blown the fuse in the short times I’ve been riding the bike.Start a new troubleshooting thread?
You're more than welcome to troubleshoot it here, but I think it's own thread is the way to go.
For starters... is the 20A fuse the only one on the bike?
Was that the initial problem, or is this (blowing fuses) a new problem?
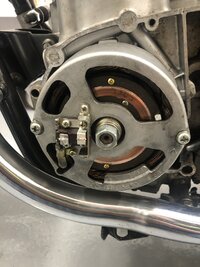
Get us a face on shot of the alternator? All stock wire harness (with side car additions)?
Are we to 600 posts yet? ;^)
Are we to 600 posts yet? ;^)
Sounds like a shorted rotor again
Stators can go wrong but it is rare
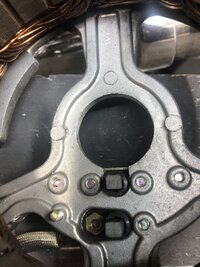
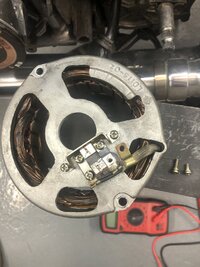
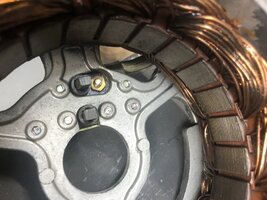
If it is according to picture #1
Power on and no connection via brushes to rotor no smoke
Stator on providing power to brush to rotor that is shorted Kabooooooomm
Please measure resistance between slip rings
And check the screws holding the Brushes and Brush holder.
Stators can go wrong but it is rare
If it is according to picture #1
Power on and no connection via brushes to rotor no smoke
Stator on providing power to brush to rotor that is shorted Kabooooooomm
Please measure resistance between slip rings
And check the screws holding the Brushes and Brush holder.
'K....so let's address the elephant in the room first...Sounds like a shorted rotor again
Here's some of my steps:
Wind up the coil, measure resistance.
Install new coil and press the halves back together, check for shorts.
Let the epoxy cure, measure resistance and check for shorts.
Install slip ring plate, check for shorts. This step was added 'cause ol' dumbass here screwed one down once with a screw twice as long as it should be and screwed itself into the coil.... "screwing" the coil....( how the fuck did that get in the parts bin.
 )
)Solder the leads to the slip ring plate, check for shorts (soldered one to the case itself once).
Drill balance holes in the rotor with drill press, check for shorts.
Immediately prior to wrapping in bubble wrap, measure resistance and check for shorts.
Some might call all those checks anal on my part... and fair enough, but back when I was just getting started (learning), I managed to fuck up a rotor at just about every one of those steps... so yeah, call me Mr Anal.
Anything's possible I suppose, so yeah... check and make sure the rotor windings ain't shorted to ground. If it is, I might just hang up my Fluke for good.

This ain’t gonna get that far.Nope Nope Nope.Get us a face on shot of the alternator? All stock wire harness (with side car additions)?
Are we to 600 posts yet? ;^)

'K....so let's address the elephant in the room first...
Here's some of my steps:
Wind up the coil, measure resistance.
Install new coil and press the halves back together, check for shorts.
Let the epoxy cure, measure resistance and check for shorts.
Install slip ring plate, check for shorts. This step was added 'cause ol' dumbass here screwed one down once with a screw twice as long as it should be and screwed itself into the coil.... "screwing" the coil....( how the fuck did that get in the parts bin.
Solder the leads to the slip ring plate, check for shorts (soldered one to the case itself once).
Drill balance holes in the rotor with drill press, check for shorts.
Immediately prior to wrapping in bubble wrap, measure resistance and check for shorts.
Some might call all those checks anal on my part... and fair enough, but back when I was just getting started (learning), I managed to fuck up a rotor at just about every one of those steps... so yeah, call me Mr Anal.
Anything's possible I suppose, so yeah... check and make sure the rotor windings ain't shorted to ground. If it is, I might just hang up my Fluke for good.
I am not saying it was shorted leaving your shop -- Not at all ..I don't believe that myself having seen the standard of your work
But everyone here knows that the installation with rattle gun and whatnot. Can go wrong
As well as a Defective regulator can push through to much Current which can hurt it.
It can be dropped and thrown around at the freight .
Besides that I can be wrong .it can be the stator winding that is shorting to core and ground
But it is simple to measure the rotor and they are sensitive
The CSF rule Cheapest Simplest First .. Again not any Criticism regarding you work Not at all.
Jut pointing out that it happens and is simple to Check once the stator is off. 3 minutes and the we can move on.
Keeping it simple.
No need to hang up any Fluke meter ..Simpe rational fault finding procedure 3 minutes and Off the table
I know what you meant Jan. No worries.I am not saying it was shorted leaving your shop -- Not at all ..I don't believe that myself having seen the standard of your work
But everyone here knows that the installation with rattle gun and whatnot. Can go wrong
As well as a Defective regulator can push through to much Current which can hurt it.
It can be dropped and thrown around at the freight .
Besides that I can be wrong .it can be the stator winding that is shorting to core and ground
But it is simple to measure the rotor and they are sensitive
The CSF rule Cheapest Simplest First .. Again not any Criticism regarding you work Not at all.
Jut pointing out that it happens and is simple to Check once the stator is off. 3 minutes and the we can move on.
Keeping it simple.
No need to hang up any Fluke meter ..Simpe rational fault finding procedure 3 minutes and Off the table
")
Blowing fuse cause located.MY BAD no one else to blame but me.Yes I missed rechecking my screws and put a longer screw in the wrong location.Big sloppy hurry.A couple rotations with a hand ratchet scraped the outer of outer ring.Apologies to all for wasting your valuable time with my hurried application of the brushes. I’m hooking a voltmeter before I proceed.
Attachments
-
 41BB284B-0971-4517-B8E1-F7F20E10042E.jpeg300.2 KB · Views: 57
 -
 D5C5094F-D189-420A-A38A-2DD2AA5E115E.jpeg307.3 KB · Views: 56
 -
 0D09025D-2218-440B-973D-A34C872A5F30.jpeg301.2 KB · Views: 55
 -
 2BC79E2B-8A54-4D44-886D-BF9F3365550F.jpeg281.7 KB · Views: 60
 -
 EA49A0E0-BB4C-45B8-BE0A-FF999358FB9A.jpeg323.5 KB · Views: 60
MY BAD no one else to blame but me.Yes I missed rechecking my screws and put a longer screw in the wrong location.
Been there done that! On my XS2 rebuild, I did the same thing, only I didn’t catch my mistake until after I ran the motor!
That’s how I wound up with one of Jim’s beautiful rewinds! 


The hurrieder I go the behinder I get.......
Designing a system where you can mix up screws and cause damage... and then not putting a WARNING in the manual is engineering malpractice imho.
Glad it was a relatively easy fix.
Glad it was a relatively easy fix.
There’s never time to do it right, but there’s always time to do it over.
I hope your damage is minimal and your beautiful bike running shortly.
For the record, I’ve done far bigger screw-ups in my time. Often while in a hurry. I have stories.
I hope your damage is minimal and your beautiful bike running shortly.
For the record, I’ve done far bigger screw-ups in my time. Often while in a hurry. I have stories.
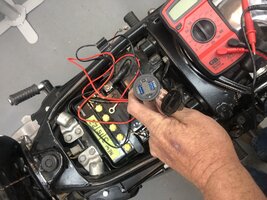
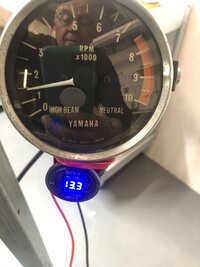
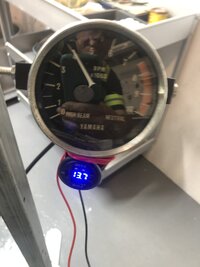
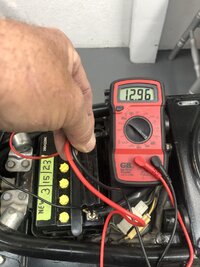
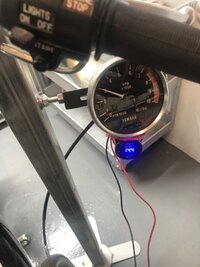
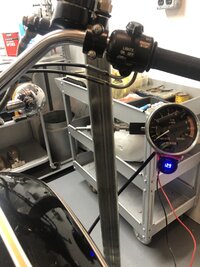
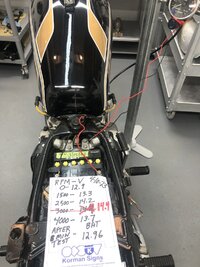
A couple 4-5 min tests on the dancing center stand using test stand.Picts not in row12.9 at 0 rpms- -.12.96 after some testing.Fabbing a mount and adding a volt meter I have on the bike next.A bit of test riding soon.I appreciate all the support for my screw-up. I need a kick in the rear for the scraping Jim’s beautiful craftsmanship.Movin’ forward from here.
Attachments
-
 E89B21EC-806F-4D25-9B62-080AED7E0006.jpeg197.2 KB · Views: 41
 -
 9EB7D024-2D97-41E1-B06A-1CCBB62A5A5A.jpeg153.1 KB · Views: 40
 -
 DB01EC12-8DA3-4DD3-ABAC-77D882CA6E0A.jpeg180.8 KB · Views: 42
 -
 ABCFB20A-0311-466C-A90C-71CA82C7BA64.jpeg267.7 KB · Views: 42
 -
 552A6B84-FA11-43A4-A3EF-869F3ECFDC10.jpeg194.3 KB · Views: 36
 -
 88E96D33-BCBD-4F5E-8BFD-E804E8C5C9A7.jpeg265.7 KB · Views: 42
 -
 2F8BDFAA-51D0-4788-98C6-DC6038880AFD.jpeg312.5 KB · Views: 42
Similar threads
- Replies
- 9
- Views
- 2K