Gotta find that drain. I like the test light method. Don’t change random parts.
-
Enjoy XS650.com? Consider making a donation to help support the site.
XS650.com receives a small share of sales from some links on this page, but direct donations have a much greater impact on keeping this site going.
You are using an out of date browser. It may not display this or other websites correctly.
You should upgrade or use an alternative browser.
You should upgrade or use an alternative browser.
New owner of a 1981 XS650 and I don’t know where to start
- Thread starter JFAIR1
- Start date
17/34 is factory US Gearing. A lot drop 2 teeth on the rear, 17/32. Going up 1 tooth on the front 18/34 is equivalent to dropping 2 teeth on the rear = to 17/32.
I think 17/34 is going to be good for an XS650 with knobby tires and small drum brakes. The gear box will be needed to help slow down. It’s not set up for interstate 55.17/34 is factory US Gearing. A lot drop 2 teeth on the rear, 17/32. Going up 1 tooth on the front 18/34 is equivalent to dropping 2 teeth on the rear = to 17/32.
JFAIR1
XS650 Member
No plans for highway riding, Marty. I also did the test light and got nothing.
Continuity test the different circuits between each switch and coupling and then through the switch coupling. This isolates each wire and picks up any resistance through couplings or switches, (clean/replace), also any resistance due to broken wires in between switches/couplings, that cant be seen if a few strands are broken creating resistance.
Either the battery has failed and won't hold a charge, or there is a draw. I don't know another way for the electrons to escape.No plans for highway riding, Marty. I also did the test light and got nothing.
Did you disconnect battery negative and place test light between battery negative post and now disconnected negative strap to frame/engine? If so, perhaps do the same with multimeter - set to milliamps - red probe on battery post, black probe on disconnected negative strap....should read 0I also did the test light and got nothing
JFAIR1
XS650 Member
Jpdevol. I tried the multimeter and got 0. I’ll have to dive further in on how to test the rectifier.
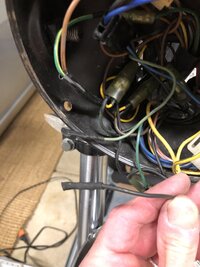
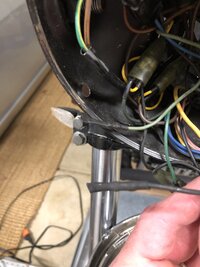
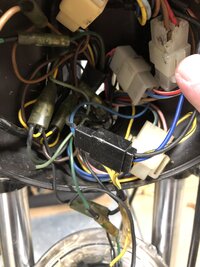
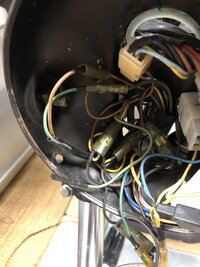
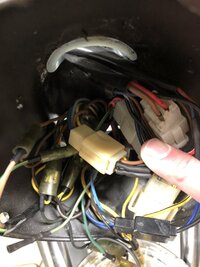
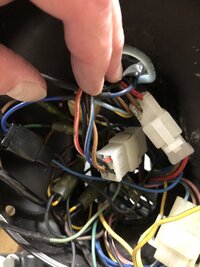
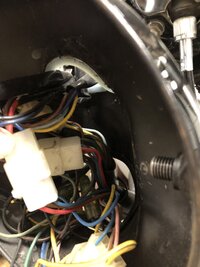
Most of this electrical stuff is Chinese to me. Everywhere I look wires have been spliced and wrapped with electrical tape. I might just have to start from scratch. Save what parts I can and replace the rest. Next time we get some nice weather I’m going to take the bike out and not use the electric start at all. Maybe by using the starter it’s just draining the battery and never recovering. I’ll add some extra pictures. Maybe you guys can see something that’s a glaring problem.
Most of this electrical stuff is Chinese to me. Everywhere I look wires have been spliced and wrapped with electrical tape. I might just have to start from scratch. Save what parts I can and replace the rest. Next time we get some nice weather I’m going to take the bike out and not use the electric start at all. Maybe by using the starter it’s just draining the battery and never recovering. I’ll add some extra pictures. Maybe you guys can see something that’s a glaring problem.
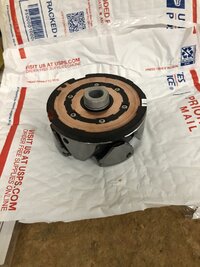
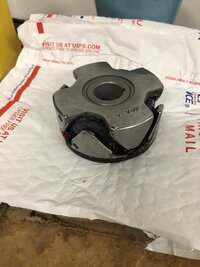
Your rotor showed up today.
JFAIR1
XS650 Member
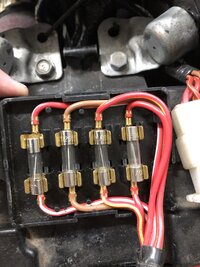
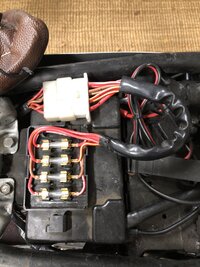
Fuses, battery and headlight.
Attachments
-
 E82D4E36-3DD4-472F-82A2-B58C4EAD74D4.jpeg335 KB · Views: 31
 -
 5F2E196F-FF19-4E4E-BB8C-944C2E33AE4B.jpeg339.2 KB · Views: 33
 -
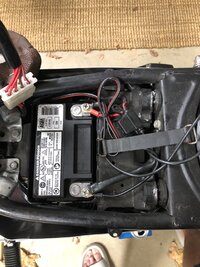 43FC2328-BE97-48ED-96D0-8B634C2EC141.jpeg369.5 KB · Views: 32
 -
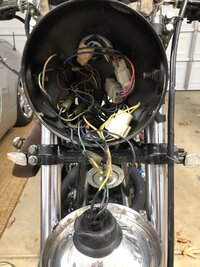 8A2663CE-A1D0-48CC-B88A-C59F9154F83C.jpeg321.2 KB · Views: 36
 -
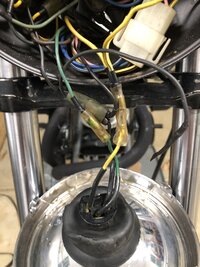 4DD77801-6C41-48F0-800F-91AC83BC8125.jpeg300.6 KB · Views: 33
 -
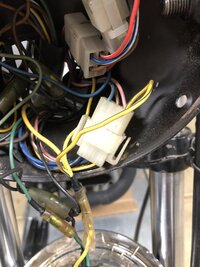 CFD9729B-4215-4DEC-8BE0-86030F6E56DD.jpeg284.9 KB · Views: 35
 -
 D3FD4049-27CC-49EA-845E-14F0958778BF.jpeg258.4 KB · Views: 32
 -
 2CE8F100-CD09-431C-83B8-2F3BBD405451.jpeg253.4 KB · Views: 32
 -
 3894291D-C153-4BAC-BF54-9DB88025913D.jpeg282.1 KB · Views: 33
 -
 7EFFB343-C101-48E8-BE8F-9424102A415B.jpeg270.4 KB · Views: 34
 -
 B5227BE8-6E6E-452A-8C25-A9D3A695FE42.jpeg239.4 KB · Views: 34
 -
 6BE7BB73-2760-4793-91E6-DC9BC8439A2B.jpeg257.9 KB · Views: 31
 -
 98CADDE5-A2AC-463E-A350-E35AC2F2DD27.jpeg241.1 KB · Views: 32
JFAIR1
XS650 Member
Thanks Jim
Edit: video I linked was not for your year of bike.
Check your battery voltage with key off.
If not at least 12.6V, charge battery.
Turn key on and check voltage. Record and report back
Is headlight off before you try to start it (most bikes it will be off till you start it unless there is a switch to manually turn on)
Start your bike as you watch the voltage. How low does it drop?
If bike starts, what is the voltage AT the battery terminals when bike is running in idle?
What is battery voltage when you hold up to say 3000RPMS?
If battery voltage goes above 14.7V, shut it off and report.
At Idle Does it hold that voltage or keep dropping? (dropping would be a sign of charging system failure)
Good advice here to clean connectors. I reduced I recall about a .3V drop from battery to the regulator on my '78 just by cleaning some connections in the headlight and the key switch. If you follow the electrical wiring, you can actually bypass the key switch from the connector in the headlight.
If your rectifier has blow/shorted diodes, you can test that if your volt meter (DMM/Digital Mulit meter) has a diode checker.
The 3 wires to the stator will be 0V or about .5V on the diode checker to Battery + and Battery - wires (usually black and red)
You don't have to think about it too much cause all 3 should do the same thing.
Example.
Put Black on black wire of rectifier/regulator and then red on each of the 3 wires that come from the rectifier (usually 3 white or 3 yellow wires?)
You will get either 0V or approx .5V on the Diode test setting of DMM. If you get say 0V, then switch leads (red lead on black wire and black lead on each of the 3. Then you would get the opposite (.5V).
A failure would be when you get one different than the other or none of them or .5V ever.
You can post your results like this here:
DMM set to Diode test
Black lead on Black wire, Red Lead on Yellow/White wires
Yellow/White 1 : ?V
Yellow/White 2 : ?V
Yellow/White 3 : ?V
Red lead on Black Wire Black lead on Yellow/White wires
Yellow/White 1 : ?V
Yellow/White 2 : ?V
Yellow/White 3 : ?V
Black lead on Red wire, Red Lead on Yellow/White wires
Yellow/White 1 : ?V
Yellow/White 2 : ?V
Yellow/White 3 : ?V
Red lead on Red Wire Black lead on Yellow/White wires
Yellow/White 1 : ?V
Yellow/White 2 : ?V
Yellow/White 3 : ?V
Last edited:
5Twins made the suggestion to go through the loom and check/clean all connections from one end to the other. That was 3 weeks ago.
I suggested to do this a couple of days ago.
This needs to b done, especially if your having electrical problems, as you are.
Pics of the wiring in the headlight shows big problems with the bullet connections and the ignition connector is deteriorating, as they all seem to do. All the bullet connectors show green inside the plastic covers as well as being dirty. Looks like whatever the po put on the connectors has caused a reaction that could be the cause of resistance throughout the loom.
Going through the loom, continuity testing, will also help you work out what the po has done. I see yellow wires connected to you indicator wires, Dg and Ch.
Gonna need to trace the wires comparing them to a diagram to work out what he has done.
Your going to be chasing electrical problems all the time if the loom isn't worked on before doing anything else.
Most of this electrical stuff is Chinese to me.
It looks daunting at first but really isn’t that bad and it really gets you familiar with your bike. You can also learn to speak Chinese.
If you don't have a pristine stock loom to work with then solder and shrink tube can be your friend.....bugger twist-and-tape and discount crimp connectors.
JFAIR1
XS650 Member
Big shout out to Jim. He got my rotor back to me and it looks perfect. I wish I had a before and after picture. I’ll post the finished product anyway. The plan is to work on the loom, reinstall the original rotor and run a few test Melnic suggested over the weekend. Thanks guys.
Attachments
I can help with the voltage regulator connector. I have all of the tooling. It might be January though.
JFAIR1
XS650 Member
I installed the new rotor from Jim and cleaned all the connections in the headlight assembly. I'll continue to work on the other connections. Here are my voltage recordings. I never once used the electric starter. I think with the 750cc kit the starter is working to hard which is killing the battery. I also ran the test twice. Once with the headlight unplugged and once with the headlight plugged up. I also wanted to mention that the headlight comes on when the key is in the ignition and turned on but the bike is not running.
13.32 volts fresh of the charger and installed.
12.31 volts with key on and headlight unplugged.
12.60 volts with key off and out.
13.13 volts at idle. headlight unplugged.
14.32 volts at 3k rpm. headlight unplugged.
14.30 to 14.60 volts at idle. The voltage kept jumping up and down but always in this range.
Rode the bike for 15 to 20 minutes
14.80 volts at idle. headlight still unplugged.
14.88 volts at 2k rpm
12.46 volts with the bike off and key on. volts dropped to 12.36 and finally settled.
12.60 volts with key out and letting the bike sit for an hour.
12.37 volts with key on and headlight still unplugged.
13.30 to 13.60 volts with the bike running and headlight unplugged.
14.20 volts while revving the bike.
Plugged the headlight up.
12.87 volts with key off
12.22 volts with key on and headlights on.
12.40 volts and rising to 12.48 volts while idling
13.80 to 13.89 volts while revving to 3k rpm
12.51 volts and rising to 12.53 volts while idling
12.22 volts with key on and lights on and bike off
12.65 volts with key out
12.68 volts 3 days later.
Thanks for your patience. I hope this means my electrical problems are over for now and I can start working on other parts of the bike.
The charging system appears to be working well....but, IMO, the bike should start right-up - no issues - with the electric start, regardless of 750kit. I'd check connections, particularly the ground strap to the battery.
Similar threads
- Replies
- 26
- Views
- 835
- Replies
- 33
- Views
- 1K
- Replies
- 36
- Views
- 1K

