Printable Rotor Drilling Templates

EvenmoreXS

1981 XS650
Messages
1,098
Reaction score
47
Points
48
Location
Tallahassee
Hello there forum members,

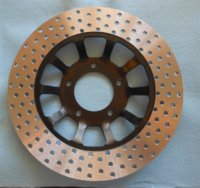
I am looking for a little assistance if you will. I have been searching for a printable template for drilling my front brake rotors in the pattern pictured below. I have found several links that have either been removed..they go nowhere... or are gone now for whatever reason, some that don't seem to print.. just links to images on photobucket. I hate to ask for help for this but I've wasted a lot of time and still haven't found the correct one. I know someone here can help. You guys rock.
Im not really interested in the swirl pattern unless there is a beneficial reason to do so, I think the 2-3-2 pattern below will look best on my bike.

If you have one, Id greatly appreciate you posting. If you have any other templates it wont hurt to add them here also, I named the thread something that will be very easy to find for other members in the future.

Thank you in advance.
 

Attachments

  • Drilled Rotor2.jpg
    Drilled Rotor2.jpg
    108.8 KB · Views: 887
Hi Evenmore,
you don't need no steenkin' template for a 3-2-3 pattern.
3 holes in line with the middle of each disk spoke and 2 holes between them.
mind you, drilling those tough bastards is a stone bitch.
Low speed, high drill pressure, lotsa cutting fluid, big centerpunch marks, cobalt steel drill bits, 5mm then 10mm drill size on a reasonable sized drill press should do it.
 
I thought about that but figured id try to find a template first. Thanks for the drilling advice. I've watched a few videos. I'll need a new drill bit and more beer.
 
There are templates posted on this site somewhere. If you can borrow a rotary table it makes the job super easy.
Consider the hole size I have read (on this site) the most efficient size is no larger in diameter than the thickness of the disk.
 
Yes, keep the hole size the thickness of the disc at most, or less. One of the "perks" of drilling a disc is increased cooling due to increased surface area. But you only get that if you keep the hole size as mentioned. Go larger than the disc is thick and you lose surface area. The surface area you've removed on the front and back of the disc where you drill the hole is greater than what you create on the sides of the hole through the disc.
 
Consider the hole size I have read (on this site) the most efficient size is no larger in diameter than the thickness of the disk.[/QUOTE]


Yep, thanks for the info. Every single thread discussing drilling rotors mentions this. There is no way I could make that mistake. That dead horse has been beaten.. revived, and beaten again. But in a good way.
 
If you can't find a pattern, you may have to do as I did - make one of your own. Years back, I was doing a 5mm disc and needed a pattern with smaller holes. I also needed more holes per "swirl" to fully cover the swept area of the disc. All I could find were large hole patterns. I downloaded a free cad program and made a new pattern to fit my needs. Unfortunately, that was 2 or 3 computers ago and I no longer have the program or even remember what it was called. But I don't recall it being very difficult to do.

I still have and use that pattern, but it's a "swirl" type, not what you want. I will say though, smaller holes are easier to drill. I don't need to use any special type of drill bit, just a plain high speed steel one. I use a 3/16" drill which is about 4.8mm.
 
Im very cool with smaller diameter holes, I can get a better swept pattern, maybe even do a 4-3-4 . Shouldn't be too hard to mark the diameter lines with a rotating table... lazy susan.. and then mark my drill spots with a ruler.

Obviously you can drill away too much..

Is whats pictured below too much? First pic. 3-2-3-2-3 spoke to spoke. lotta damn holes.....

At what point is diminishing returns met?

Also, is there a benefit to using dimples in the pattern instead of drilling all the way through in some places? I haven't seen anyone touch on this other than, " That Looks Trick "

Thanks guys.
 

Attachments

  • drilled rotor3.jpg
    drilled rotor3.jpg
    83.9 KB · Views: 1,077
  • drilled rotor4.jpg
    drilled rotor4.jpg
    127.5 KB · Views: 707
...At what point is diminishing returns met?

There's an engineering perspective I haven't seen addressed here, thermal mass.

If you dump a certain amount of energy (heat) into a material, it's temperature will rise based on its thermal capacity. Reduce the mass and the temperature should rise proportionally (absolute temperature). At some point, the temperature could be high enuff to start brake fade. However, this is offset a little by the more rapid shedding of heat due to higher temperature...

Probably worth being considered in racing applications, but for basic commuter to and fro it probably shouldn't come into play.

Any advice on the dimples with holes on the rotors? Any benefits.

besides less drilling !!!
 
Dimpling, combined with drilled holes definitely looks "trick," but I'm pretty positive the advantages of dimpling are similar to those of drilling. Dimpling leaves more material so I'd imagine it doesn't dissipate as much heat, but it's probably better maintains the structural integrity of the rotor... just my 2 cents
 
Dimpling, combined with drilled holes definitely looks "trick," but I'm pretty positive the advantages of dimpling are similar to those of drilling. Dimpling leaves more material so I'd imagine it doesn't dissipate as much heat, but it's probably better maintains the structural integrity of the rotor... just my 2 cents

Hi 'tailgate,
Brakes work by converting momentum into heat.
A plain disk has more mass than a drilled disk so the heat the brake pads generate is slower to raise a plain disk's temperature to a dangerous level.
A drilled disk has less mass than a plain disk so the heat the brake pads generate is quicker to raise a drilled disk's temperature to a dangerous level
However, all those holes in a drilled disk give it more surface area than a plain disk which allows it to cool off quicker.
I reckon it's "What you make on the swings, you lose on the roundabouts" in comparing the temperature rise & loss of the two.
Drilling (or slotting) disks does two good things for you.
1) All those holes sweep brake dust, road dust and water away from the brake pads so the brakes work better.
2) All those holes reduce the bikes unsprung weight
 
I was hoping for more weight savings but it really wasn't very much. I put lots of holes in it and still only saved about 1/4 lb.


I didn't find the drilling difficult either. I just used a normal drill bit but a good quality one. I'd start each hole on the center punch mark dry so I could see what I was doing, then add a drop of oil. And all on my little $50 HF bench top drill press. It's by no means a high quality unit but I must say, I've gotten plenty of use out of it.
 
Drilling (or slotting) disks does two good things for you.
1) All those holes sweep brake dust, road dust and water away from the brake pads so the brakes work better.
2) All those holes reduce the bikes unsprung weight

I thought drilled brake rotors also ultimately provide more "bite," meaning the brake pads get a better grip on the rotors... I know I'm skipping the physics on this one, but I swear I read that somewhere...
 
I thought drilled brake rotors also ultimately provide more "bite," meaning the brake pads get a better grip on the rotors... I know I'm skipping the physics on this one, but I swear I read that somewhere...

Mostly better braking in wet conditions. I've had both kinds, no holes or grooves and rotors with grooves. There's a real noticeable difference, and a big difference in the solid XS rotor when dry and wet. Actually you can feel the change when the water is finally swept away on a solid rotor while braking.

Scott
 
XS1100 special rotors are thinner, slotted, bolt on and available cheap off fee bay.
there are other lighter alternatives also, many do require a machined spacer to get the offset right.
this is a left hand rotor.

s-l1600.jpg


The slots angle the "other way" I have used one on the right side and had no issues.
 
Back
Top