What the Carb?

Flat_Tire_Moto

XS650 Member
Messages
12
Reaction score
10
Points
3
Location
Vancouver
I recently acquired a 1975 XX650 and it came with some issues, as well as a couple Rubbermaid bins of things and a whack load of carbs. Like 10 plus the two on the bike, all of varying condition and levels of neglect. The ones on the bike definitely need some minding and what I was hoping to do was take some of the carbs in better shape from the bins and use them to rebuild.

20240225_150500.jpg
20240225_144939.jpg


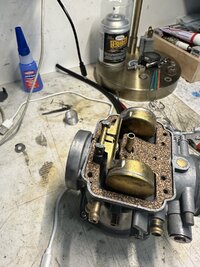
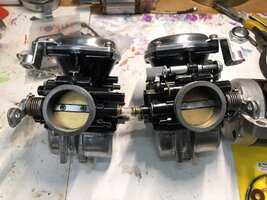
What I came across though is that the ones in the best condition seem to be different from the ones currently on the bike and I am not sure if I would be able to use them or not. they also appear to be built quite differently from the left carb to the right.

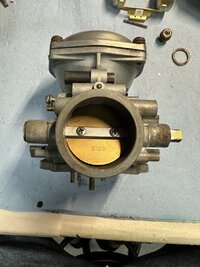
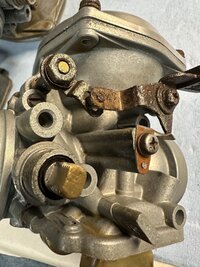
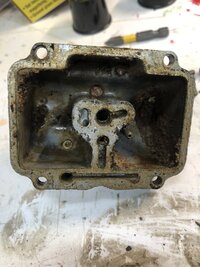
these are the ones currently on the bike but need a complete overhaul.

20240227_183847.jpg
20240301_175039.jpg


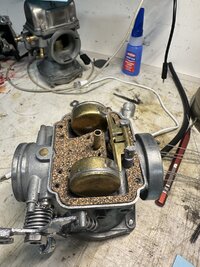
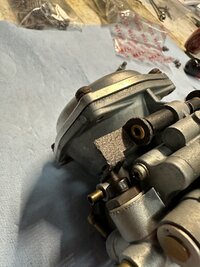
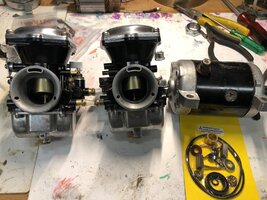
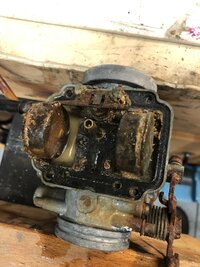
and this is the one that I want to change to as I have two in quite good condition, but they have a different Starter jet bodies and a different hose connection.

20240301_175048.jpg


Im not sure if I should just suck it up and try and get the nasty one back looking nice and not swap or would this swap work? I'll also add that I believe the engine has been bored and sleeved to 750cc..

Little over my head but thought the more enlightened folks here might be able to shed some light on my situation.

Cheers.
 
That carb set currently on the bike is a later, linked set, from a '76-'77 model by the looks of it. It is missing the lower angle bracket that ties the two carbs together, probably left off because it's down leg wouldn't clear the cam chain adjuster cover.

Finished4.jpg


But you could notch it out, or even "upgrade" to a newer cam chain adjuster (type E) that would clear.

All the other carbs look to be older ones, all run as single, separate units with their own throttle cable. The big "tell" is they don't have the casting on the bottom front of the carb body for that angle bracket to bolt to. Personally, I would overhaul and use the later linked set. I can provide you with measurements if you want to make up a new lower angle bracket.
 
I think that lower bracket might actually have been in one of the Bins. But definitely getting caught up on the cam tensioner. I'm having a help of a time getting it cleaned and the pin for the floats out... bit of a nightmare at the moment
 
Well, maybe do something like this to the angle bracket .....

Length.jpg


Take care trying to get that float pin out so you don't break a post off. I'd use plenty of penetrating oil and heat, then gentle taps with a pin punch and a small hammer. I have a little 4 oz. ball peen that I use on carbs.
 
Well, maybe do something like this to the angle bracket .....

View attachment 262902

Take care trying to get that float pin out so you don't break a post off. I'd use plenty of penetrating oil and heat, then gentle taps with a pin punch and a small hammer. I have a little 4 oz. ball peen that I use on carbs.
I very much don't wanna mess up that post. Gonna have to find some patience and take my time with it.
 
The BS38 float pins are a very loose fit in the pivot posts. If it's stuck, it's most likely due to gas varnish. So, maybe try some carb cleaner along with the penetrating oil, and definitely put some heat to it. A heat gun works good and will get it plenty hot enough. But, keep it away from the soldered parts on the floats, it'll get hot enough to melt them, lol. I found that out the hard way, lol.
 
Last edited:
Admit the carb looks a bit nasty, but if you can get them apart without breaking anything, a good clean and possible a vapor blast + ultrasonic cleaning will make them look like new. I’ve had several in a lot worse condition - they all turned out OK at the end. Take your time and you’ll be happy with the result.
 
Admit the carb looks a bit nasty, but if you can get them apart without breaking anything, a good clean and possible a vapor blast + ultrasonic cleaning will make them look like new. I’ve had several in a lot worse condition - they all turned out OK at the end. Take your time and you’ll be happy with the result.
Any suggestions on what to put in the ultrasonic cleaner? At the moment I have some simple green degreaser but it’s not gonna do much for that nasty carb.
 
You can use this, increase the ratio for real dirty work. https://asonic-ultrasoniccleaners.com/products/as-carb-1
I must say the simple green has worked for me, assume your cleaner has heat ( which is needed to improve cleaning). I suggest blast them first if you have that option or soak them in WD-40
It does have heat. And so far simple green has worked great for grease and grime. Not working the best against these carbs.

But will give them the treatment this week. I loaded them up with busters penetrating oil', will try and get that pin out… then if not hit the bath on hot for a while and go from there.

I do have a small sandblast cabinet but would be worried about potentially getting media in where I don’t want it.
 
If you blast with glass beat and rinse well plus several trip to the ultrasonic cleaner you should be ok.
When I work on carb I soak / clean the best I know, then vapor blast with glass beats ( it’s basically a wet sand blaster ), I then clean with compressed air , ultrasonic bath compressed air again and so on for a couple of times. So far have had no issue not being able to clean out all the canals. I also have some very fine “brushes” to help with the job. The finer one is 0.25mm. Attached a few different carbs - before and after scenario.
Make sure you have everything apart before any blasting! Two of these were so bad I wasn’t sure it was worth the effort - but it turned out it was. These are for ‘74-74 models before they were linked. Two are on my ‘75 XS, the other two may end up on my ‘78 XSE if I don’t find a linked set that’s not to crazy priced. I keep my non linked on the models they belong to as I like to keep them original to the year.
 

Attachments

  • IMG_3713.jpeg
    IMG_3713.jpeg
    323.5 KB · Views: 14
  • IMG_3592.jpeg
    IMG_3592.jpeg
    355.7 KB · Views: 12
  • IMG_3712.jpeg
    IMG_3712.jpeg
    377.8 KB · Views: 11
  • IMG_3711.jpeg
    IMG_3711.jpeg
    420.8 KB · Views: 12
  • IMG_3591.jpeg
    IMG_3591.jpeg
    282.7 KB · Views: 12
  • IMG_3590.jpeg
    IMG_3590.jpeg
    394.2 KB · Views: 14
  • IMG_0962.jpeg
    IMG_0962.jpeg
    334.9 KB · Views: 13
  • IMG_0963.jpeg
    IMG_0963.jpeg
    311.3 KB · Views: 11
  • IMG_0959.jpeg
    IMG_0959.jpeg
    286.8 KB · Views: 17
  • IMG_0958.jpeg
    IMG_0958.jpeg
    278.4 KB · Views: 11
  • IMG_0955.jpeg
    IMG_0955.jpeg
    290.4 KB · Views: 17
  • IMG_0954.jpeg
    IMG_0954.jpeg
    334.7 KB · Views: 16
  • image.jpg
    image.jpg
    231.2 KB · Views: 16
If you blast with glass beat and rinse well plus several trip to the ultrasonic cleaner you should be ok.
When I work on carb I soak / clean the best I know, then vapor blast with glass beats ( it’s basically a wet sand blaster ), I then clean with compressed air , ultrasonic bath compressed air again and so on for a couple of times. So far have had no issue not being able to clean out all the canals. I also have some very fine “brushes” to help with the job. The finer one is 0.25mm. Attached a few different carbs - before and after scenario.
Make sure you have everything apart before any blasting! Two of these were so bad I wasn’t sure it was worth the effort - but it turned out it was. These are for ‘74-74 models before they were linked. Two are on my ‘75 XS, the other two may end up on my ‘78 XSE if I don’t find a linked set that’s not to crazy priced. I keep my non linked on the models they belong to as I like to keep them original to the year.

Yup I have glass beads. It's pretty rough grit but gets finer as I use it... I'm really gonna have to dig deep and let time do it's thing... good long soaks and go slow with it.. a lesson I patience I guess.

I'll definitely give this a try as ild like to get them looking nicer and the linked set saves me the hassle of trying to build up two other ones.

Thanks
 
Mostly the linked set saves you the hassle of syncing two carbs and have two cables to the throttle :) - I got lucky I guess and made it work well on both my ‘75 XSB’s - but I would like to avoid it on the ‘78 XSE I’m working on now, but so far haven’t found a set that doesn’t break the bank - I don’t mind pay up if they are complete and refurbished, but many are I need of a lot of work adding to the overall cost - like diaphragm is 50-70 bucks plus gaskets and jets - so I’ll be patient and wait till some show up at the right price and use what I have for now. Good luck
 
Yes, don't give up. I found a nice set on Craigslist last summer for $45. They are very nice and unmolested, even still have the limiting caps on the mix screws, lol. And luckily they were drained when they were removed some 20 years ago so should be easy to clean up.
 
Yes, don't give up. I found a nice set on Craigslist last summer for $45. They are very nice and unmolested, even still have the limiting caps on the mix screws, lol. And luckily they were drained when they were removed some 20 years ago so should be easy to clean up.
Yes - I know they are out there - just a matter of timing :)
 
Here a little update.

I took the advice and went back to the carbs that were paired.

They needed some serious tlc and were coated in some weird salt like deposits. No idea what it is. (More on that below)

I decided to give them a hack of a bath and let them soak in a warm bath for 24hr or more. The deposits on the carb bodies foamed up almost like foamy bits you'd skim off the top of a pot of stock or something. (I used to be a chef)

I was also able to use a small punch and get those float out with relative ease.

I wiped this foamy business off as best I could and dried them up. Gave them a once around in the sand blaster and had great results.

IMG-20240317-WA0006.jpg
IMG-20240317-WA0007.jpg
IMG-20240317-WA0013.jpg
IMG-20240317-WA0010.jpg


One I was done with that I let them sit and they got a bit of oil on them and noticed they didn't look as even or nice. I thought maybe I should rinse them in the ultrasonic again. Ugh. Mistakes!

I guess that I just re-deposited what ever the scum was back on the carb bodies.

Anyone know what this stuff could be.

20240319_192754.jpg
20240319_192805.jpg


Anyway.. it's a process and I'm learning from it so can't complain to much. Will rinse in clean solution once again... dry them and blast one more time to remove whatever that stuff is.

Cheers
 
Anyone know what this stuff could be.
Salts was the correct answer. That appears to be aluminum corrosion. It turns into salts. What is in the bath? I’m thinking it must be corrosive to aluminum. I also believe sandblasting is too aggressive for carburetors. Soda blasting is probably more appropriate.
 
Salts was the correct answer. That appears to be aluminum corrosion. It turns into salts. What is in the bath? I’m thinking it must be corrosive to aluminum. I also believe sandblasting is too aggressive for carburetors. Soda blasting is probably more appropriate.


The deposits were there prior to the bath, don't think that is what's causing it. I'm using a diluted simple green.

For soda blasting, can u just change the media in the blasting cabinet and away you go or are there changes required.
 
Back
Top