Agreed. Ignore the instructions, remove the rust and it's a good product. It's the lack of (or bordering on) truth in advertising that rubs me the wrong way.I still think it’s good stuff because it’s epoxy.
-
Enjoy XS650.com? Consider making a donation to help support the site.
XS650.com receives a small share of sales from some links on this page, but direct donations have a much greater impact on keeping this site going.
You are using an out of date browser. It may not display this or other websites correctly.
You should upgrade or use an alternative browser.
You should upgrade or use an alternative browser.
Mikey's new to him 1980 650
- Thread starter Mikey
- Start date
It seems that is everywhere. In this case, they could be putting their product at risk. Full disclosure, a friend f mine applied it in the same manner as it was applied to @Mailman's tank, directly over the rust and failed liner. 5+ years later and it's still doing the job. However, that's not how I would do it and I don't recommend it.It's the lack of (or bordering on) truth in advertising that rubs me the wrong way.
As I write this I have a XS650 Special spinning in the clothes dryer with two pounds of rust busting media in it. I got a 5 lb bucket of it at Harbor Freight. It does a fantastic job as a prerequisite to acid treatment.
The dryer is running in the no heat mode. The tank is inside an old sleeping bag and all the remaining space in the drum is packed with pillows. Yeah, my missus balked, but who fixes everything around here anyway? No harm will come to the dryer.
Last edited:
X77S
Let's do this!
And more importantly to the tank.
jetmechmarty, I was thinking about the clothes drier the other day. Is the tank wrapped up so it is not free to move in the drier i.e. it is rotating rather than tumbling about?
Thank you.
Thank you.
I put the tank in an old sleeping bag. I put pillows in the dryer to get the tank in the center of the drum. Then I stuffed it full with another sleeping bag and pillow. I let it spin there for 60 minutes after making sure it was turning with zero detected vibration. I reoriented the tank and ran it another hour.jetmechmarty, I was thinking about the clothes drier the other day. Is the tank wrapped up so it is not free to move in the drier i.e. it is rotating rather than tumbling about?
Thank you.
I’ll follow up with phosphoric acid at another time.
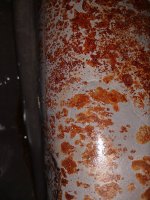
So, now it’s apparent that a failed liner was in there. Nothing but powder remaining.
That was good jetmechmarty.
Finally got back to the 80 Got the tank ( thanks gggGary )cleaned out with Metal rescue rinsed with water dried with a hair dryer and sloshed the inside with a mixture of gas and oil
It looks Good, it looks like there is a bit of rust still in there but it's just surface rust (keep the tank full and run a filter for awhile good to go)
Installed the petcock (Thanks Jim) and thought let's fire it up
Checked the oil way over full so I drained all the oil and gas out of it and removed the sump plate
Does anybody have a line on a Cometic or similar gasket material if not I have a spare that I can use (Hylomar blue on the sump cover side /grease and or oil on the engine side just thought with better gasket material I wouldn't need to keep scraping off the old gaskets
Attachments
After I clean and scrape the gasket off a sump plate the first time (often the original), I usually never have to do it again. I don't use any sealer on that gasket, just oil, grease, or anti-seize, so the new gasket never sticks too badly. I usually get several oil changes out of a gasket before it's "worn" enough that it needs replacing. It will warn me by starting to sweat oil or give an occasional drip. Then I know I'll have to swap it out for a new one next oil change.
Now it's time to re torque the head
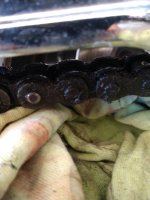
The rubber /metal washers seem to stuck on pretty good just get em off and not ruin the studs?
I bought other copper washers for the 75 at a local hardware store ( 3/8 ID 7/8 OD ) should have bought more
Anyway to re torque the head bolt the old washers have to go

The rubber /metal washers seem to stuck on pretty good just get em off and not ruin the studs?
I bought other copper washers for the 75 at a local hardware store ( 3/8 ID 7/8 OD ) should have bought more
Anyway to re torque the head bolt the old washers have to go
I am not sure if it's been mentioned but the washers need to be 1/8" thick to avoid too much thread having to be taken up by the Acorn nuts. If you use a thin washer the extra gain in thread length might bottom out in the Acorn nut and prevent the torque being set correctly, or pop the dome off the Acorn.
Yes, the dome metal is pretty thin. Just keep checkin' as you torque. The stud will imprint the dome if you bottom out. If the shape of the dome doesn't change at full torque, you're golden.I am not sure if it's been mentioned but the washers need to be 1/8" thick to avoid too much thread having to be taken up by the Acorn nuts. If you use a thin washer the extra gain in thread length might bottom out in the Acorn nut and prevent the torque being set correctly, or pop the dome off the Acorn.
Thanks as always guys !Yes, the dome metal is pretty thin. Just keep checkin' as you torque. The stud will imprint the dome if you bottom out. If the shape of the dome doesn't change at full torque, you're golden.
I have a new problem (question really)
On my old tank I had an (aftermarket?) non vacuum petcock
Now on the new to me tank I have a vacuum petcock where do I get the vacuum from do I just take it off one of the nipples that are on the carb intake manifolds ?
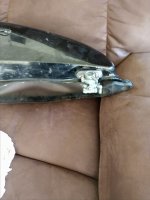
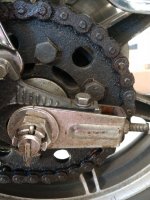
This is the old non vacuum petcock
On my old tank I had an (aftermarket?) non vacuum petcock
Now on the new to me tank I have a vacuum petcock where do I get the vacuum from do I just take it off one of the nipples that are on the carb intake manifolds ?
This is the old non vacuum petcock
Attachments
Yes.

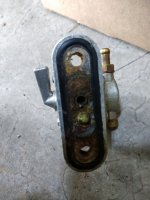
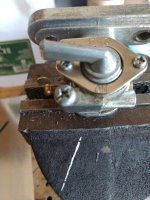
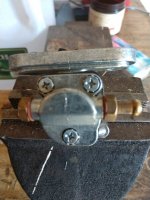
Here's


 the new petcock
What do you do when you want to balance the carbs as far as the petcock goes
Thats kinda what I thought
What do you do when you want to balance the carbs as far as the petcock goes
Turn it to Prime. It opens without the vacuum then.What do you do when you want to balance the carbs as far as the petcock goes
Turn it to Prime. It opens without the vacuum then.
 Thanks!! One day I'll go from a mild mannered parts replacer to a parts adjuster
I believe this bike will run today
Videos or it didn't happen....I believe this bike will run today

Similar threads
- Replies
- 34
- Views
- 880