Product review: Ikon Shock absorbers 76 series basic

Yep, the recipe for steering that's quicker and also more linear is to raise the rear on taller shocks, and 5/8" lift puts you right in the zone. I used a pair of Koni double clicker oil damped shocks for a few years. They were a marked improvement over Progressive Series 12 fixed damping gas shocks (not as good as the custom fixed damping Works Performance gas shocks that replaced the Konis, though). Good damping is what keeps the rubber in contact with the road and lets the bike hold the line in rough corners, and Koni/Ikon shocks do the needful. Congrats!
 
shock-absorber-7610-1418-shock-absorber-1.jpg

Gotcha, "7610's"
 
Inquiring minds;
When did you last check preload on the steering bearings?

Ok, first of all, thank you Gary for making me think about this. My steering had gotten a little loosey goosey , and I tightened up my steering damper. All that did was to add drag to turning my handlebars. So today I tackled tightening up my steering head bearings.

Sorry ole man it's a take it apart deal, ask me how I know, and what a pain it is to replace bearings on a Royal Star Venture.

I hate it when you’re right! o_O What a pain!

If it were me (there's your disclaimer :rolleyes: ) I'd loosen the stem pinch bolt, top nut on the stem and both fork cap bolts. That way you could use your rubber dead blow to tap the top of the triple up a hair..... do the adjustment. After adjusted and in this order... just snug the stem top nut (don't fully tighten), loosen the lower triple pinch bolts ( Reason being the top triple will sit lower cause you lowered the spanner nut it seats on... forks will need to drop a hair)... now tighten the stem nut and fork cap bolts. This should square up everything. Tighten the 3 pinch bolts and done.
That's how I plan on checking the SG this winter... 'cept I have 2 extra pinch bolts and an extra spanner nut.

So Jim, I thought this sounded like a pretty good plan of attack, but I thought you were wrong about one thing, loosening the fork caps. I hate it when you’re right also! :laugh2:

Here was the entire sequence,
1. Remove the gas tank and get the bike up on a lift and secured.
1073444C-B514-4127-AD5A-4B304775CF2F.jpeg
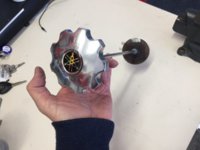
2. remove the entire friction damper assembly
E2E6CB1B-4F3E-42E8-AB88-E3667FAC246B.jpeg
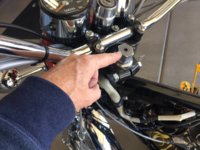
3. Loosen the top triple tree pinch bolt
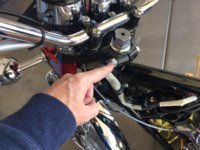
2045CF4B-F931-4F47-999D-F5877CE4C97E.jpeg
4. remove the top triple tree nut
EF8EE452-AFF4-4836-A388-E9BAFDB902F4.jpeg
5. loosen the two lower triple tree pinch bolts
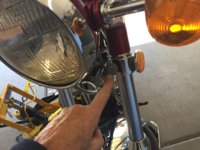
CBBA27B6-82C7-4D2D-B471-D239B0B2C625.jpeg

Now in my mind, I had loosened everything that could move when tightening the steering head bearing up. So I got my skinny punch and hammer and started driving that notched top nut around. It moved quite a bit, then just to test my work I grabbed the bottom of the forks and wiggled them front to back and Oh No! I could hear a definite clunk and feel free play in the front end. Crap! :eek: Now I’m beginning to think The whole front end is going to have to come off so I can see what’s doin. Oh man, I was dreading the thought. Then I remembered Jim saying to loosen the fork caps, in order to do that, I had to unbolt the handlebars and tip them back out of the way. Which I did. A couple of taps on the triple tree with my rubber mallet and I rechecked the front end for free play and the clunk is gone! Woo hoo!
Everything is back together now and hopefully tomorrow I can get it out for a little test ride. I sure hope I didn’t tighten things too much because It is a commitment to re adjust!
I am happy I took the time to correct this and that it is now done the right way.
-Bob
 
Guess I should have been explicit; overtightening is what trashed the Venture bearings. A sordid story involving "internet advice" and get'r done itis.
Stock it had ball bearings, with only 10K on the clocks I assumed stock, in my defense the steering WAS already funky and sneaking in to tighten already installed tapered rollers didn't go well. No problem! Only took a couple hours to get down to the steering.

DSCN9719.JPG

Why I 'll stand by my advise that off, the top triple should come.
 
I have been looking for a set of quality shock absorbers for my XS2 for some time now. That bike rides like a buckboard wagon. The original shocks, while being quite nice in appearance , are simply horrible. If I were riding on a rough bumpy road I would have to slow down to keep my teeth from chattering and a sharp dip or bump could literally make me go “ OOF! “ and it would knock the breath out of me.

I was considering Progressive 14 series and Hagons. I was having difficulty finding some hard data regarding some critical dimensions, primarily diameter of the coil springs and shock body. The reason these dimensions are important for me is clearance with the factory chain guard ( it’s tight ) and the factory shocks are pretty skinny. I also didn’t want to buy shocks with a “ one size fits all spring” , a lot of shocks come with a spring that is aimed at heavier riders and I’d be right back to having a hard ride.

I wound up buying a set of Ikon 76 series basic shocks. No damping adjustments, not gas charged, just well made hydraulic shocks, that are rebuildable and can be revalved. The only upgrade here is chrome springs, the standard springs are black. It also just worked out that they were fitted with a lighter weight spring that is suited to my weight. I bought these used from an Icon dealer on EBay , a customer had returned them for an upgraded model and I was able to get them at a significant savings.
In the box are the two shocks, a set of 10mm reducers and a pre load adjuster wrench. I did use the 10mm reducers.
View attachment 157749 View attachment 157750 View attachment 157751

Here is a side by side with the Ikon on the left with the factory shock on the right. The coil spring is larger around and the shock body is about 6mm larger in diameter, it is also 5/8” longer center to center of the mounting bolts, than stock. The important thing is the amount of exposed shock body at the bottom, this will give me the clearance I need.
View attachment 157752

When I mounted the drive side shock, it just touched the chain guard, no pressure, just touched. But I didn’t want them to rub against each other so I used a dead blow hammer and massaged a gentle curve into the bottom of the guard. It cannot be seen when mounted and it now totally clears.
View attachment 157753
View attachment 157754
View attachment 157755 View attachment 157756

Time for a test ride!
I took it out to to an area near me that has little two lane roads with some good curves and the road is rather rough.
I could tell right away that the ride had improved, the suspension still felt firm, but now much more controlled. I was deliberately aiming for bumps and dips and that spine jarring kick is GONE! It also just generally feels more comfortable riding on rough roads. But here was the surprise for me, the bike now also handles better! Before, it didn’t really like to be pressed hard going through corners, it felt kinda squirmy, I was blaming the retro tires for that, but now it suddenly feels much more stable and confidence inspiring when I carried speed through a corner. I hit some pretty tight curves today on some roads with rough pavement and I intentionally pressed a higher speed than I would’ve before and it now tracks like it’s on rails!
Color me impressed!
I have to admit, I wasn’t entirely confident I would see any noticeable difference and the cost for good shocks is not cheap, I always told myself, I’m not racing this bike, what’s the difference? But I now have to say, I’m very happy I popped for them. For me they are totally worth the cost.
-Bob
View attachment 157757
Thanks for posting this. I’m rebuilding a 74 and have exactly the same desires of quality, spring for my weight, and serviceability. Just hit order on the exact same setup.
 
Thanks for posting this. I’m rebuilding a 74 and have exactly the same desires of quality, spring for my weight, and serviceability. Just hit order on the exact same setup.

You’re welcome, I’m glad you found it helpful. I’m sure you will be very happy with them, it was a significant improvement on my bike!
Good luck with yours! 😉
 
Komi took over Ikon when they stopped production. Can rebuild Ikon rebuild able shocks with Koni rebuild able parts.parts.


From
https://www.performanceparts-ltd.com/customer-services/brands-we-stock/ikon
The Ikon story dates back to 1967 where the Koni suspension company launched a range of motorcycle shocks with internal adjustability and linear springs. Into the 70’s gas assisted technology and progressively rated springs were added to the line-up. Then in the 80’s in addition to their popular “dial-a-ride” shocks, new mono shocks were added to the range in response to the shift in motorcycle designe

2001 saw the dawn of Ikon suspension as an independent company specialising in motorcycle suspension. After negotiation with Koni, who were ceasing production of their motorcycle products and based on their technical legacy, 2001 saw the first Ikon shocks off the production line with the revamped 7610 series.
 
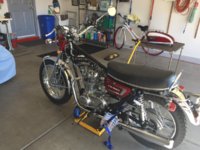
I believe the extra bit of shock length is a bonus but I am an amatuer. I converted an '82 Special to standard configuration a few years ago. I did a 'Joe Minton" fork mod, tapered rollers, modest brake work and 12.5" 7610 K
Red Calendar9.jpg
onis. I think the 12.5 Konis add 1" length to the Special frame spec. The bike feels light a nimble and is a joy to ride.
 
I believe the extra bit of shock length is a bonus but I am an amatuer. I converted an '82 Special to standard configuration a few years ago. I did a 'Joe Minton" fork mod, tapered rollers, modest brake work and 12.5" 7610 KView attachment 345595onis. I think the 12.5 Konis add 1" length to the Special frame spec. The bike feels light a nimble and is a joy to ride.
That was a special?!
 
With 13 1/2" length, some shocks can have 4"/ 100 mm travel (stroke), which gives over 120 mm rear wheel travel on a standard. This definitely helps with both comfort and handling. I think buying 13 1/2" shocks with 3" travel is wasting half the potential improvement.
 
Back
Top