I used 3/4" OSB for my inside walls.
How did it come out? Could you post a couple of pictures @Grimly ?
Pete
I used 3/4" OSB for my inside walls.
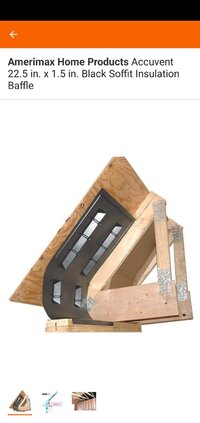
Sharing my lessons learned....I'll shut up after this one. Don't ask me how I learned this the hard way. Your builders I'm sure are aware of this, but they may not care if someone else is doing the insulation. Prior to installing the ceiling metal, install rigid pvc soffit baffles (not the cheap styrofoam ones). These stiff baffles won't fall apart when blowing in the insulation (or when trying to staple them into place).

Can us dummies chip in too?
Long ago when I did a 100x200 pole barn for my retail store. I used the pole barn panels, but at about 4' above the floor, I installed a wire "raceway" around the perimeter on a 2x6 purlin turned vertical. The " " because it was just made from a couple of stock pole barn siding trims, the wire was installed in PVC conduit inside the "raceway". 10' conduit so a double box every 5'. So easy to open the tin cover and add circuits and special use outlets. Even a compressed air outlet system.
View attachment 223572
That lack of a toilet might prove to be an issue after all! I guess you keep a slop jar in there.
View attachment 223554
1 empty windshield washer fluid bottleThat lack of a toilet might prove to be an issue after all! I guess you keep a slop jar in there.
View attachment 223554
1 empty windshield washer fluid bottle
3/4 PVC pipe and one of my wifes old flower pots
And an old milk delivery case for the 5 year old
When I first installed it I just let it drain in a small hole I dug (grass didn't like it much)
Now dug down deep / crushed rock in the hole and ya got it (Iwant to find some how to be able to just push a small button which will then play the sound of a toilet flushing)
My wife approves / maybe not so much the we man using it but when a guys gotta go ...
I don't know how I managed to post the picture twice I guess I must stutter when I'm posting
View attachment 223585View attachment 223586View attachment 223587
Dig the hole deep and that grass won't mind and maybe give the jug a little splash of water when your done for the dayNow THAT is a darned good idea Mikey!!
Pete
Part of the walling. The uprights are 2x7 and 8' high. With an OSB panel either side of them the wall turns into a fairly solid construction which is well capable of supporting the ceiling / floor of the upstairs mezzanine space.
I like the PVC panels and looked into it myself, gets pricey quick unfortunately depending on the size of install. Currogated metal panels look weird to me when top to bottom, although I’ve seen some cool mixes of drywall from ceiling to about 3’ from floor and then corrugated metal panels covering the bottom 3’, looks good and protects the most banged up area of the shop. Wood planks to me always look cool as hell and gives a vibe, but not a quick easy install. Not my garage but dig the look.I'll likely do drywall, but I have been considering this PVC product:
https://trusscore.com/blog/superior-drywall-alternatives-for-your-garage-walls.html
That’s a big a$$ gas line Pete. How big of a heater are you installing? I want to do that here too before the show flies. Looking good! You’ll enjoy many hours out there this winter.
I though you guys operated on 110 volts, or is that just over the border in America? What about Alaska and Hawaii do they operate on 110 volts also
I though you guys operated on 110 volts, or is that just over the border in America? What about Alaska and Hawaii do they operate on 110 volts also