I think oil's the issue, unlike steel you can't just burn off the oil when welding aluminum.
-
Enjoy XS650.com? Consider making a donation to help support the site.
XS650.com receives a small share of sales from some links on this page, but direct donations have a much greater impact on keeping this site going.
You are using an out of date browser. It may not display this or other websites correctly.
You should upgrade or use an alternative browser.
You should upgrade or use an alternative browser.
XS1 Motor Disassembly Help
- Thread starter Dinner200
- Start date
Gorgeous bike, BTW !
Welcome to the forum.
I would get more than one additional opinion on the welding.
Welcome to the forum.
I would get more than one additional opinion on the welding.
I think oil's the issue, unlike steel you can't just burn off the oil when welding aluminum.
Yes to that ..but here is a free piece out .Possible to clean
And the edge in the motor is visible possible to clean
Having said that there can still be problems with oil in the melt . Common when welding motorcycle engine parts
But an experienced welder will have that same problem
even if disassembly has happened.
I have seen clips on the subject on line and so . It can be a problem.. But perhaps doable
Perhaps not doable --- but summer coming up The upside saving a massive amount of work and costs in seals gasket and so
And ride this season. Wont hurt to ask around .
The question is free...
Dinner200
XS650 Member
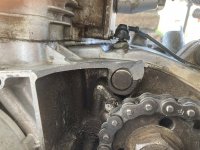
Hmm, I’m not sure if that’s a possibility. The crack goes through part of the shifter fork pin hole. Honestly though if I don’t have to take it all apart I’ll take itIs the possibility to weld it without disassembly investigated ?
It is a fairly flat surface and rags for protection -- wet perhaps ...can be placed inside if the side cover is removed and
On the outside against the cylinder and so .
On the inside root support ( not sure it that is the correct English word )
can be placed making the welding simpler. Even clamping it a bit. is possible
I have not welded TIG on aluminum but for other methods I would not rule the welding in place impossible.
Sticking my nose out I think I could do it and there are much better welders than myself out there
It has the advantage not warping as much as if on the table in parts.
Again TIG I have not done .But I have welded other methods And as a first assumption I would at least ask around for the top Notch people on this and Air industry have them. Showing that picture and a couple more --- listen what they say.
If that goes wrong there is the possibility to dissemble .. Again we are not talking the farmhand Cowboy trying to weld
But a experienced senior professional.
Attachments
I'll just throw this out there....
You could do a temporary repair now so you can enjoy it, then have all winter to tear the engine down and have it welded. J B Weld does a pretty good job on aluminum. You'd need to clean the entire area good enough to eat off of, but it would work. The trick to getting a good bond with aluminum is wire brushing the repair just before you apply the epoxy. Aluminum starts to oxidize almost immediately when exposed to air. The oxidation is what makes for a poor bond. Use a stainless wire brush and scrub it immediately prior to applying the J B Weld. It will most likely last forever.... but at least 'till riding season is over.
Just a thought...
It can be weld'd..... the area underside needs to be surgically clean.. ask in your area for a good welder.... my guy can weld paper....... once welded underneath the top weld can be done.. then sanded to a flat finish, then painted..
Dinner200
XS650 Member
I tried to JB weld this, didn’t hold as I need to bend the chunk that came off back so the screw hole aligns. I can get the old JB weld off just fine with a torch so that isn’t an issue. In terms of turn around time I’ll be out of town for some time soon so having a temp fix now won’t do me much good.I'll just throw this out there....
You could do a temporary repair now so you can enjoy it, then have all winter to tear the engine down and have it welded. J B Weld does a pretty good job on aluminum. You'd need to clean the entire area good enough to eat off of, but it would work. The trick to getting a good bond with aluminum is wire brushing the repair just before you apply the epoxy. Aluminum starts to oxidize almost immediately when exposed to air. The oxidation is what makes for a poor bond. Use a stainless wire brush and scrub it immediately prior to applying the J B Weld. It will most likely last forever.... but at least 'till riding season is over.
Just a thought...
I am liking the idea of having it welded in place still. So the story goes that I was going to send the case completely disassembled to an aircraft crankcase repair place in Oklahoma because they were one of the only places that said they could do this repair. On Facebook I had a user comment they were in SoCal and could weld it which happens to be where I’m headed soon. I’ve contacted the guy and my new plan might be to take the entire motor with me and see if this guy can weld it in place. If not I’ll see if someone can do it in place in Denver.
That still leaves the issue of the bent chunk. My idea would be to weld it partially, bend it back, and finish welding it but I’m no welder. Attached is a photo of when I tried to JB weld the part back. Thoughts?
Attachments

That still leaves the issue of the bent chunk. My idea would be to weld it partially, bend it back, and finish welding it but I’m no welder. Attached is a photo of when I tried to JB weld the part back. Thoughts?
a ) I have not worked with aluminum in this sense.. But if this was a Steel part it would be possible to straighten it out with a acetylene torch and some Sheet
metal skills if it is bent at all That needs an investigation I don't believe it is much bent ..
b ) Speaking of steel --- a fracture of this type ,,makes the part deforms plastic at the fracture surface So it is not necessarily so that the part is bent at all
only in the fracture zone closest to the crack
c ) Again speaking of steel there can be a fractured surface that the bent chunk fits in like the hand in the glove but it will point out because of the plastic
deformation in the fractures zone
So if steel one would not fit it into the fracture surface ( pointing out as in the picture ) One would ensure that it came into the right position
upper surface and the bolt hole at the right place ..Some adjustment might be needed for the bolt hole perhaps a new stud welded drilled and Tapped .
Tacking the chunk in place not fitting exactly at the fracture surfaced just getting it into the correct place position.
I would not tack it ( weld in ) and hammer it into position here although it in some cases could be a method
There would be a slightly bigger crack to weld .. Since it is not tight fitting in the fracture zone anymore but the welder might see that as an advantage
Getting a better possibility to get into the bottom of the weld these are questions a skilled person can answer. AS well as the hammer it straight when there.
The stud ?? Dont have time right now ..But Perhaps not weld as deep there.
One could think a moment about how to proceed if needed how to reverse further in time
I would also inspect for cracks close to the fracture zone
The engine I'm currently using in my XS2 has the same issue. It's actual broken worse on the case around the bearing.
For a temp fix I used cleaned it well and glued it together with 3M weather strip adhesive. If you do this make sure and bolt the side cover on so it stays in proper alignment. Same thing if having it welded. I do plan on welding it in the future.


For a temp fix I used cleaned it well and glued it together with 3M weather strip adhesive. If you do this make sure and bolt the side cover on so it stays in proper alignment. Same thing if having it welded. I do plan on welding it in the future.
Is the possibility to weld it without disassembly investigated ?
I agree with Jan P.
Disassembly of the engine might not be needed. I would get an opinion on welding it as Jan P. suggested.
As a welder, I can not discourage this enough. With TIG welding of any type especially aluminum your success if predicated on how clean you get your matting surfaces. It is simply impossible to to get those surfaces clean enough to weld successfully without disassembly. Aluminum is hard to clean enough to weld at the best of times but when its been full of oil and heat cycled over and over again its REALLY tough to get it clean. This often involves baking the pieces to be joined after several vigorous cleanings with solvent to get all the oil out of the pores. Otherwise you will have poor penetration and contaminated welds that will will not hold oil or last. Not to mention an aluminum weld of that thickness and type would require some preheating for the best chance of success and that would be to say the least ill-advised when dealing with an assembled motor. @Dinner200 is absolutely on the right path, having a place that specializes in welding aero aluminum/ aviation engine repair is probably the the best possible scenario as they would be familiar with all of those processes and have the necessary equipment.
Mr Pyles Has Experience with this. Thank you for that input.
I would like to add the aspect of this into the decision making.
Not saying that this is certain
This does not appear to be a place with high mechanical stresses.
Not pressure inside nor Oil to speak off.
So a less than perfect weld can solve the problem. Some grinding and filler and paint .
On top of that
It may look OK also.
The tearing down of a motor is not a simple task for everyone .. Tools / Workbench / Time / Skills / Cost
Nor is the putting it together so. Quickly turns into the " No Bike Zone "
If another big overhaul is in the plan soon as per # 29 above or can happen now changes the decision.
If the rings are worn and other things .then a tear down will happen anyhow.
Myself I bought a new Block at ca 100 Euro After a Chain break Easier to find for a 1980 Model but the same engine casings are used many years.
It is not pretty and I wont have matching numbers but it is doable. .The TIG Welding is off the table
It would cost some money to do that also.( TIG )
My Chain smash happened behind the sprocket seal
Any one welded that please tell.Not taken that motor apart . Yet
Dinner200
XS650 Member
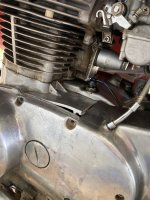
Ok I’m lost now. I’d really like to think I can get away with not disassembling the motor as it ran beautifully beforehand but I’m getting mixed answers. THE CHUNK THAT CAME OFF IS BENT! Gluing it as I tried before resulted in the attached photo. What I’m hearing is it was stressed and has micro-cracks inside of it looking like it’s bent. How would this be fixed? This section of case doesn’t hold oil and isn’t structural so couldn’t it be cleaned and tacked back in place? I’ve been calling and texting around and I might be loading the motor into my truck to see if a few places in town could fix it without disassembly.
Attachments
You are absolutely right, if this is outside the oil envelope it is not AS critical. But that does not negate the fact that it still most likely needs to be pre-heated, and without the VERY liberal use of some sort of heat dissipating compound like cool blue you do run the risk collateral damage that would ultimately lead engine disassembly. This is why case damage oftentimes leads to the eventual downfall of a bike. I do tend lean in the direction of overkill, but its served me well over the years. My professional welding comes from the food processing industry, where cleanliness is a matter of continued employment and grinding/over-welding is not an option.Mr Pyles Has Experience with this. Thank you for that input.
I would like to add the aspect of this into the decision making.
Not saying that this is certain
This does not appear to be a place with high mechanical stresses.
Not pressure inside nor Oil to speak off.
So a less than perfect weld can solve the problem. Some grinding and filler and paint .
On top of that
It may look OK also.
The tearing down of a motor is not a simple task for everyone .. Tools / Workbench / Time / Skills / Cost
Nor is the putting it together so. Quickly turns into the " No Bike Zone "
If another big overhaul is in the plan soon as per # 29 above or can happen now changes the decision.
If the rings are worn and other things .then a tear down will happen anyhow.
Myself I bought a new Block at ca 100 Euro After a Chain break Easier to find for a 1980 Model but the same engine casings are used many years.
It is not pretty and I wont have matching numbers but it is doable. .The TIG Welding is off the table
It would cost some money to do that also.( TIG )
My Chain smash happened behind the sprocket seal
Any one welded that please tell.Not taken that motor apart . Yet
Dinner200
XS650 Member
My thoughts exactly. This motor only has 8500 miles on it and started and idled absolutely perfect. I have friends doing big bore kits and full engine rebuilds and it becomes problem after problem so I agree with trying to have it done in place. My main concern is the selector drum shaft where the break goes through, I’m sure it could be worked around? Depends what the welders say. For now I’m going to halt disassembly.Mr Pyles Has Experience with this. Thank you for that input.
I would like to add the aspect of this into the decision making.
Not saying that this is certain
This does not appear to be a place with high mechanical stresses.
Not pressure inside nor Oil to speak off.
So a less than perfect weld can solve the problem. Some grinding and filler and paint .
On top of that
It may look OK also.
The tearing down of a motor is not a simple task for everyone .. Tools / Workbench / Time / Skills / Cost
Nor is the putting it together so. Quickly turns into the " No Bike Zone "
If another big overhaul is in the plan soon as per # 29 above or can happen now changes the decision.
If the rings are worn and other things .then a tear down will happen anyhow.
Myself I bought a new Block at ca 100 Euro After a Chain break Easier to find for a 1980 Model but the same engine casings are used many years.
It is not pretty and I wont have matching numbers but it is doable. .The TIG Welding is off the table
It would cost some money to do that also.( TIG )
My Chain smash happened behind the sprocket seal
Any one welded that please tell.Not taken that motor apart . Yet
Attachments

It is also worth noting that HF/AC TIG welding can cause damage to things like CDI/TCI boxs, iggy coils, and stator/rotors if proper care is not taken to remove/isolate them from the "circuit"
This area here around your shift drum bore is the thickest, it will require the most heat. You run a pretty high chance of distorting the bore with it in place. You may not have any actual penetration of the oil envelope but you do have contact with it, also where the most heat will be required. Given the proximity of the shift drum bore plug to the repair area it will 100% have to be removed to prevent damage as it actually protrudes into area to be welded. Not to mention the case is aluminum and the shift drum is ferrous ductile iron and these two metals expand and contract at wildly different rates introducing a whole new set of problems. The amount of heat required will most definitely destroy the main-shaft seal. And not least of all the logistics of trying to weld up under the bottom side of that case with the motor intact makes my brain and back hurt and I am certainly no stranger to out of position welding. Keep in mind just because someone is good welder that does not mean they are a good mechanic or know anything about motorcycles. I have no doubt that if you go into enough welding shops one of them will eventually agree to the job, but that does not mean its a good idea. I hate to sound all dome and gloom but I hate to see someone turn an otherwise doable repair into a failure. It is theoretically possible that a repair with the motor intact could be successful but they aren't statistically odds that I would gamble on. Ultimately it is your bike and your decision but if it were mine, Id take this opportunity to address any issues I might have in a 40yo motor.

Dinner200
XS650 Member
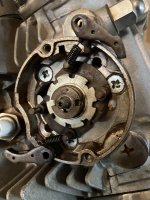
You know what you’re talking about and this is my baby, my dream bike, it’s worth doing right the first time. So that leads back to the original question, how do I get the advance unit off? I was able to get those screws out with a #3 bit at the end of a breaker bar but I’m not sure how to get the unit itself off. Almost like the aluminum ring unscrews?This area here around your shift drum bore is the thickest, it will require the most heat. You run a pretty high chance of distorting the bore with it in place. You may not have any actual penetration of the oil envelope but you do have contact with it, also where the most heat will be required. Given the proximity of the shift drum bore plug to the repair area it will 100% have to be removed to prevent damage as it actually protrudes into area to be welded. Not to mention the case is aluminum and the shift drum is ferrous ductile iron and these two metals expand and contract at wildly different rates introducing a whole new set of problems. The amount of heat required will most definitely destroy the main-shaft seal. And not least of all the logistics of trying to weld up under the bottom side of that case with the motor intact makes my brain and back hurt and I am certainly no stranger to out of position welding. Keep in mind just because someone is good welder that does not mean they are a good mechanic or know anything about motorcycles. I have no doubt that if you go into enough welding shops one of them will eventually agree to the job, but that does not mean its a good idea. I hate to sound all dome and gloom but I hate to see someone turn an otherwise doable repair into a failure. It is theoretically possible that a repair with the motor intact could be successful but they aren't statistically odds that I would gamble on. Ultimately it is your bike and your decision but if it were mine, Id take this opportunity to address any issues I might have in a 40yo motor.
View attachment 194162
Attachments
I have no doubt you can find a "welder" who will stick it together for you. I'm not a welder, but I do have some understanding of the subject. If it were mine, I would take the case half to the shop that does airplane cases. Do it right, do it once. While you're in there, see if your engine needs any other attention. This could end up a blessing in disguise.
Yes the advance weight drive dog unscrews, It can be a bit of a bastard. A castle socket is the right tool but good luck find one. I think there is a couple of threads here on removal.You know what you’re talking about and this is my baby, my dream bike, it’s worth doing right the first time. So that leads back to the original question, how do I get the advance unit off? I was able to get those screws out with a #3 bit at the end of a breaker bar but I’m not sure how to get the unit itself off. Almost like the aluminum ring unscrews?
You could re-approach the idea of using JB Weld.
I had almost identical damage to one of my XS650 cases. After much cleaning and scuffing, I applied layers of the epoxy to the inside, all over the crack joint area. On top, I shaped a rather thick aluminum cover plate to cover the crack and provide stabilization. I used the epoxy to attach it.
This repair has now lasted for about 4 years of use.
Similar threads
- Replies
- 10
- Views
- 524