Bleeding the front brake

michaelpthompson

XS650 Addict
Messages
137
Reaction score
43
Points
28
Location
Arvada, Colorado
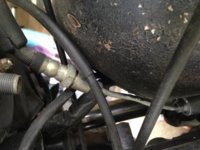
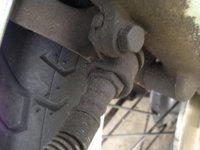
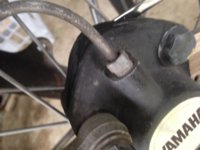
OK, trying to bleed the front brake on my '75 XS650B. PO said it worked fine when he parked it (of course), but the reservoir was dry. I put a wrench on the bleeding nipple (looks like a grease zerk, is that right?), got a tube onto the nipple, other end in the standard peanut butter jar. Filled the reservoir and began pumping, just trying to get fluid down the line. A tiny bit came out of the nipple, but after that, no matter how much I pumped, nothing was flowing. Tried pumping with the valve closed, no discernible change in pressure. Opened it again, pumped some more, no change in reservoir fluid level.

Am I doing something wrong, or is perhaps the seal gone bad in the MC?

Pics of my setup in case I'm not doing this correctly.
View attachment 63964
View attachment 63965
View attachment 63966
 
You don't pump with the bleeder open. You pump slowly, hold the lever pulled open bleeder, close bleeder, pump, hold, open, close.
With a completely dry M/C, you need to bleed the M/C. Remove the line from the M/C, hold your finger tip over the hole the banjo bolt goes into. Now slowly pump the lever.
As you pull the lever air and fluid get pushed out past your finger tip, as you release the lever your finger tip seals the hole so air can't get back in. Repeat till you get a good flow of fluid. Cover the bike with rags or old towels, Brake fluid can damage paint.
Now with a good fluid flow quickly rehook the line. Try bleeding at the caliper. It may or may not bleed. If not you will need to woprk your way down the line and bleed each section of line. Unhook seal with fingers pump.
If you can get a syringe, like you use for injecting spices inside of meat, Hook a hose to the syringe, and the bleeder screw. With a syringe full of fluid push the fluid back up the line to the M/C.
Are you still using the original rubber hoses? If so I would recommend replacing them with either new rubber or braided stainless steel lines.
Old rubber lines rot from the inside out. As they rot the bits of rubber float around in the fluid just waiting to plug up somewhere. Rubber lines also flex a bit, The braided stainless steel don't, this improves the strength and feel of the brakes.
Leo
 
Thanks, I'll try that. I wasn't too worried about air at this point, just trying to get fluid flowing down through the line. I will make it one of my priorities to replace with stainless steel.
 
Thanks, I'll try that. I wasn't too worried about air at this point, just trying to get fluid flowing down through the line. I will make it one of my priorities to replace with stainless steel.

Hi Michael,
your best bet if the master cylinder is empty is to try and backfill the system.
Swap your catch jar for a pump oil can full of brake fluid and pump the fluid in through the open bleed nipple until the reservoir fills up.
In theory the brake system won't have any air bubbles in the fluid and will work.
In practice, at least it'll bleed easily.
And what you should really do is tear the whole system down, clean and check everything and fit stainless brake lines.
But you knew that, eh?
 
+1 on Leo's advise to cover things. I'll add cover it with WET rags. Water dilutes the fluid if you do spill. A dry rag might get the big puddles but it will still be 100% brake fluid you are wiping around/off the parts.

+1 on Fred's advice to completely clean the system components for job satisfaction.

I'll add you need to get used to getting all the air out. A small bubble on a flat land or low land bike can become a concern quickly at 10,000 feet. As in Oh shit no breaks.And that is the voice of experience.
 
OK, I'm a bit confused. My brake lines ('75 XS650B) come in multiple parts. First, there's a black one, about 23 inches long. That goes into a steel one about 4 inches, which goes into something on the frame, with another short steel section (about 3 inches) coming out, followed by a fourteen inch black one with spring shielding around it that goes into the caliper.

The parts manual seems to confirm this setup:
BrakeLines.jpg


I looked on MikesXS and there seem to be several options.

1. A solid steel "upper" line.

2. An Upper and Lower front Braided Stainless Brake Hose, 20 inches fits different year

3. A Front Upper/Lower Braided Stainless Brake Hose, 41 inches fits different year, and

4. Upper front 17" Braided Stainless Brake Hose

So, can I just replace one or more of these with the parts from Mikes? I'm only seeing upper lines here, what about the lower one?
 
Hi Michael,
here's the full description for "Stainless hose":-
Stainless steel wire braid reinforced Teflon brake line.
You can see why "stainless hose" is what's usually said.
OK then, you can replace the stock hoses with ones just like 'em but in stainless.
I'd only duplicate the stock Rube Goldberg set-up if I was building a bike to Concourse condition.
The least cost option is a single stainless hose from the master cylinder to the brake caliper. (it's the hose ends that cost the most of the money so two shorties cost almost twice as much as one long one)
The two hose option lets you keep the aluminum fitting in the middle which keeps the hose from flopping about and lets you keep the stock brake light pressure switch.
You can buy an in-line pressure switch if you go with a single hose or you can rely on the rear brake switch like back in the old days.
No effin' way I'd bother with those two short rigid steel lines.
 
So, I could use the one long line, but the brake light would only come on with the rear pedal? Might be worth it to get ride of all the bits in the stock setup. Mikes does have a 41 inch single hose that's labeled '77 to '84. Would that work? Looking back at Mikes listings, there doesn't seem to be a braided option for earlier than '77.
 
Hi Michael,
The MikesXS hose you mention has a banjo-fitting on each end.
Your pre-'77 brake caliper is tapped to suit an automotive style end fitting so no, that one from MikesXS won't work for you.
An on-line search will find stainless lines in various lengths along with a choice of different end fittings that'll adapt the line to build what you need.
And an in-line brake pressure switch.
 
Contact Micheal Morse at 650Central. He'll have just what you need. His sister business is Vintage Brake. As Fred said, you will need threaded fittings on each end of the hose, not banjo fittings like the '77 and later models use. You may need to keep the short steel line down at the caliper. The hose is fatter than that steel line and won't fit through between the fender and fork like the skinny steel line does.
 
- - - You may need to keep the short steel line down at the caliper. The hose is fatter than that steel line and won't fit through between the fender and fork like the skinny steel line does.

Hi 5twins,
of course you are right, I'd forgotten that the 34mm forks had that "feature". Sorry to misadvise you Michael, seems like you are stuck with using at least the short rigid line to the caliper.
 
Wait, I guess I didn't look at that parts drawing (or your pics) close enough. You need a banjo fitting on top, threaded fitting on the bottom.
 
There seem to be two banjo fittings. One at the M/C
IMG_3714.jpg

and one at the bottom of what I presume is the stop light switch
IMG_3716.jpg


There are two black rubber hoses and two small steel lines with various bits in between. I could replace all of them with one braided line and an inline switch, or just replace the two rubber parts with stainless. I would imagine I could just clean out the small steel ones. What do you think?
 

Attachments

  • IMG_3715.jpg
    IMG_3715.jpg
    207.1 KB · Views: 304
  • IMG_3717.jpg
    IMG_3717.jpg
    177.9 KB · Views: 291
  • IMG_3718.jpg
    IMG_3718.jpg
    152 KB · Views: 307
OK, finally got the brakes bled. My friend Gordon (also my PO) came over and gave me a hand. Took off the banjo bolt at the M/C, put his thumb over the hole and built up pressure with the lever. Then put it back on and did the same at several places down the line, until he had pressure at the caliper. Closed it all back up and voila, now the lever is solid and holding. Soon as I rebuild the left petcock, it should finally be time to fire this old girl up. Thanks to everyone here for all the advice!
 
Back
Top