Shoot, more emphasis on an axle thru both. This will greatly help keep it all aligned. You may have to bang the backing plate in all the way and back out a few times progressively farther til it all comes apart.
-
Enjoy XS650.com? Consider making a donation to help support the site.
XS650.com receives a small share of sales from some links on this page, but direct donations have a much greater impact on keeping this site going.
You are using an out of date browser. It may not display this or other websites correctly.
You should upgrade or use an alternative browser.
You should upgrade or use an alternative browser.
How difficult is it to replace the rear drum brakes?
- Thread starter bret
- Start date
-
- Tags
- brakes maintenance
If you can see any of the edge of the shoes, lube and try tapping on the shoes directly along the circumference with a large slot (screwdriver) drift tool.......might get lucky.
As nj said, that splined shaft may be turned a little and applying the brake. I'd work on trying to free that up, getting it to rotate a little each way. maybe that will release the brake shoe's hold on the drum. Put penetrating oil around the splined shaft where it enters the hub, put the brake lever back on it tight, and tap it gently left and right to see if you can break the shaft free and get it to turn. You may have to soak it a while, maybe even apply some heat to it. I don't really use an open flame heat source anymore, I just use a heat gun. On high, it gets stuff plenty hot and I've freed up lots of stuck parts using it.
As far as wear, on the lever that turns the cam is pointer. On the brake plate is a raised area that curves around with a taper. When the shoes are new the pointer is close to the wide end of the taper, as they wear the pointer moves toward the thinner side of the taper.
This gives you a rough idea of shoe wear with out actually pulling things apart.
On the stuck brake plate, Can you spin the brake plate in the hub?
A 50/50 mix of acetone and ATF is the best penetrating lube you can use. ATF is available anywhere, acetone is at most parts stores, look in the paint section. Use squirt can to pump this mix in around the bake plate. This will soak in between the shoes and drum.
Leo
Also turn the whole wheel to different sides, tap bounce around, the lining may have fallen off a shoe and gotten wedged.
Excellent timing and information 5T as i am researching rear brake drum service..Dunno what i need inside yet but i know they need attention as i am barely getting any braking from the rear drum... I think its been 5 years since they were rebuilt...
Chachiboy
XS650 Addict
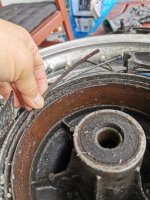
Update - after more muscle power than what I would have liked, I got the brake plate off! As expected it's a mess inside and I will be replacing everything. There seems to be a layer of rust on the inner drum. A sliver of the drum broke off in the process (see pic). Hope that's not a big issue. My next question is what is the best way to fully clean the rust and corrosion on the inside? Sandblast? Wetsand? Wire brush?
Attachments

I'd probably use gasoline and steel wool to get the gunk out. Final with brake cleaner and clean rags Lube the cam that expands the shoes well with grease. I woudn't work on the rust much -- the brakes might grab at first but the new shoes will clean it pretty fast. Where the shoes don't make contact it would be rusting anyway. If the broken off thing is outside of where the shoes make contact it shouldn't be a problem, otherwise it is
Chachiboy
XS650 Addict
I'd probably use gasoline and steel wool to get the gunk out. Final with brake cleaner and clean rags Lube the cam that expands the shoes well with grease. I woudn't work on the rust much -- the brakes might grab at first but the new shoes will clean it pretty fast. Where the shoes don't make contact it would be rusting anyway. If the broken off thing is outside of where the shoes make contact it shouldn't be a problem, otherwise it is
Thanks for the recommendation. Wasn't looking forward to trying to clean off all the rust
When I first got my bike, one of the linings came off the shoe. It was probably 30 years old. Discovered it when I applied brake and it felt really weird. Happily it didn't cause it to lock up. I think I got my new shoes from the Yama dealer down the street.
Chachiboy
XS650 Addict
I just tried my Dremel with a wire brush and it works so much easier and faster. It will still take time, but it's easier to hold than to scrub. Here is a pic of my springs. Do these weaken over time... Or best to buy new ones. I can't imagine they are too expensive but I would like to keep if possible
Attachments

Shoes come with new springs, if I remember right
Since youre using a dremel, I assume you aren't usng gas as a solvent...
Also, there's prob some asbestos residue in there. Wouldn't want to be breathing the stream the dremel is kicking out
Since youre using a dremel, I assume you aren't usng gas as a solvent...
Also, there's prob some asbestos residue in there. Wouldn't want to be breathing the stream the dremel is kicking out
Those springs may be NLA.......as I seem to recall something in the cobwebs of me mind......lol
found the springs at this random dealer
https://coolspringspowersports.dealerspikeparts.com/oemparts/p/yamaha/90507-20002-00/-spring-tension
or if you're in the jungle
https://www.amazon.com/Yamaha-90507...=2025&creative=165953&creativeASIN=B005C582G2
https://coolspringspowersports.dealerspikeparts.com/oemparts/p/yamaha/90507-20002-00/-spring-tension
or if you're in the jungle
https://www.amazon.com/Yamaha-90507...=2025&creative=165953&creativeASIN=B005C582G2
Springs last forever if they don't get too rusty. I like a small coarse sharpening stone on my rusty drums. use with liberal amounts of mineral spirits to keep the stone from clogging. yeah I've busted a chunk of rim off a drum before, no problem.
JonnyO
XS650 New Member
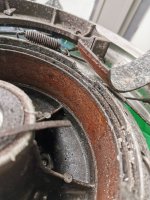
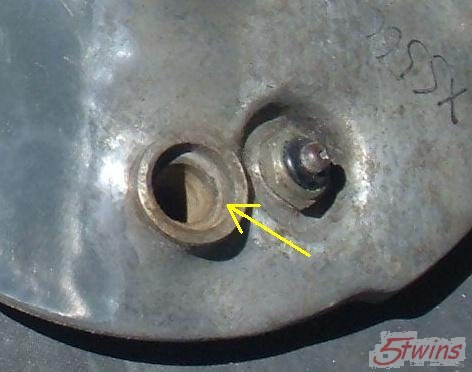
Replacing (or servicing) your drum brake (front or rear) is quite simple once you know the one important little trick involved. This is something you should do yourself as opposed to having a shop do it because you will do a better job. There are a couple other items you should address while in there. The pivot shaft that runs through the backing plate should be pulled, cleaned, and greased. Also, the brake drum surface should be cleaned. If you take it to a shop, they'll pop the old shoes off, stick the new one in, and probably won't do any of this other much needed stuff. OK, when you first pull the brake plate out, you'll probably be presented with something that looks like this .....
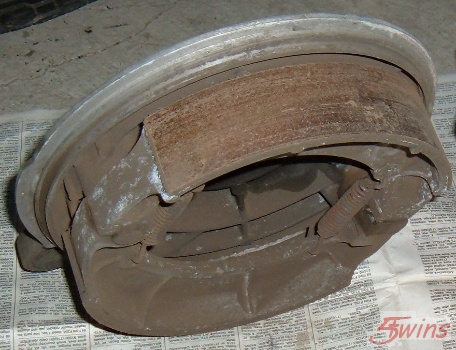
Go to the auto parts store and get yourself a spray can of brake cleaner. You can do a rough cleaning first before you start the disassembly. If you're going to re-use the shoes, mark them "Top" and "Bottom" before removal so they go back in where they came from. Now for the little "trick" - the easiest way to remove/install brake shoes is to "fold" them off and on. Hold one shoe down in it's installed position and simply fold the other one up 90° to it. The shoes will easily come off now as a set still connected by the springs. Install is the reverse - set one shoe down in position (and hold it there), set the other at 90° (and connected with the springs) on the far side of the pivots, and simply fold it down into place. Once the shoes are removed, you can do a thorough cleaning of the backing plate, getting into all the nooks and crannies (Q-tips work well here).
Now on to the other things that need doing. The shoe pivot shaft should be cleaned and lubed. Before removing it, mark the split in the brake arm on the shaft head with a Sharpie. This will allow you to assemble it later with the arm properly positioned .....
Once the arm is removed, you should find a felt ring seal nestled down into a depression around the top of the shaft .....
Pull the shaft out of the hub noting the position and orientation of the thick washer just under the flats on the brake shoe end. Now you can carefully lift the felt washer out. Clean it by dipping in solvent and pressing between clean paper towels. Repeat until the solvent presses out clean. Knead the clean felt ring full of fresh grease before install. This is the seal for the pivot shaft and is what keeps the dirt and water out.
On the shaft, you'll notice it's center section, the part that resides in the brake plate, is depressed. This is a grease reservoir. After cleaning the shaft and hole in the plate, coat the shaft with fresh grease and work it in and out of the hole to displace the excess lube. Use a twisting motion so the depression remains full. Wipe off all the extra grease that wells up around the top of the hole.
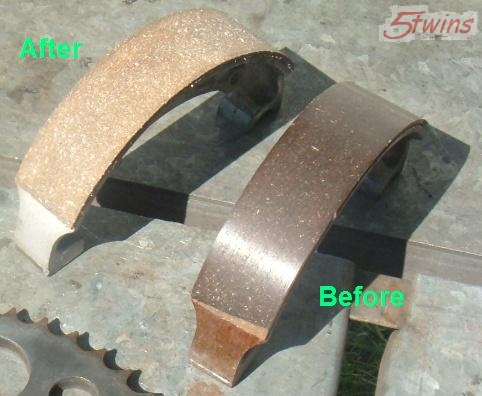
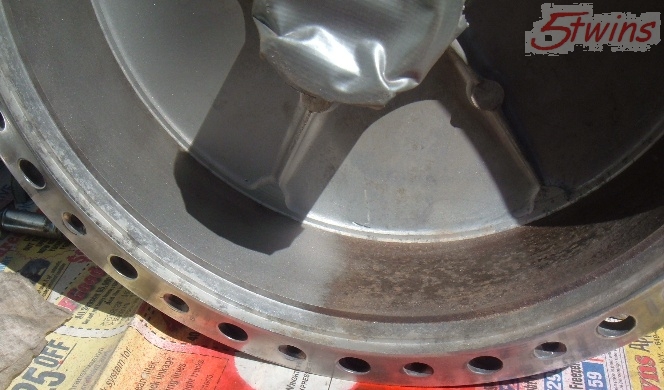
Are you replacing the shoes because you've actually inspected them and found them worn too thin or simply because the brake no longer stops as well as it should? They may be fine and have plenty of life left in them, just needing a thorough cleaning and deglazing, along with the drum. That can be accomplished by lightly sanding the surfaces but by far, the best method is glass beading them. Here's some before and after shots of glass beaded shoes and drums .....
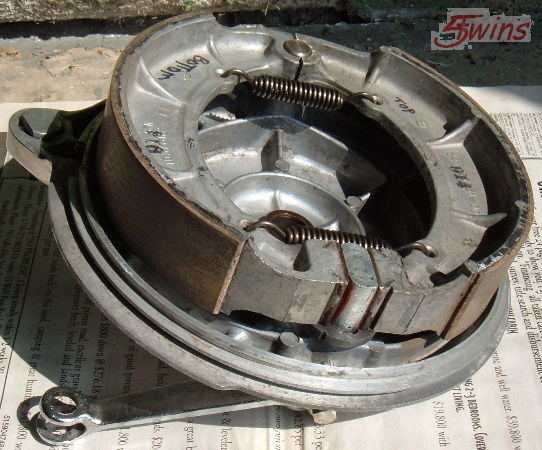
The springs should be cleaned and if rusty, wire wheeled. Apply a light coat of oil afterwards, just enough so they shine. Before installing the shoes, apply a small amount of grease to the pivot post and the flats on the pivot shaft. After install, wipe away any excess grease that has squeezed out. The finished job should look something like this. Note the small amount of red grease showing at the edges of the flats on the pivot shaft (excess having been wiped away). And yes, this is the same brake plate assembly from the first pic after cleaning .....
Edit 3/21/19 - Through careful research and measuring, member 2M has discovered that the brake cam is not exactly symmetrical. One end of the cam moves or applies it's brake shoe slightly less than the other end. The splined end of the cam has a dimple stamped in it. This denotes the end of the cam that applies it's shoe slightly less. The cam should be installed with the dimple on the inboard side, towards the axle .....

All the details on this can be found here, starting with post #29 .....
http://www.xs650.com/threads/650-rear-drum-brake-plates.51046/page-2
Thanks. A great help in repairing my '81!
Similar threads
- Replies
- 6
- Views
- 202