Vlad
XS650 Enthusiast
Hi all! I re-keyed my seat lock successfully using this method and wanted to share it here. This worked for me on an '80 XS650SG. I'm not sure which other bikes use the same type of locking cylinders. I'm also not familiar with a lot of the specific terminology, so please forgive me for mis-descriptions of any of the parts.
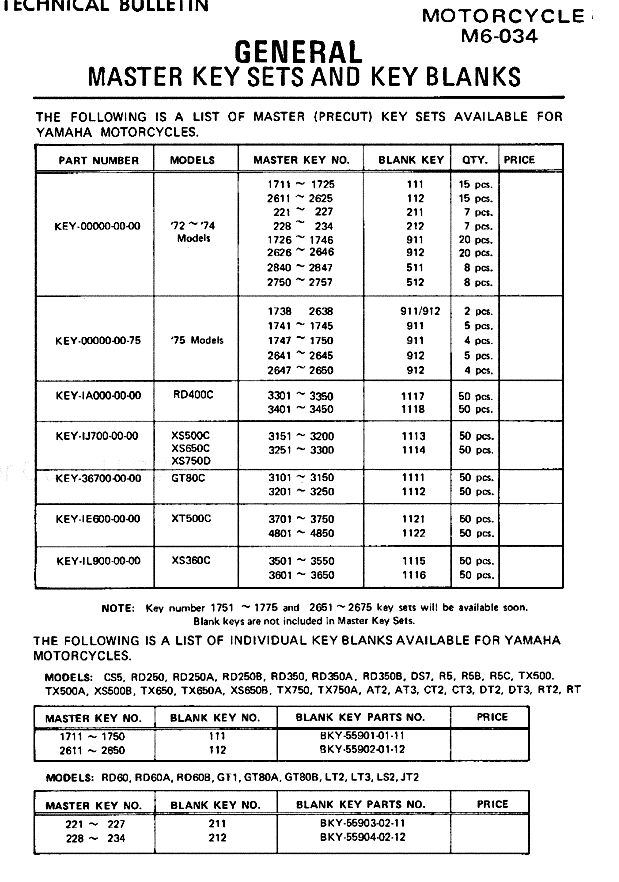
First I removed the seat lock from the bike and then removed these two screws from the back:
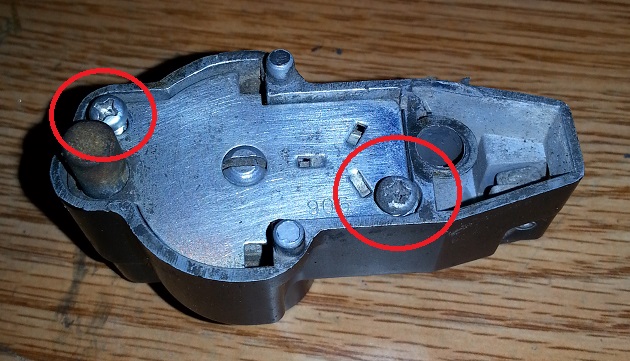
Next, I removed the helmet latch spring body:
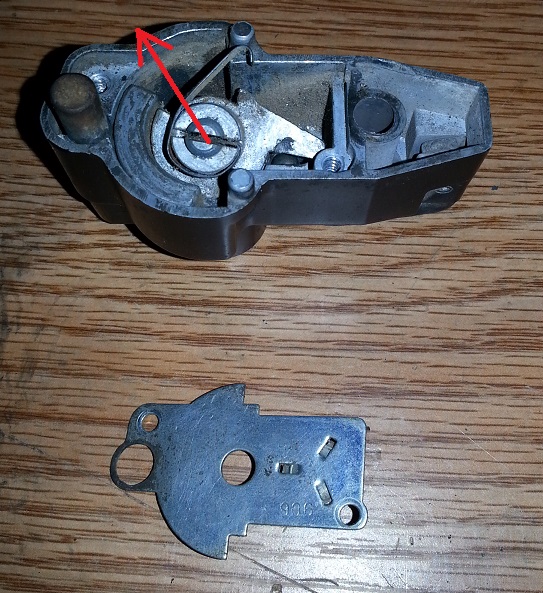
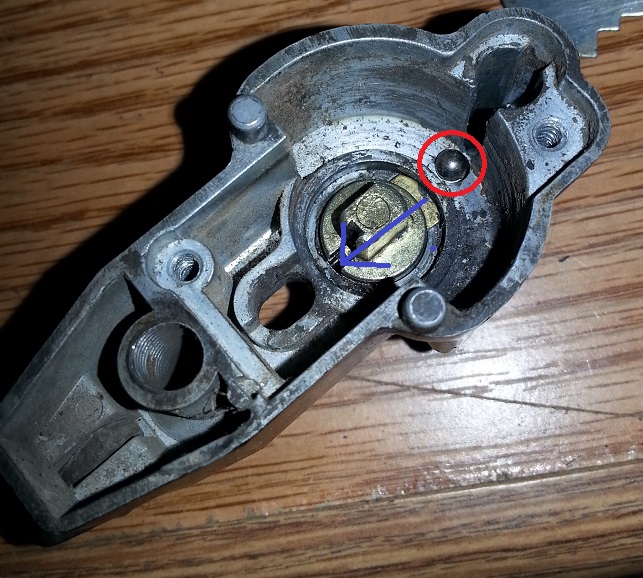
Next, I removed the seat locking pin and this other part. Mine was pretty gunked up so the parts stuck together. Be aware that there is a small pin and ball bearing here that would be really easy to lose if you dropped it somewhere so proceed with caution.
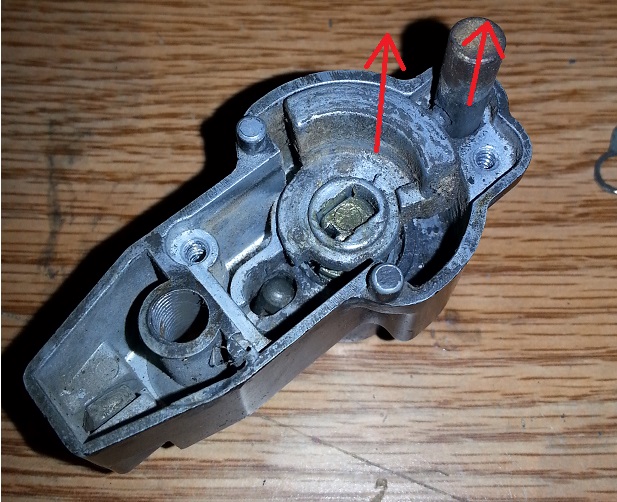
Here is that ball bearing. To remove the lock cylinder, push the brass slider thing (blue arrow) just enough so that it clears the bore of the lock body. Then the cylinder should easily be removed from the key side.
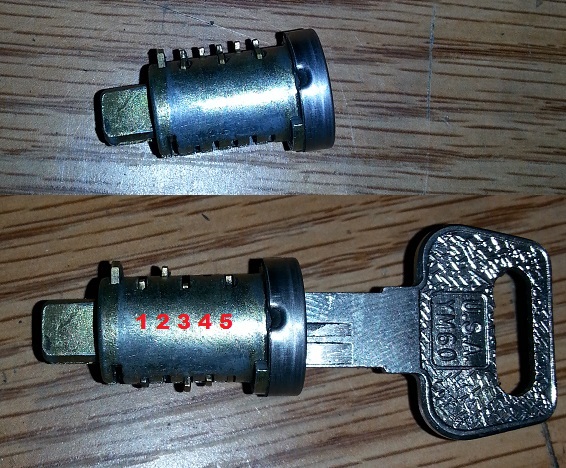
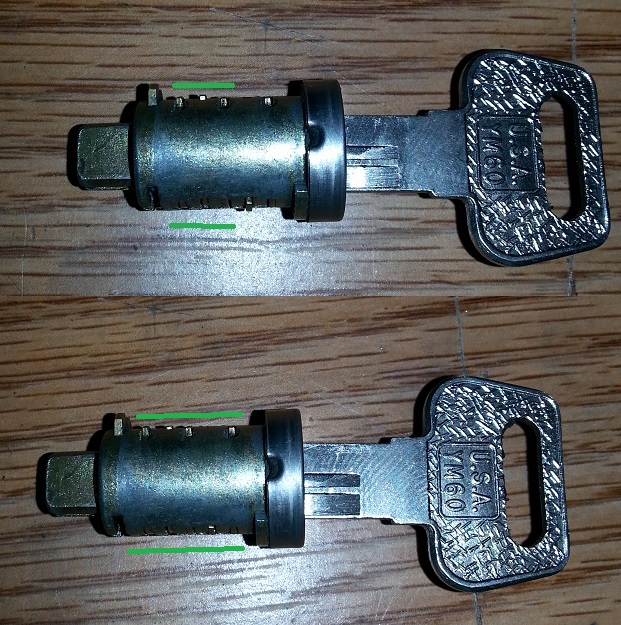
When you take it out, it looks like this (top). When you put your key in, it looks like this (bottom). Notice how the tumblers moved to random places. Also note their numbers, we'll be using this later.
So the first thing you'll want to do is find any of them that match the key in any of the five positions. In my case, 2 of them were a perfect match (numbers 1 and 5). Place the matching ones in their place and leave them there. If you don't have any matching ones, don't worry.
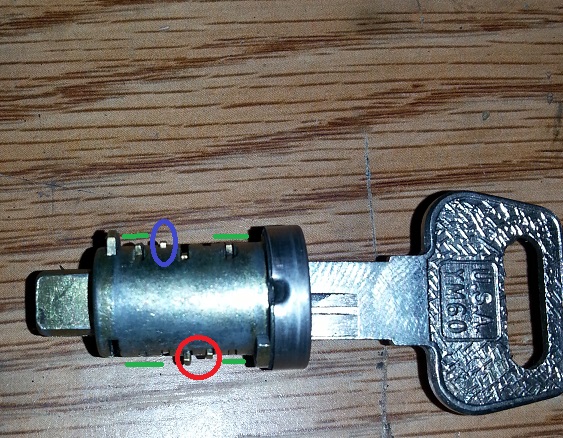
After moving them around, this is the best I could come up with. The circled blue one was just barely peeking out so I filed down the top just a little bit. The ones circled in red are obvious no-goes so we'll need to work on this. VERY IMPORTANT: When moving your tumblers around place them such that you maximize the number that are either a perfect match, or they are low. It'll be much better to have 2 that are low than 1 that is perfect and 1 that is high. Low/High is in reference to the locking slider that holds the cylinder into the body. It's all the way on the left in this pic and protrudes towards the top. Low means the tumbler is going down and high means it's going up.
Now, the reason that you want to go with as many low as possible, is that you will basically be filing down the inside of the tumbler to shift it up.
Since each tumbler is on a spring, inserting the key simply displaces it by how deep the key is cut in that position. Therefore, if the key is not cut deep enough, we can make up for it by removing some material from the tumbler. To shift them down would mean to add material to this piece. I'm not quite sure how I would do this, perhaps soldering a piece of brass or copper to it and then filing it down to the correct size. But if I had any left over that I had to shift up, I would have probably simply discarded them. 4/5 or even 3/5 is good enough for me; I don't honestly believe that changes the probability of my helmet getting stolen or the bike being vandalized.
Now be careful! Don't file off too much at a time. Go little by little, reinserting your key to check that you haven't gone too far. Here are the results after filing the two pieces of mine that were low:
Top pic shows #3 fixed, bottom pic shows #3 & #4 fixed.
Once you get to this point, you're done. Just clean everything up, lube it really nicely (I used white lithium on everything inside the body and a graphite lube on the inside of the key hole), and re-assemble.
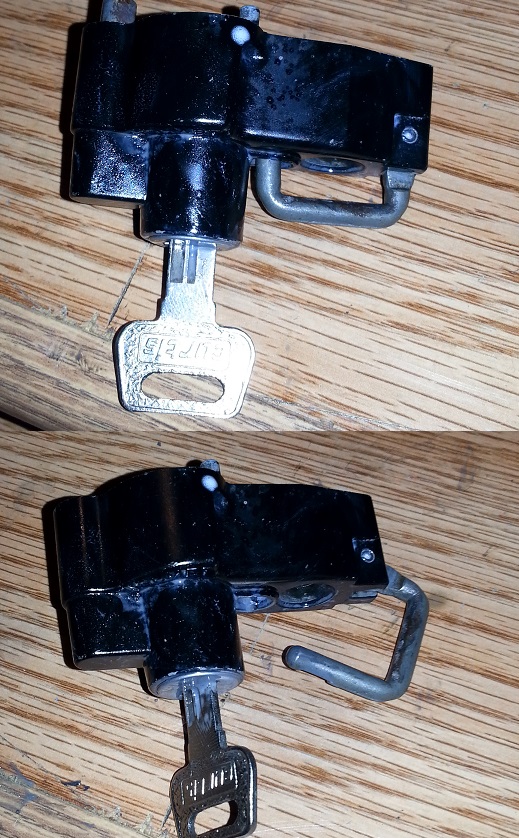
First I removed the seat lock from the bike and then removed these two screws from the back:
Next, I removed the helmet latch spring body:
Next, I removed the seat locking pin and this other part. Mine was pretty gunked up so the parts stuck together. Be aware that there is a small pin and ball bearing here that would be really easy to lose if you dropped it somewhere so proceed with caution.
Here is that ball bearing. To remove the lock cylinder, push the brass slider thing (blue arrow) just enough so that it clears the bore of the lock body. Then the cylinder should easily be removed from the key side.
When you take it out, it looks like this (top). When you put your key in, it looks like this (bottom). Notice how the tumblers moved to random places. Also note their numbers, we'll be using this later.
So the first thing you'll want to do is find any of them that match the key in any of the five positions. In my case, 2 of them were a perfect match (numbers 1 and 5). Place the matching ones in their place and leave them there. If you don't have any matching ones, don't worry.
After moving them around, this is the best I could come up with. The circled blue one was just barely peeking out so I filed down the top just a little bit. The ones circled in red are obvious no-goes so we'll need to work on this. VERY IMPORTANT: When moving your tumblers around place them such that you maximize the number that are either a perfect match, or they are low. It'll be much better to have 2 that are low than 1 that is perfect and 1 that is high. Low/High is in reference to the locking slider that holds the cylinder into the body. It's all the way on the left in this pic and protrudes towards the top. Low means the tumbler is going down and high means it's going up.
Now, the reason that you want to go with as many low as possible, is that you will basically be filing down the inside of the tumbler to shift it up.
Since each tumbler is on a spring, inserting the key simply displaces it by how deep the key is cut in that position. Therefore, if the key is not cut deep enough, we can make up for it by removing some material from the tumbler. To shift them down would mean to add material to this piece. I'm not quite sure how I would do this, perhaps soldering a piece of brass or copper to it and then filing it down to the correct size. But if I had any left over that I had to shift up, I would have probably simply discarded them. 4/5 or even 3/5 is good enough for me; I don't honestly believe that changes the probability of my helmet getting stolen or the bike being vandalized.
Now be careful! Don't file off too much at a time. Go little by little, reinserting your key to check that you haven't gone too far. Here are the results after filing the two pieces of mine that were low:
Top pic shows #3 fixed, bottom pic shows #3 & #4 fixed.
Once you get to this point, you're done. Just clean everything up, lube it really nicely (I used white lithium on everything inside the body and a graphite lube on the inside of the key hole), and re-assemble.