I don't have the instructions so I'm not sure what these said. I always break the tang off by rotating ccw until it snaps off.
-
Enjoy XS650.com? Consider making a donation to help support the site.
XS650.com receives a small share of sales from some links on this page, but direct donations have a much greater impact on keeping this site going.
You are using an out of date browser. It may not display this or other websites correctly.
You should upgrade or use an alternative browser.
You should upgrade or use an alternative browser.
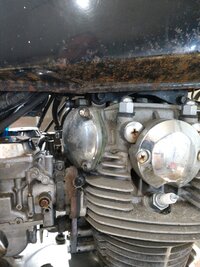
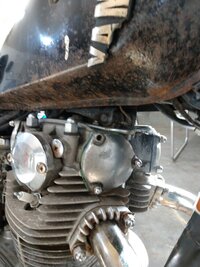
Mikeys new to him 81
- Thread starter Mikey
- Start date
If it’s not a blind hole, the flat punch looking device is driven through the Helicoil with the palm of your hand. That action will break off the tang.
I've always broken the tang off with a breakoff punch but maybe you could remove it with the slotted T-handle install tool like they say (turn 90°)? I've never used that style of install tool so can't say for sure.
I've just ordered 4 new studs and then took a look at OEM crown nuts and like wow I'm not paying those prices
I'll check at the local hardware store to find some
I'll check at the local hardware store to find some
Unfortunately, aftermarket replacements don't look the same, they're taller .....
https://www.amazon.com/dp/B0B8H9HZV...pY2tSZWRpcmVjdCZkb05vdExvZ0NsaWNrPXRydWU&th=1

https://www.amazon.com/dp/B0B8H9HZV...pY2tSZWRpcmVjdCZkb05vdExvZ0NsaWNrPXRydWU&th=1
Last edited:
Yeah the illusive short crown nut in stainless. But the long ones work OK It's the m8 with 13mm hex that are a pain.
Do I understand correctly that the M8 with 12mm is JIS? The same goes for the lower triple clamp pinch bolts.It's the m8 with 13mm hex that are a pain.
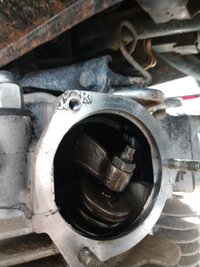
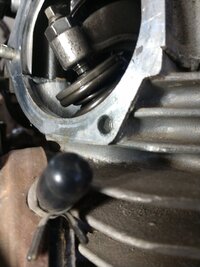
Well the missing studs are on the right hand covers
One missing studs location the threads look good the other one most of the threads are gone except right at the bottom
So I'll need the kit like Jim has posted ( www.amazon.com/XT-AUTO-Stainless-Compatible-Repairing ) drill out the bad one with supplied drill bit blow out debris insert helicoil break off the bottom tang and then insert new stud with locktite
Sounds pretty straight foreword to me
Attachments
I'll just buy 8 new crown nuts so they'll all be the same and save the others for sparesYeah the illusive short crown nut in stainless. But the long ones work OK It's the m8 with 13mm hex that are a pain.
Drill out what's left of the old threads. This "sizes" it for the special sized tap.drill out the bad one with supplied drill bit blow out debris insert helicoil break off the bottom tang and then insert new stud with locktite
Sounds pretty straight foreword to me
Re-tap the hole threads.
Run the helicoil down (with red loctite) until it bottoms.
Turn the tool back out a half a turn... this breaks the installation tang off.
Remove the tool and broke off tang.
Install new stud with red loctite....
Done.
I guess it would make sense to use locktite on the helicoilDrill out what's left of the old threads. This "sizes" it for the special sized tap.
Re-tap the hole threads.
Run the helicoil down (with red loctite) until it bottoms.
Turn the tool back out a half a turn... this breaks the installation tang off.
Remove the tool and broke off tang.
Install new stud with red loctite....
Done.
I would have missed that step Thanks !!
Off to the hardware store for some crown nuts
Edit: I take it I want to use some kind of lube when tapping out the hole threads and then clean it out with like carb cleaner or something ?
Ok maybe one last questionDrill out what's left of the old threads. This "sizes" it for the special sized tap.
Re-tap the hole threads.
Run the helicoil down (with red loctite) until it bottoms.
Turn the tool back out a half a turn... this breaks the installation tang off.
Remove the tool and broke off tang.
Install new stud with red loctite....
Done.
Put in the helicoil with the red locktite ( don't need the locktite to cure? before rotating the tool half a turn or just bottom out the helicoil and turn it 1/2 turn ccw and not wait for the locktite to cure
I know simple question but for me ...
Learn it right once and I'm good to go in the future
I'm just getting the kit you recommendedRotor should be ready to ship back in the next day or so. I'll just hold onto it until you give me the word.
By the time I pay return shipping to get you yours back to you I can buy the kit and have spares for next time
Thanks for the offer though!!
No you shouldn't need to wait for a cure. When you turn the tool ccw, it's expands the helicoil and fixes it in place while you break the tang off. If for some odd reason the helicoil starts to back out along with the tool, stop and let the loctite cure. Never seen that happen but I know some people "claim" that happened to them. I'm skeptical of that though, it's always worked fine for me.
Soon as you break the tab off, more loctite and tighten the stud in place. Done.
Soon as you break the tab off, more loctite and tighten the stud in place. Done.
OK Mikey.... just did a little research and apparently the old style I used in the aviation world are different from the ones we're looking at now. On these you're getting, you're supposed to stick a punch in there and knock the tang off that way.
Thinking back, I don't recall which method I used on these I have now. I was thinking I just turned it backwards like I was taught and did for 50+ yrs in the airplane world... but maybe not. If the directions say to use the punch.... then use the punch.
Thinking back, I don't recall which method I used on these I have now. I was thinking I just turned it backwards like I was taught and did for 50+ yrs in the airplane world... but maybe not. If the directions say to use the punch.... then use the punch.
I don't imagine it'll be an issue on this particular job, but do measure the length of the insert and the depth of the hole before starting to insure the insert will thread all the way in - so the insert should be shorter. The finished insert must be below the surface of the hole (by a mm or so). if it sticks out some, problems could ensue as the insert can get damaged on assembly, etc.
I can't remember if that particular hole is blind or not; if it is, leaving the tang may not be an issue (the stud will take care of it). Preferable to remove it though
Mikey - you got this!")
I can't remember if that particular hole is blind or not; if it is, leaving the tang may not be an issue (the stud will take care of it). Preferable to remove it though
Mikey - you got this!
OK... so, jus' wanted to make sure I wasn't smokin' some weird shit....
I went ahead and ran a helicoil into an old rocker box. Drilled, tapped.... ran the helicoil in until it seated. Turned the insertion tool backwards, the helicoil locked into place and about a half a turn (ccw) later the tang snapped off just like it's always done for me. No punch needed. Ymmv.
Like JP says, stick something in the hole and mark it for depth. Transfer that mark to the drill bit and the tap. No, I don't use oil for tapping aluminum... at least not for just one hole.
The hardest part of this Mikey is keeping the drill bit and tap perpendicular to the surface. Other than that, it's a piece of cake.
Last edited:
Nuts and bolts I can do
Thanks everybody !!
Thanks everybody !!
Similar threads
- Replies
- 9
- Views
- 913